Tea Towel Design Workshop
Acknowledgement
We acknowledge Aboriginal and Torres Strait Islander peoples and their continuing connection to land and as custodians of stories for millennia. We respectfully acknowledge the land on which we all meet today, and pay our respects to elders past, present and emerging.
Summary
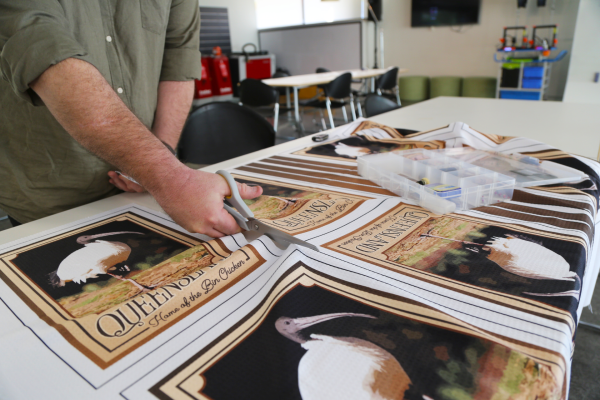
The Queensland to a T is the latest exhibition in the SLQ Gallery and to celebrate the opening of this unique exhibiton of the Glenn R. Cooke Souvenir Textile Collection we are giving you the chance to reconnect, in a really hands on way, with this often ignored, but ever-present kitchen accessory.
The Tea Towels in this collection are situated at fascinating cultural crossroads – They are not just a piece of functional décor to brighten up the domestic space. They are also a souvenir that serves as a visual distillation of how different Queensland communities wanted to see their own town or region represented and how the visitors wanted to remember their trip away.
This workshop - the first of two - allows you to design and make your own spin on the Tea towel, drawing from the State Library of Queensland Collections. With a reference image from the collection, you will be guided through basics in Adobe Photoshop and Illustrator to turn your collection image and your own design elements (such as text and lines) into a finished tea towel design.
Skills Introduced
- Photoshop - preparation of reference image (Introduction to adjustment layers - eg, curves, hue/saturation, vibrance, colour balance)
- Illustrator - Tool bar, image tracing, clipping masks, text, basic editing with the direct selection tool
Participant Requirements
A login is required for Adobe Creative Suite prior to the workshop.
Preparation
If possible, participants should familiarise themselves with the State Library of Queensland Collection and/or Flickr Account prior to attendance to find an image as the basis of their design.
Workshop Walkthrough
Find an Appropriate Image from the Collection to Use
Select an image from the the State Library of Queensland Catalogue (One Search) or State Library of Queensland Flickr Account.
Here are detailed instructions on how to search the State Library of Queensland Catalogue with One Search.
Today we will use just one image as the basis of our design, but you can also composite several images into one design in future if you so desire. For the purpose of this workshop, where images are to be turned into both tea towels and vertical tote bags, please look for images that are:
- Vertically oriented, or can be cropped to be vertically oriented.
- Have bold details, if possible. Although we can adjust contrast to make certain areas stand out more strongly, fine lines and very small details are likely to be lost in the tracing process.
- Fairly crisp, in-focus images. While the tracing process can somewhat correct 'fuzzy' images, working from images that are fully in focus is generally easier.
Important: Please ensure that the image you use is labeled as 'Out of Copyright' or 'No Known Copyright Restrictions', so that you can use the image/s freely.
When you have found an appropriate image, please download it for use.
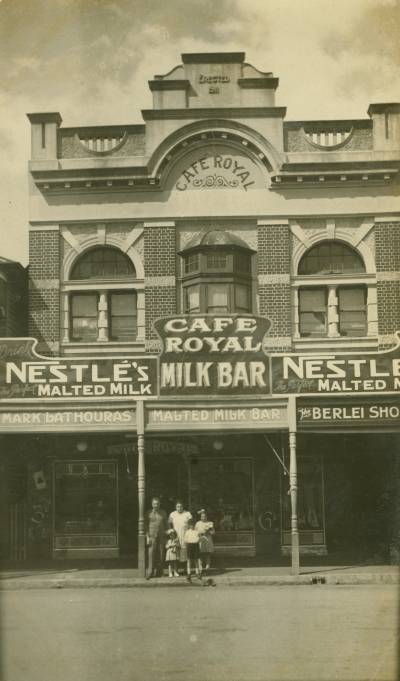
For this walk-through, we will use this image from the State Library of Queensland Archives as the basis of our design:

Make Adjustments in Photoshop to Prepare Image for Tracing
Before tracing your source image in Illustrator, we want to make sure that the image has enough contrast for the tracing to work effectively. We can also use Photoshop to adjust colours to our liking before tracing.
While we are going to look at simple adjustment layers to make these changes in today's workshop, you can also use Photoshop to fully recolour black and white images if you desire.
In the layers panel, in the bottom right-hand corner, click the circle symbol to reveal the adjustment layer options.
Clicking on one of those options will provide you with the ability to adjust certain aspects of the image without directly editing the layer below - so you can go back and change your adjustments at any time without having to start from scratch. Today we're going to cover some absolute basics, but for more detail on Adjustment Layers, check out Adobe's article on Adjustment and Fill Layers.
To start, let's select 'Levels'. Levels will allow you to change the tonal variation within the image. While 'Brightness and Contrast' will allow you to change the contrast between light and dark, 'Levels' also allows you to adjust your mid-tones also, which allows for finer control. When you click on the adjustment layer, it will show what you can adjust in the 'Properties' panel. Slide the sliders as you please to achieve your desired results.
As you can see here, we were able to change the contrast dramatically and pick out some of the detail that was lost when it had lower contrast.
You can also adjust the colour of the image by playing with 'Hue/Saturation', applying a 'Gradient Map', 'Selective Colour' (if you are working with an already-coloured image), or 'Colour Balance'. Today, we'll apply a little colour to our artwork with 'Colour Balance'.
Once selecting 'Colour Balance' from the adjustment layer options, you can adjust the colours displayed in the shadows, midtones and highlights of your artwork. This can be a quick and easy way to add some colour interest to your piece without completely recolouring the artwork.
Continue to make adjustments until you are happy with your finished source artwork. You can create multiple adjustment layers, and experiment with all of their effects - or even draw or paint over the source image and use blend modes to adjust your artwork to your liking.
When you are happy with your completed artwork, save it as a .psd (so that you keep a copy that you can further adjust later, if you wish), and as a .jpg, .tiff or other flat file type (for use with Illustrator).
Become Familiar with Illustrator
We will be using Adobe Illustrator to create the final design for your tea towel. Adobe Illustrator is a powerful tool for creating Vector Graphics which are most suitable for design. Vector graphics can be scaled infinitely with no loss of quality.
First, open slq_tea_towel_starter_file_-_23x38.ai and rename it to 'Your_Name_Tea_Towel.ai' instead, so that you have your own copy. This image provides an artboard at the correct size for your tea towel artwork.
- To the left of your screen, you will see your toolbar. Hovering over any of the tools with your mouse will provide you with the name of the tool - you can always google the name of the tool for more information on how each one works. If the tool has a small triangle in the bottom right-hand corner, it means that there are other tool options available. Click and hold on the tool to see those other options.
- At the top of the screen, you will see the menu bar, and below that, a variety of options that will change depending on the tool you have selected. If you do not see that second bar, go to 'Window', 'Workspace' and 'Essentials Classic' to make it show up correctly.
Making sure that all of these things are visible will be helpful later on.
Import your Image into Illustrator
To import your prepared image, go to 'File', then 'Place', and select your file. When you do, it will bring up cross-hairs and allow you to place your image on the screen.
- Once placed, you can make your image larger or smaller by clicking one of the white 'anchor points' on the corner of the image and dragging them out to be larger or smaller. Hold down SHIFT as you click and hold to maintain the original aspect ratio.
- You can also hover your mouse just outside a corner anchor point to bring up the option to rotate also.
Find an approximate placement you're happy with. We can always adjust this later.
Trace your Image
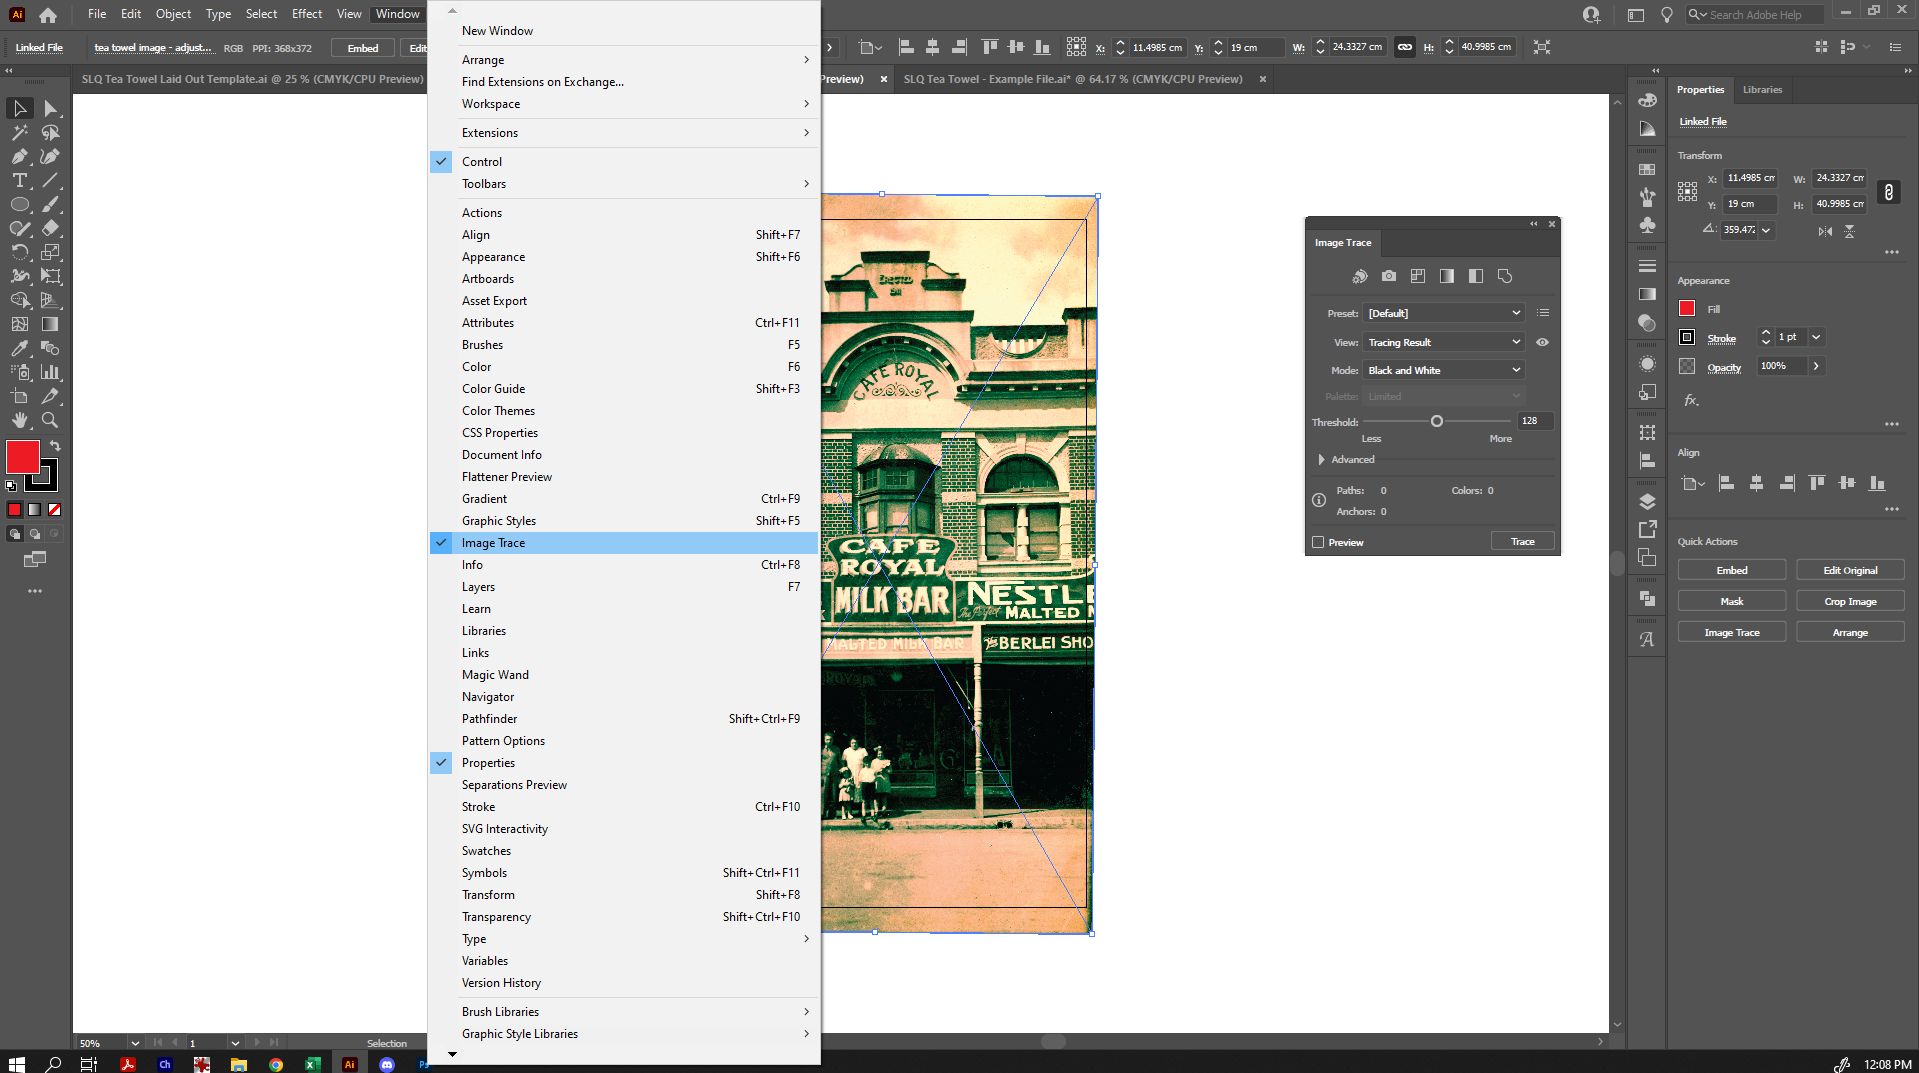
Go up to 'Windows' and select 'Image Trace' to bring up the Image Trace Window.
Once the Image Trace Window is open, click the arrow beside 'Advanced' to bring up all options.
Making sure that you have your source image selected (you can tell from the cross in the centre and the white anchor points around it), click on 'Preview' in the Image Trace window. By default, the initial trace will be in black and white.
From here, we can make adjustments. For example, setting the mode to 'Colour'.
Because we want to replicate a more screen-printed style design, we're going to select 'Limited' in the Paette option. We can refine that further by choosing the number of colours we want to use on the 'Colours' slider. Experiment by allowing more or fewer colours, to find what works best for you.
Under the 'Advanced' options we can tweak our image further:
- The 'Paths' option controls the distance between the traced shape and the original pixel shape. Lower values create a looser path fitting; higher values create a tighter path fitting.
- 'Corners' specifies the emphasis on corners and the likeliness that a sharp bend will turn into a corner point. A higher value results in more corners.
- Noise specifies an area in pixels that is ignored while tracing. A higher value results in less noise. (For a high-resolution image, try a higher value (for example in the 20–50 range) to have some effect. For a low-resolution image, set it lower. You may have quite different results with even a small shift, so don't be afraid to try many different options).
For more explanation on image tracing options, check out Adobe's Image Trace Guide. Here is a quick Video Demonstration of Image Tracing also.
Because we want to replicate a more screen-printed style design, let's limit our colour palette and find a nice balance between detail and simplicity. Once we are happy with our tracing options, go to 'Object' in the top menu bar, and select 'Image Trace' and then 'Expand'.
Once you do, you will be able to see the outlines of the individual coloured shapes that make up your traced image (when selected). By default, all of the individual shapes are already grouped together so that anything you do to one part of the image does the same to others within the group. If you want to, you can ungroup them and edit them individually (eg, change colours of particular sections, or remove shapes). The 'Group' options are located under 'Object' in the menu.
You can also close the Image Trace window at this time by clicking the X in the corner.
Create a Clipping Mask
At the moment our design is not limited to the size of our tea towel. You may also want your image to only take up some of the tea towel size, to leave room for text and other colours or graphics. In order to create a mask for the image, we're going to create a shape on our tea towel, to define where we want that mask to be. Select one of the shape tools on the left toolbar.
Click and drag to create your shape. If you want it to be an exact circle/square/etc, you can hold down SHIFT as you drag, and it will snap it to the 'perfect' dimensions for that shape. If you have exact dimensions in mind, you can also just click somewhere on the screen, and it will pop up a dialogue to set exact dimensions.
Once you have created a shape, you can then go back to the 'Selection Tool' in the left-hand toolbar, so that you can select your shape and move or adjust it as needed. If you do not switch back to the Selection Tool, each time you click, it will try to create a new shape. Don't worry if your size or shape isn't perfect at this point either - again, we can change it later if necessary.
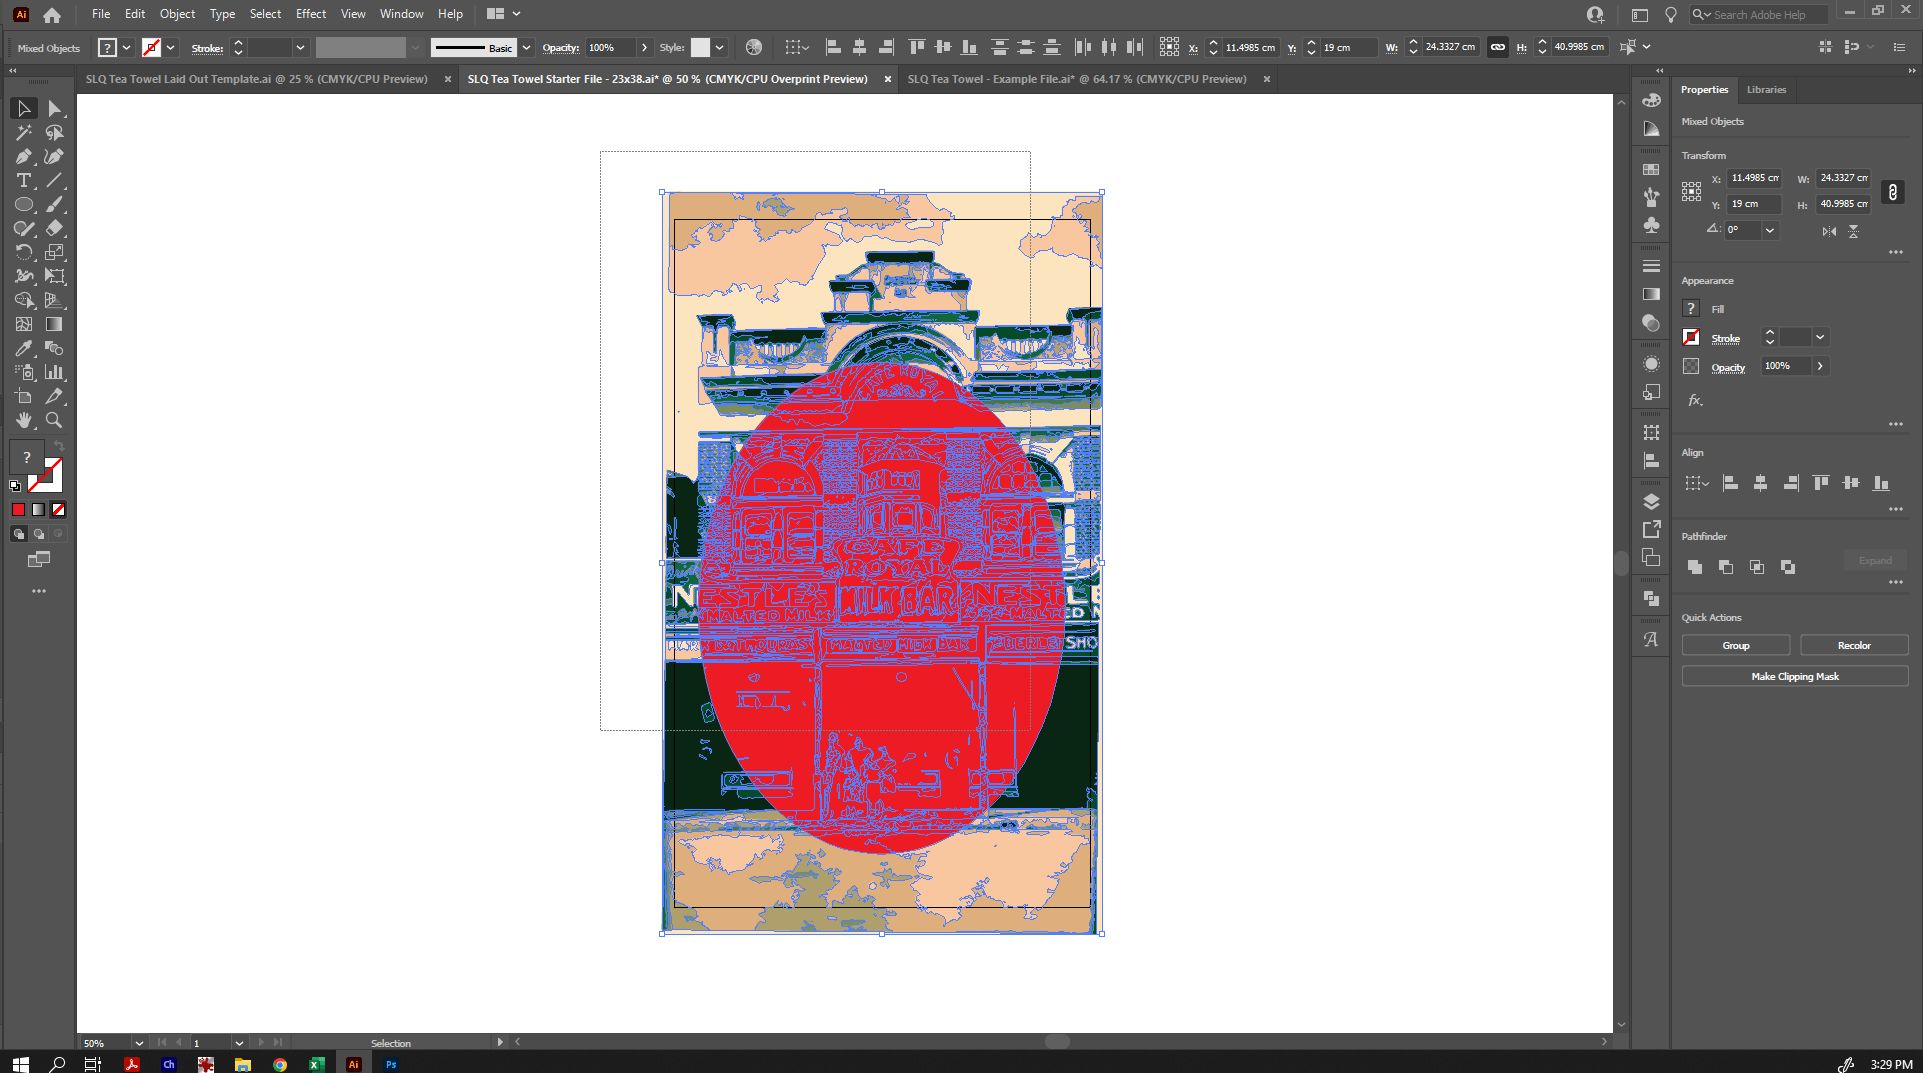
Now that you have your mask shape on the top layer, select both that and the image you traced below it. You can do this by either holding down SHIFT as you click on each item, or by dragging a marquee over both, so that they are both selected.
To create the clipping mask, go to 'Object' in the top menu, then 'Clipping Mask' and 'Make'.
Your traced image will now appear only inside your mask shape.
Here is a quick Video Demonstration of Making a Clipping Mask.
You may be absolutely happy with your original mask placement, but if you're not, you can still change it. To move the image within the clipping mask, double click the clipping mask shape, and you'll enter 'Isolation Mode' - you can tell if this has happened because you will see a light grey bar at the top of the screen telling you what isolated area you've got selected. From here, you can click on your traced shape and resize, move and otherwise edit it as normal. You can also alter the shape of your clipping mask when in this isolation mode level.
If you double click your traced image, the isolation goes a step further into that group, and you will no longer see your clipping mask layer. This is very convenient for editing individual colours and shapes in your traced image group again. If you enter it accidentally though, just double-click away from the shape to go back to the top level.
Learn more about Isolation Mode in Adobe's explanation of Object Selection
Please note: it is quite easy to enter isolation mode by mistake, because double-clicking is quite easy to do. Just double-click away from the isolated area to return to the top level.
Now that you have your traced image in your clipping mask, if you are not in isolation mode, any effect you take on your clipping mask will also affect everything inside the clipping mask, as it will treat it as one object.
Finishing your design
Now that you have your traced image in a clipping mask, let's finish off your design with some other decorative elements, such as text, colour and shapes.
It can help, at this point, to have rulers so that we can precisely place elements of our design. To bring up rulers, either go to 'View' in the top menu and click on 'Rulers', then 'Show Rulers' or click Ctrl+R. Also check to make sure that 'Smart Guides' is ticked in the 'View' menu at this time.
You can pull guidelines from the rulers to define specific areas, such as the borders of your tea towel. Just click on the ruler and drag to create guides. You can delete them, if needed, by simply clicking them and clicking 'Del' on your keyboard. In the next image, you can see that I've dragged out guides to sit on each edge of my tea towel size.
We can create a background colour by selecting the 'Rectangle' tool in the left toolbar, then picking a colour from the 'Fill' colour selector (you can change this at any time, and can add new colours by clicking the + symbol at the bottom of the swatch panel). Click and drag from the top left corner of your tea towel size to the bottom right corner. Because we have Smart Guides selected, it should be easy to create your rectangle at the exact size we need.
Once you have done this, you may notice that the rectangle you created is on top of everything else. To move it behind, go to 'Object' in the top menu, then select 'Arrange' and 'Send to Back'.
If you want to add a nice outline to your clipping mask, you can do so by double-clicking the edge of your clipping mask to enter isolation mode, and then select a colour from the 'Stroke' colour selector. You can also change the thickness of the stroke at this time also.
Now let's add some text! Click on the Text tool in the side toolbar - it looks like a 'T', then click somewhere outside of your design to type your text. (If you click inside a shape, it will create paragraph text inside that shape - not what we want. If we click and drag, it will create paragraph text instead of regular text - again, not what we want.)
Once you have typed your text, go back to your side toolbar and select the 'Selection Tool' again, and you can resize your text as before - by clicking and dragging the corner anchor points. Holding down SHIFT as you drag will constrain proportions.
From here, you can drag it onto your tea towel design. Hint: I use a guideline set to the vertical centre of my tea towel design and give my text a centre alignment to make it easy to position.
Edit your text by using the options that have now appeared in your top toolbar (now that text is selected), or in the 'Character' window. If the 'Character' window has not appeared for you automatically, you can open it by going to 'Window' in the top menu, and then 'Type', then 'Character'.
There are many ways you can alter the shape of text - for example, by warping the text into different shapes. Here is a quick Video Demonstration of Warping Text in Illustrator.
From here, you can make final adjustments and add additional design elements such as:
- Lines and shapes created with the Pen Tool
- Simple shapes created with the Shape Tool (rectangles, ellipses, polygons, etc)
- Other image-traced shapes - eg, you can draw onto white paper, take a picture, and image trace those shapes for inclusion with your design. When tracing over images on white, selecting 'ignore white' in the Image Trace window will give you a very clean result, and you won't have to delete backgrounds before using your traced shapes.
- Additional text and vector shapes.
Making Your Design Print-Ready
Once you are happy with your design, there are a few things you need to do to make it print-ready. First, we're going to make sure that your text appears correctly on any machine you use. As not all computers have the same fonts installed, we're going to change them into shapes instead.
Please note: once text has been converted to shapes, it is no longer editable as text. It is recommended to save a back-up of your file now, in case you want to change the text again later.
Once you have saved your back-up, select all of your text, and go to 'Object' in the top menu, then 'Expand'.
Once you have done this, rather than the text being underlined (indicating that it is editable) when selected, you will see that every letter is outlined.
Delete your guides, and group all of your tea-towel design together.
Now copy your design (either by going to 'Edit' in the top menu and selecting 'Copy', or by holding down Ctrl+C, and open up our print template - slq_tea_towel_laid_out_template.ai, or slq_tea_towel_laid_out_template_-_cc2019.ai if Illustrator tells you that the other file was made in a newer version of Illustrator. This file is designed with the layout you need for printing.
Paste your tea towel design on this template file by going to 'Edit' in the top menu and selecting 'Paste', or hold down Ctrl+V.
Your tea towel design has been made to the exact size of the tea-towel pieces on the template. We can automatically align your design with the grey tea towel rectangles by selecting your design and the first tea towel square (Hold down SHIFT as you click both). Once they are both selected, click the grey rectangle one more time, and a bolder outline will appear to show that it has been selected as the object to align things to.
In the top toolbar, there are alignment tools. Hover over each to see how they will align to the target object. Select 'Horizontal Align Centre' and 'Vertical Align Centre', and it will pop perfectly into place.
Alternatively, you can access these options under 'Object' in the top menu, then 'Align'.
Repeat this process for the remaining three tea towel slots - paste another copy, select it and the target grey rectangle, click the grey rectangle again to set it as the target object, and align.
The tote rectangles are slightly smaller than the tea towel rectangles. You will need to resize your artwork to fit into those spaces.
The height of the tote spaces is 34.5cm. In the top tool bar, in the 'H:' field on the right, change that number to 34.5cm. Make sure that the chain link is set to 'constrain proportions', otherwise changing the height will not change the width to match.
Align your resized artwork on the tote bag spaces, being sure to rotate the bottom two so that they are upside-down (so that when the tote is sewn, it is right way up). Remember, holding SHIFT as you rotate ensures that they snap perfectly into 45 degree rotations.
You can also add coloured rectangles to cover the handle pieces, should you so desire.
Export your File
Save your file as a .AI for yourself. For the printer, however, we need to send them a .PDF.
Go to the Save As dialogue, and under 'Save as Type', select PDF. Save with your name in the file name.
The save options will now appear. Under 'Options' in the 'General' tab, you can deselect all options.
Congratulations! You have completed your design, and it is now ready to be printed.
Further Resources
We have only touched on a limited number of the skills you can develop in Adobe Illustrator in this workshop, with an emphasis on Image Tracing in particular. There are so many ways that you can use Illustrator to design that we have not touched on today.
One of the quickest ways to start learning Illustrator is to dive in and give it a go! As mentioned previously, googling (or youtubing) the name of a tool with the word 'tutorial' is likely to bring up a plethora of resources on how to utilise every aspect of this powerful program.
To get started however, here are some great additional resources that may be of use to you:


