2022 Arduino Christmas Tree

This is a redevelopment of 2017 Christmas Tree
Developed Mick, Nov 2022. Revised for delivery in 2023.
Promotional Copy
'Tis the season to create your own beautiful Christmas light-up tree'
This workshop is aimed at people new to Arduino microcontrollers. You will learn how to create a decoration of your very own using this open-source electronics platform. Arduino consists of both a physical programmable circuit board and a piece of software used to write and upload computer code to the physical board.
At the end of this 4-hour workshop, you’ll take home a sparkling Christmas tree cut on the laser cutter for the centre of your festive decorations.
Background
At its heart the original Tabletop Christmas Trees was a very basic workshop with equal parts electronics and laser activity. And that's being generous - participants didn't get to use the laser (they got a demo) and the electronics was limited to a coin cell battery, wire and an LED. But it served as quick (20min) , entry-level introduction to people who'd never played with these ideas.
As the basis for a 4 hour workshop there would need to cover more.
In 2022 this workshop was scheduled in our Christmas program alongside Laser cut earrings and Laser-cut paper craft, so I thought it would be good to move away from the laser (which we were well and truly covering in the other workshops) and lean into the electronics.
As such, the workshop will focus on the following basic skills and understanding:
- Demo of the Laser Cutter and what you can do with it
- Electronic circuits - current flow and components
- Intro to soldering and the tools on the bench
- Intro to Microcontrollers with the Arduino Nano
- Intro to Coding for Microcontrollers using Arduino IDE
Acknowledgement
We acknowledge Aboriginal and Torres Strait Islander peoples and their continuing connection to land and as custodians of stories for millennia. We respectfully acknowledge the land on which we all meet today, and pay our respects to elders past, present and emerging.
Summary
In this workshop participants see how they can use a variety of tools in the Fabrication Lab to create an ornament illuminated with programmable LEDs.
We'll see how you can use the laser cutter to cut and etch acrylic to create a side lit effect and design and assemble an attractive 3D ornament out of a 2D material.
We'll learn the basics of how electricity flows and the different functions of basic components.
We'll learn how to use a soldering iron and some of the other tools on the electronics bench.
We'll learn about microcontrollers and how to use Arduino IDE to program the Arduino to create different lighting effects on our Christmas tree.
And if we have time, we'll customise our ornament with a laser-etched inscription.
Skills and Understandings Introduced
Materials
If your workshop does not require any materials (maybe digital only) delete this section or change to something more appropriate.
| Material/ equipment | Quantity per kit | equip to share | Cost | Supplier | SOP/SDS |
|---|---|---|---|---|---|
| Participant take home kits - 1 per participant | |||||
| Arduino Nano Every | 1 | $17.59 | RS Components | ||
| Neo Bit | 1 | $0.00 | Core Electronics | ||
| Cable | 1 | $1.17 | RS Components | ||
| Flat Pack Laser cut acrylic tree | 1 | $4 | SLQ - A4 sheet of 1.5mm Acrylic | ||
| Flat pack laser cut base | 1 | $2.50 | SLQ - A4 sheet of 4mm Laser Ply | ||
| Bamboo skewers | 2 | ||||
| Box | 1 | SLQ box making machine | |||
| Glass display Canister | 1 | Kmart | |||
| Usb Cable | 1 | $4.95 | Lindy | ||
| Timber adhesive | SDS | ||||
| Acrylic adhesive | SDS | ||||
| Electric Circuits 101 kits retained by SLQ | |||||
| 2032 Coin Cell | 5 | SOP | |||
| | 5 | ||||
| mini breadboard | 5 | ||||
| LED | 5 | ||||
| Resistor 330R | 5 | ||||
| | 5 | ||||
| Equipment Required | |||||
| PC laptop/desktop with IDE | 5 | ||||
| Soldering iron | 2 | SOP | |||
| Wire strippers | 2 | ||||
| Helping Hands | 2 | ||||
| Magnifier | 2 | ||||
| Light | 2 | ||||
| Multimeter | 2 | ||||
| Laser Cutter | 1 | SOP | |||
| Laser Computer (Ruby machine) | 1 | ||||
| Solder | SDS | ||||
| USB Microscope | Projector | Soldering Iron & Bench Tools |
Preparation
Before the workshop you will need to …
Workshop Session Plan
Part 0 - Intro
Intro Activity - Favourite Invention
- Whats your name?
- Why did you sign up for today?
- Whats your Favourite Invention?
The Transistor
experts to estimate that 13 sextillion transistors were manufactured from their invention in 1947 to today (that 13 followed by either 21 or 32 zeros). In 2014, this was 2.9 sextillion. This shows just how quickly we are producing them and putting them into service how many transistors are there in the world?
A transistor is a semiconductor device with at least three terminals for connection to an electric circuit. In the common case, the third terminal controls the flow of current between the other two terminals. wikipedia
see summary and show off what we are going to make.
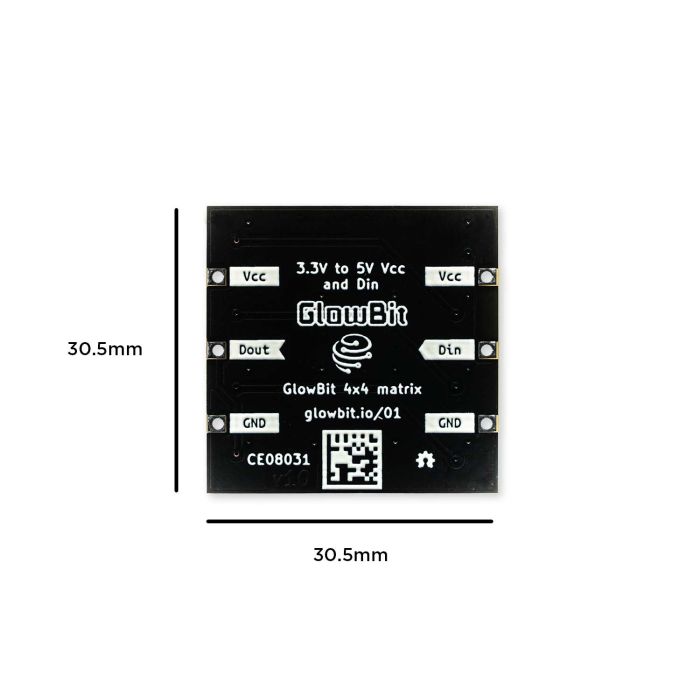
Whats a neopixel - this is a gang of 4 x 4 = this means there is 16 cells but each Cell has a RG and B LED. and each of these has an individual address. and a little IC
and show them…
the diagram of how it works
battery to usb power »>
5v positive into the arduino to power the arduino and power the all the LEDs (neopixels )»>
little computer script that we'll upload to the arduino will say which led will turn on when for how long in different patterns.
and when we fire it arduino and it runs our scipt it
Part 1 - Laser Demo
10 mins
Whats a laser? How can we draw and cut a 2D design that can be assembles into a 3D ornament
How do we use the Laser Cutter's etch function to create an edge lit effect on acrylic
Activity - Assembling laser cut components
- remove protective paper,
- test assemble,
- work holding,
- Apply adhesive.
Part 2 - Current flow in an electric circuit & some common electronics components
30 Min
How does electricity work??? Its easy you go over and turn it on at the switch on the wall ![]()
Intro to electricity
In lots of situations, especially in workshops, you'll get asked if you know how something works, before quickly moving to the next bit. And electricity is one of these classic things that a hand wavey assumption is made that you'll know how it works and we don't really stop to make sure we all really understand it.
Today we're going to stop and try and make sure that we all have the basic understanding of
- how Electricity flows in a circuit,
- how some common components work and
- how we can make use the effects for our own devilish ends.
We are going to use ELI5 concept to make sure we all understand. Explain Like I'm 5 is a bit of a movement on the web, started on reddit (and other message board style social media) and things like youtube where people take commonly asked questions like “How does Electric circuit work?” and answer these questions in a way that a lay person would understand - using a Five year old intelligence as a rough filter of the assumed understanding or experience of the world as a starting point for the explanation. Often the ELI5 explanation ( or the best ones i think) make use of observations a five year old would use. You'll see what I mean when we get to it.)
This will form the basis on which can move onto these components can be paired with a micro-controller and some code to controls some imputs and outputs latter in the session.
Electric vs Electronic - Key Concepts like Voltage & Current flow in conductors, Resistance & Power and how these are used in electronics
An electric current is a stream of charged particles, such as electrons or ions, moving through a circuit.
Current is measured in Amps and symbolised as i)
*One ampere is equal to 6.241509074×10¹⁸ electrons worth of charge moving past a point per second.
Voltage, the electric pressure or difference in potential that causes this current to flow (conventionally from positive to negative*).
There are a couple of analogies that commonly get used to describe how this happens that are intuitive to us because we see and in these things in our daily observations. The first one is the “ Hydraulic - Electroanalogy” and, the other is the “Earth gravity analogy” (marble run) of electrical potential.
Its good to look at both of these analogies because they both have strengths and limitations.
Simple Circuits - Current Flow and Pot
A waterwheel or turbine can be like a simple circuit.
| Compare | |||
| The turbine converts water pressure to the mechanical energy to turn the shaft of the generator | The LED in our simple circuit - converting electrical energy into light |
|---|
The Hydro - Electro Analogy
We don't want to over complicate it so we'll say that this all all happens on a flat plane… we'll get to gravity soon.
Water under pressure flows thru out the hose, to move to low pressure (no pressure state, to find equilibrium).
We can use this flow to do work turn a water wheel.
In this analogy the difference in pressure between the town water that comes from the dam and all the infrastructure upstream like water towers and pumping station AND the “zero” pressure of standing water out in the open air… represents the Voltage.
*nb: theres a big caveat here- electrons “actually” have been discovered flow from negative to positive (only recently actually)… but the convention has remained - Current flows Positive to negative, active to neutral, positive to ground.
Activity - put together the circuit
- Hook up a battery to a LED by placing the legs of a LED over the 2 faces of a coin cell ( explain the Polarity of LED, explain polarity of Battery )
Now we are going to build the circuit we have been talking about above. 
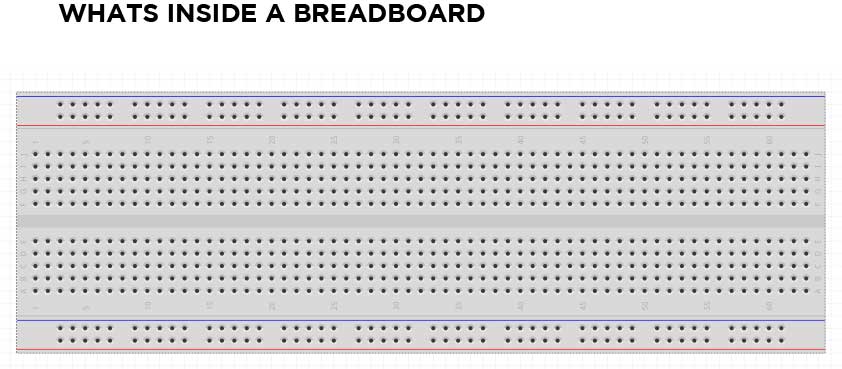
but before we do this we need to know whats going on inside a breadboard
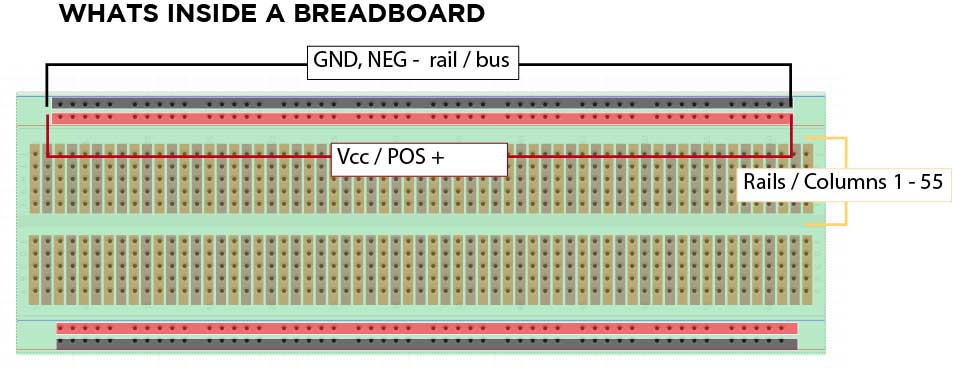
Putting your potential to work
Electric circuits take the energy, the difference in potential and apply this energy to do work. We convert one kind energy to another form. We convert the pressure or voltage and of the charged particles current to a different form of energy
- we convert the pressure of the water in the hose to turn the wheel
- we convert electric charge to heat - pass electricity thru an LED which excites semi conductor material in that releases photons (light)
Put in more charged particles(current) in, or ramp up the pressure (voltage) and we can get the thing to do more work
Simple Circuits - Resistance
Of course our conductors and pipes aren't perfect - we lose a bit of energy getting it to where the work needs to be done. Think of it this way, you loose a bit of energy for every metre of pipe you run thru ( there's turblance & the friction of the water rubbing up against itself and the pipe- which turns into heat or vibrations or noise. This all eats into the energy we have for doing the work.
Earth gravity analogy
Remember before when we were talking about pipes I said it was all on the flat and all powered by the pressure in pipes?
The second analogy is the Earth gravity model - Think of a marble race or even a hot wheels race track.
The force of Gravity here on earth is something we are intuitively familiar with. What goes up, must come down and we can use this potential to do work.
Check out this animation
Activity - lets add a switch and our resistors to our circuit
Part 3 - Electronics Bench
Equipment & consumables on the Electronics bench
- Soldering Iron,
- Screw Driver,
- side-cutters,
- wire stripper,
- plyers,
- tweezers,
- multimeter (demonstrate continuity, resistance & voltage)
- helping hands,
- desoldering
- hot glue (explain safety measures)
- solder ( explain safety measures )
- Flux,
- tip cleaner
- heat shrink.
Soldering
Types of solder joints -
- Thru hole,
- Surface mount,
- No Solder - bread boards and jumper cables, prototyping boards.
Activity - Soldering cut and strip cable, tin conductors, solder to pin, test, hotglue
Part 4 - Arduino
What is a microcontroller?
A microcontroller (or MCU for microcontroller unit) is a small computer on a single integrated circuit.
- one or more CPUs (processor cores)
- memory
- programmable input/output peripherals
- can be mixed signal devices interacting with
- digital signals
- analogue signals
Why use an MCU?
Microcontrollers are small, low powered and robust, making them perfect for embedded systems such as:
- medical devices
- remote controls
- office machines
- appliances
- power tools
- toys
- wearable technology
What is Arduino?
Arduino is an open source computer hardware and software organisation, project, and user community 1)
- The hardware is based on the Amtel 8-bit AVR MCU
- The software uses the Processing IDE, with a simplified version of the Java programming language
- Open source has led to the creation of a huge range of
- clones
- compatible devices
- peripherals
- A strong community means
- “Someone, Somewhere has solved the problem”
- we can run this workshop using and adapting existing resources.
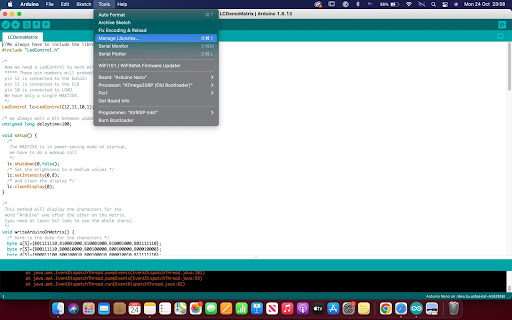
The best place to know where to start is to look at the library(s) that we included in our code. Usually there will be some sort of documentation along with the library. In our example sketch, we can find the included library and look for more information about it by going to Tools → Manage Libraries.
[photo of libraries panel]
To see which libraries are installed in the IDE, make sure to select the ‘Installed’ filter on the panel.
[photo showing installed]
Once we’ve found the library, click on more info.
Sketches
Fast LED DemoReelAdaptedMick1DEC - got this so they can chose 1 or 2 or three patterns (rainbow, rainbowWithGlitter, confetti, sinelon, juggle, bpm) that they can choose from
strandtest_wheel - hopefully we'll manipulate this one so the can pull one or two of these too
would be good to do a basic binary (non library ) one
References
Electricity
Physics Videos by Eugene Khutoryansky's animated visualisations of "Electric Circuit Components"
Steve Mould's video on Spintronics "Mechanical circuits: electronics without electricity"


