Desktop Moss Wall

Developed by Peter Musk
Summary
This workshop introduces participants to making with biomaterials, and forms part of a series that includes the Kombucha workshops, and Making with Mycelium. Simple, robust and readily available organisms have been used to explore the addition of Biology to maker culture, without requiring the complex and expensive tools and reagents needed for DIY molecular biology, and avoiding Biosecurity constraints around working with genetically modified organisms.
Indoor plants have scientifically demonstrated benefits for the health and well-being of workers in indoor environments, but often suffer from onerous maintenance regimes that conflict with flexible work practices - holidays and even week ends can play havoc with watering. Moss offers the benefits of indoor vegetation, but has low nutrient requirements (capturing and absorbing nutrients carried by the surrounding air), and the ability to sustain viability during intermittent dryness (by virtue of their inherent capacity to suspend their growth during drought, and readily recover when moisture is returned). Like all photosynthetic organisms, moss still have a requirement for light, albeit at low levels. Slow rates of growth are a bonus, leading to reduced maintenance and sustained enjoyment. Moss does not absorb water or nutrients only through their roots, which serve mainly as organs of attachment.
This workshop results in a small moss garden, with a vertical form factor that reduces desktop space requirements, and provides portability if moving to a light source becomes necessary. Weekly watering is sufficient to promote growth.
Activity Summary
This workshop was delivered as three connected activities:
- an introduction to the biology and life cycle of mosses, using the presentation contained in support files at the end of this page.
- a laser cutter induction, with participants personalizing a part of their moss wall by etching or cutting. The design template for this can be drawn from the design files at the end of this page.
- assembly and planting of a pre-cut acrylic moss wall, using polypropylene absorbent matting and compressed rock wool growing medium.
Materials
- Pre-cut moss wall (requires 1 x A3 sheet 3mm black acrylic per participant)
- polypropylene absorbent spill pads, cut to fit (similar to these: https://www.globalspill.com.au/product/general-purpose-pads-medium-duty-mgp/
- 12mm compressed rock wool growing medium, cut to fit from cress plates, available from https://www.grodan.com/product-overview/vegetable-solutions/grodan-cress-plate/
- black plastic plant trellis (20mm squares), cut to size (available from: https://www.bunnings.com.au/whites-20-x-20mm-60cm-x-10m-supa-net_p3040741
- sewing needle and polyester thread (approx 1m per participant)
- acrylic glue
- silicone sealant
- moss - can be pre-grown in trays of rock wool or similar - this takes about 10-12 weeks to completely fill a seedling tray sprigged with wild sourced material.
Tools
- Laser cutter (if induction is to be included)
- bamboo skewers (used as glue applicators)
- a few large rubber bands to clamp pieces in place while glue sets
- scissors
- turpentine (best solvent to remove uncured silicone from hands or job pieces)
- paper towels
- box cutter (to cut absorbent matting and rock wool to size)
- ruler and marker (to cut absorbent matting and rock wool to size)
Instructions
Step Zero:
Take 15 minutes or so to go through the presentation on moss biology. Emphasise drought resistance, and need to avoid fertilizing (especially iron salts which are toxic to moss) and slow growth rate. Low light may be adequate, but some light will be required for growth.
Highlight that spore production will be part of the life cycle.
Step One:
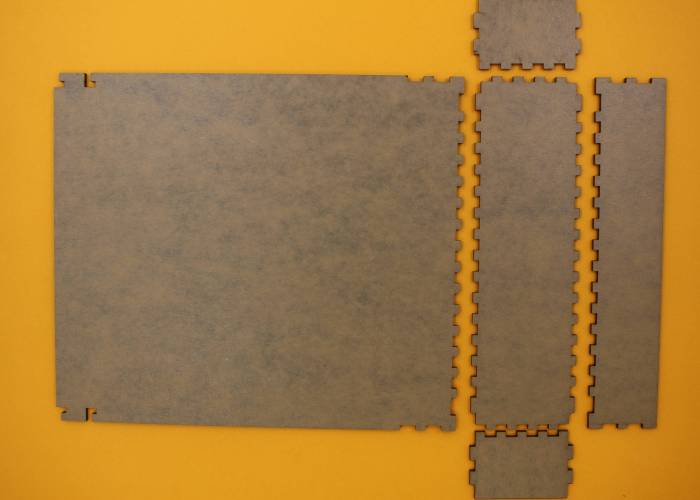
Lay out the pre-cut pieces for the moss wall, and remove the protective paper coating from the INSIDE only.
Leaving the protective coating on the outside will help avoid marking by excess glue.
Step Two:
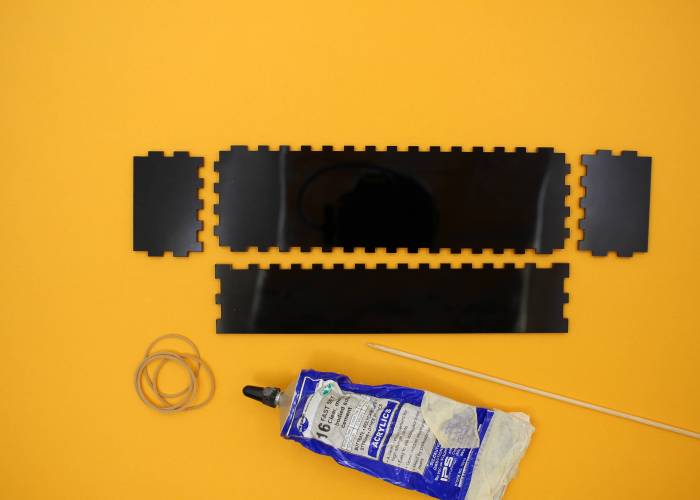
After removing the internal protective paper from the bottom tank parts, assemble acrylic glue, skewer (for spreading glue) and rubber bands (to clamp the assembled job).
Step Three:

Dab glue into the joints, and fit the tank parts together. Do not worry about filling every joint with glue - water-tight sealing will happen later when silicone is applied.
Slip rubber bands around the tank to hold everything in place while the glue sets (this may take a few hours - leave the rubber bands in place if you want to proceed sooner)
Step Four:
![]()
Apply a bead of silicone waterproof sealant around the internal corners of the tank. Be sure to run the sealant up the vertical corners as well.
If skin sensitivity allows, a smooth seal can be achieved by running your finger around the inside corners. Clean up with turpentine and paper towel.
![]()
Set aside for 30min minimum to allow the silicone to harden (leaving the rubber bands in place for as long as possible is a good idea).
Step Five:
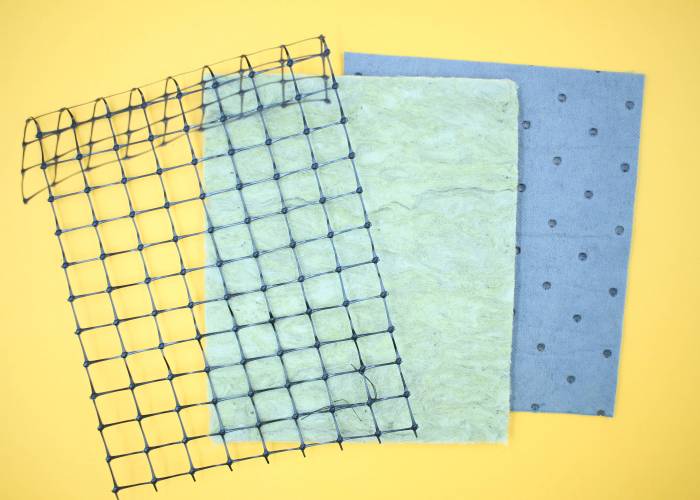
Assemble the pieces for the moss mat, cut to size as necessary. The finished moss wall must fit between the two top supports.
Use the plastic mesh as a guide - cutting to mesh to give a clean edge will give a more pleasing result. The mat and rock wool can then be cut to suit. Note that the top of the plastic mesh will be folded over to give a way to support it vertically - it will need to be 3 or 4 squares longer than the moss pad, as shown in the picture.
Step Six:

Sprig the moss onto the rock wool pad as shown. leaving some gaps will allow for future growth.

Step Seven:
Sewing the mesh retainer in place
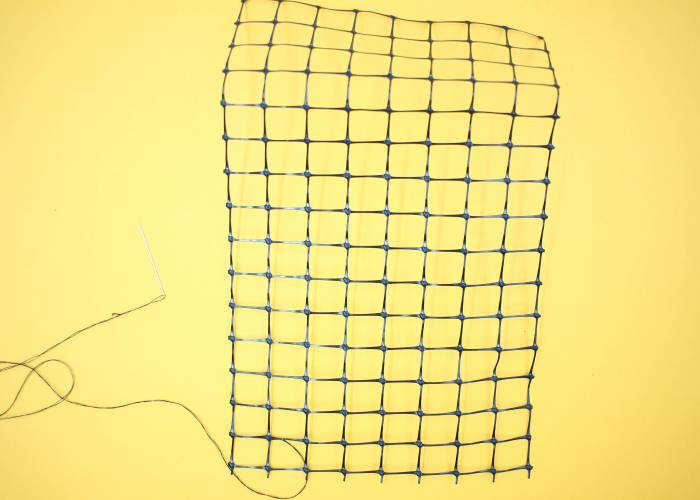
Thread your needle, and tie onto a corner of the plastic mesh as shown. Lay the moss covered rock wool on top of the absorbent backing, and position the mesh on top, aligning the edges.

Sew the mesh onto the support material to hold the loose moss in place. You do not need to sew every corner, but ensure the edges are secure. A few stitches in the middle should be sufficient.
Step Eight:
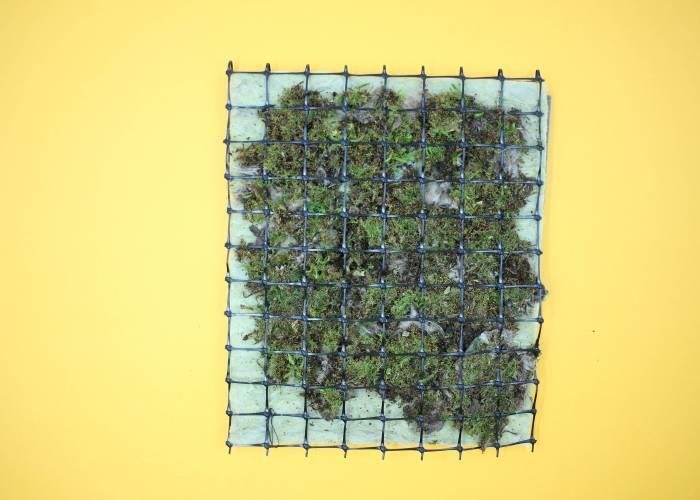
As you sew, tack the overhanging top of the mesh to the back of the wall - leave a single row of mesh free at the top (don't sew a tight fit here) so that the support can be threaded through later.

You can see from the back that stitches are well spaced, and the loop of mesh at the top is not too large as to be unsightly.
Step Nine:
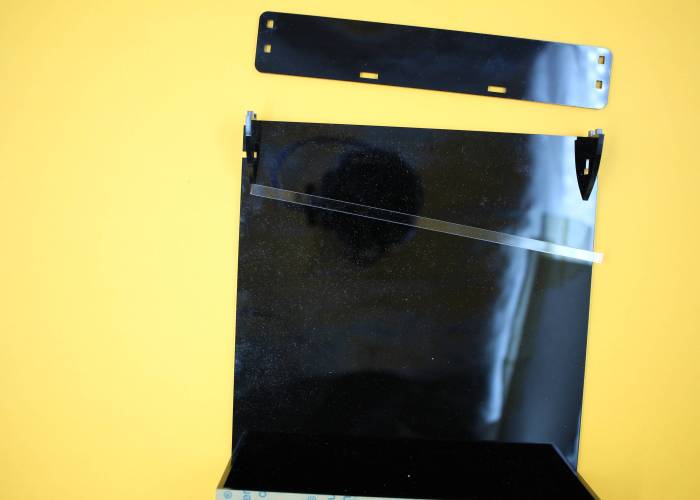
Locate the 6mm square support bar - it will be held in place by the lid brackets.

Thread the support bar through the top of the mesh as shown.
Step Ten:
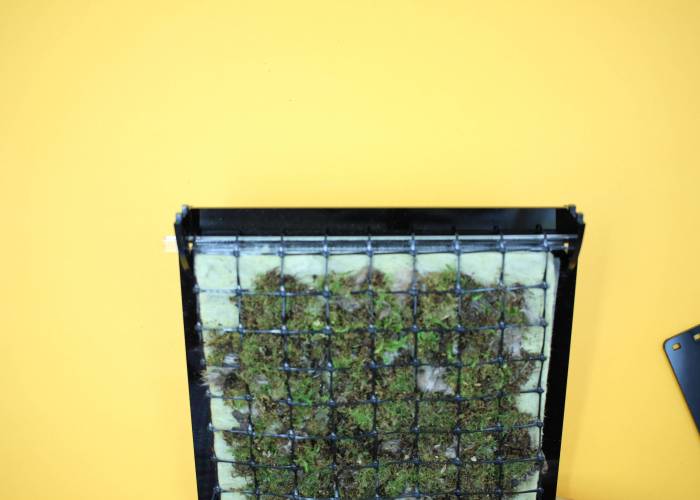
Finish the assembly by inserting the support bar into the support brackets - slide it back and forth to locate one end, then the other, with the brackets in place.
Add the top cover, and your moss wall is ready for deployment. An initial watering will help establish the moss, and you can tip off the overflow (but hold the wall in place as you do).
Step Eleven:
Care and Maintenance
Transplanting might cause the moss to be set back for a few weeks - do not despair if it looks brown for a while. Water by spraying with a mist of water each day or two, or give the wall a good soaking once a week.
After a while, you will see new green shoots emerge, and over time the moss will regenerate, and produce a lush green desktop garden.
Do not add fertilizer to the water - moss can be killed by garden fertilizers , which often contain iron salts. The growing moss should pick up the nutrients it needs from the air.
Production notes
Moss Species
Identification of moss usually requires material that is producing spores, and often a microscope. The Atlas of Living Australia might provide some clues, but it is not necessary to know the exact name of your moss to enjoy the benefits of the moss wall.
By sourcing your starter moss from your local environment, you increase the chance that it will thrive in your local climate. Taking moss form an exposed, wild grown environment also increase the chance that your moss will be robust enough to handle the transplanting involved in this workshop.
Establishing your starter moss
By growing on a similar medium to the rock wool, you minimize the chance of transplant shock. This project used rock wool insulation mat (available from hardware stores in large bales) - a fairly open, fibrous material, that compacted over time as the moss established. This material has the advantage that it can be cut with scissors at harvest, and avoiding too much disturbance to the attaching rootlets will help recovery. Pulling the moss off the support for sprigging onto the moss wall will not kill it, but will increase the establishment time - better to cut up the starter moss complete with adhering support material, and stitching the whole lot in place.
If you do not have access to the rock wool insulation, then any open weave mesh material should work (you could try Chux or similar). Cottons will be subject to decay and discolouration, however.
Design to avoid rapid drying
An initial prototype used a suspended moss wall, made up of open weave insulation material, sandwiched in a pocket of plastic mesh. Airflow to both sides of the growing medium seemed to make for very rapid drying, and a need for more regular watering. This new design, added the absorbent backing, used a more compacted rock wool substrate, and resulted in the wall having only one exposed side - all intended to reduce the water loss.
Critical Success Factors
Which of the critical success factors does this Prototype target? For more details see SLQ-Strategic-Plan-2016-20
Enable Access
- Provide life skills and early childhood literacy programs
- Increase free access to digital content
- Strengthen Queensland library infrastructure and discovery platforms
Engage Community
- Grow the State’s historical collection of Queensland culture and heritage
- Engage with communities of interest through dedicated centres of engagement
- Facilitate the community’s use of and interaction with content
Build Capability
- Build capacity within our communities of interest
- Generate new revenue sources
- Position our workforce for the future
Delivering of The Edge Promises
Aside from the SLQ Strategic Plan, there is The Edge's commitments to the community and the lens we look at it through. Here are a few more check boxes for you to answer
This empowers creative experimentation across...
- Art?
- Science?
- Technology?
- Enterprise?
It will inspire...
- Whimsy?
- Nostalgia?
- Curiosity?
- Awe?
Files
Moss Wall Presentation moss_wall_presentation.zip
Laser Cutfiles (Corel Draw format) moss_wall_cdr_files.zip
Laser Cutfiles (svg format) moss_wall_svg_files.zip

