Electro-Graphic Wallpaper

That sounds dangerous...
This workshop is really two workshops; wallpaper making and interactive wallpaper making. It's about taking the old school process (hand routing wallpaper for block printing taken from this video from Pathe News). The final product is to create wallpaper that interacts with temperature, whether that is ambient temperature or controlled temperature (electric blanket wallpaper).
Workshops will use Fabrication Lab equipment but not be dependent on it; it could all be done by hand if equipment was not available. It would just be more difficult. All processes developed as a part of this project will be documented for replication (gigs, press designs etc) so it could be rolled out wherever.
This project ticks off on art, science, technology and enterprise. The first three are self-explanatory (I think) and the last - enterprise - is modelling a viable SME within the fabrication space. You could make good money making bespoke wallpaper.
The Idea is...
- First part of the idea To create designs in Illustrator (or similar) for routing on a CNC (the big one of the small on) for printing onto blank wallpaper rolls. We would work with an old-school print maker to unpack the way it was done (production process) and how we could update it. This would be it's own workshops.
- Second part of the idea To work with heat reactive colour pigments to create prints that will react ambient temperature change. This would be a seperate workshops also, working on small form projects to perfect the technique and the science.
- Further iteration of this process to work a thermostat controlled element into a laminate within the paper so the effects can be controlled externally. Also exploring the use of a multiple of pigments that react at different temperatures to create various effects.
The final resultant workshops - Electro-Graphic Wallpaper - will be offered November/December 2017.
Materials
These materials are per participant if not specified otherwise.
Tools
Tools required during the workshop. It is not required that one of each is supplied for participants but one tool per two participants is preferred.
Development
Assistance to develop this idea has been seeked out with Anita Milroy, an experienced visual artist, printer and mixed media maker. Anita has also completed level 3 Laser induction and is inducted on the CNC. MB
Flying Arts Trial
The first trial of this workshop will be with the Flying Arts artiz participants over 2x 3hr sessions.
In the first session participants get a general overview of using illustrator for designing vector file suitable for cutting out as woodblock prints either on the laser or CNC. This first workshop will mainly recycle the AI for Laser (lamps) workshop we have run over a couple of seasons. During the workshop participants will have an opportunity to create their own design (or customise example designs) in pairs.
The first session will end with a demonstration of the CNC and cutting one of the participants files( the rest of the art work will be cut on the laser over night.
The second session will start with participants reassembling ther print blocks ready for printing a length of wallpaper each, using the 2 colour designs they developed with a partner the day before. these will be printed on a rig that will be developed in house (mick )and tested (with Anita) to ensure reasonable prints are achieved.
In lead up to these deliveries Mick will also trial the use of thermographic pigments in this printing process.
Printing Rig
over the last few weeks i (MB) have built a 1st prototype of the printing rig. it consists of a reel roller attached to a set of guide rails designed to align the blank paper perfectly with a printing surface (also with registration guides)

in which a wood block, that has been inked in a tub with coloured printing medium is pressed down with.
 The paper will be drawn through and hung on a drying line.

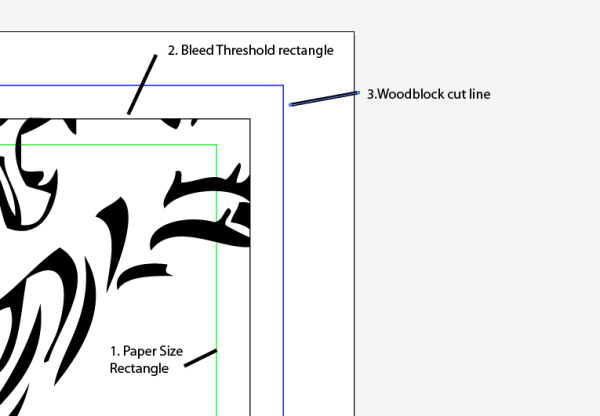
to ensure reasonable printing of repeatative patterns each wood block will be created with artwork with a 10mm bleed on all sides.
AI Tips for creating a repeatable pattern woodblock print
There is a number of tips I discovered in creating artwork in AI to test the prototype
- Lock off a with the three rectangles from inside to out. 1/ Paper size rectangle, 2/ Bleed thresholdrectangle, 3/ Woodblock cutline.
- line up repeated motif with a reference point in the artwork and with papersize threshold rectangle
- the artwork needs to continue past this paper rectangle into the bleed rectangle
- add new anchor pots on all paths that cross the bleed rectangle.
- remove all anchor points that sit outside the bleed rectangle.
- now manipulate the anchor handles that make the curves of the paths bulge over the bleed rectangle.
Tips for re assembling your cut out design
Plywood cut in the Laser

- First do the jigsaw puzzle of lining up the parts of the design with the score lines you have cut on the back board.
- probably want to use tweazers for this.
- i found using the soot marks on one side and resin stains on the other help me to orientate all the parts so they were the right way up.
- Also tried to keep the different sections apart to start with (lower left hand corner , centre, upper right hand corner) though some of these were mixed up.

- Then i glued the parts in place using aquahear (PVA glue) and a brush where necessary.

* Again place these parts with the tweazers.


This is a fairly fiddly, focused and intricate activity. it requires some quiet and motor skills. it may not be for every one. the Flying arts participants will be able to do this in their pairs
Acrylic cut in the Laser
for this i( mb) trialed cutting out the parts on 3mm acrylic at the same time a scoring a 2nd piece of 3mm acrylic. This turned out good with the cut out parts sicking down to the second piece of acrylic
Afterwards i went round with a syringe full of acrylic adheasive and glued the parts down, sqirting the adheasive nect to the parts sucked the glue thru (capillary action?). i guess we'll see if they remain stuck after they are washed in the post printing clean up.


Test Print 1
So my first test print was a bit of a failure.
* The tub that i used to spread out the paint was not level. This meant that the paint spread on the surface ( which wasn't very well spread ) wasn't making even contact with all the positive areas of the block. it also made contact (inked ) negative areas of the block. Thi might be resolved by applying the paint to the block on a pane of glass (acrylic? )or with a hard roller?
- The textured paper didn't pick the ink up evenly either
- The design was flawed also you need the artwork in all four corners to be a repeatable pattern ( rookie Mistake)


also the lack of positive space in the artwork in the top right and bottom left meant that there was nothing to hold the negative surface of the block away from the paper when pressure was applied and allow paint to register where theres no artwork.


Test Print 2
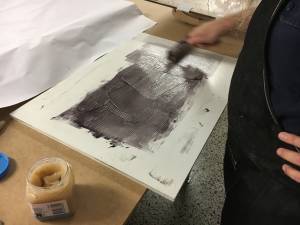
This time instead of the tub of paint. i used a piece of expanded pvc foam board as a flat surface to roll the paint out on

and a different wall paper stock the wallpaper i used in the first test had a plasticy texture (sourced from Bunnings )


The second type of paper (sourced from wallpaper direct in the UK) has less texture and the texture is casted into the paper. The texture of the paper was still a an issue as you can see in the photo of the limited print. Another strategy that may yeild some improvement is to line the bed with some foam.


the use of the pvc board to spread the paint with a roller was successful - though the polished surface of the acrylic printblock cause the paint to bead creating interesting but utimately unwanted patternation.

you can see this patternation in the print above on plain paper. we'll try to resolve this by givig the acrylic a light sand and trialing using craft card as the postive surface of the block.
Daniel is hunting down so untextured blank paper
Thermographic Pigments
Test Print 3 over the last couple of months I (mick) have had trouble finding buying the thermoreatcive pigments. Test print three was done with the SolarColorDust.com Black to Pink Ulta thermoreactive (87F) pigment http://solarcolordust.com/products/create-your-own-sample-pack-thermal-dust-86f-8a222844-875c-49ad-ac14-be7fe4377bce
Setup
Its good to have all you gear ready to go before you start

Lay out everything you are going to need for the whole process from mixing you block ink, printing drying and clean processes.
Mixing
- Medium
- Pigment
- Sherbet spoon (for measuring out pigment)
- mixing plate ( expanded PVC board or glass)
- Palette Knives
- Rags
Printing
- Wallpaper block
- Soft Brayer (Soft rubber roller)
- Paper (loaded up, aligned and ready to print)
- Scissors
- Print Bed
- spray bottle?
Drying
- Clothes line (set up ready to go)
- Pegs
Cleanup
- Tub
- Brushes ( under your bench ready to clean up quickly)
- Hose
- Dry rack
Mix Pigment and Medium to make ink
measure out some medium on to the mixing board/glass with a pallette knife. Make a valley/depression in the middle of your chunk of medium.

you probably need less than you think. 1 or 2 level teaspoons of medium is probably a good start.
With the sherbet spoon measure out some pigment into this depression (like when you crack an egg into flour when your making cake batter) 1 or 2 level sherbet spoon is probably the right concentration of pigment.


Care fully fold the pigment into the medium (without blustering the dry pigment everywear and wasting it) until it is a consistent mix.


Now with your soft rubber brayer, roll out the ink onto you mixing board/glass until the ink is spread thin across an area of the board. If you have the right consistency ink and it is spread correctly the roller will start making a sticky sound as you roll over the ink. Once you have this, you are ready to start printing.


Load your roller with ink
Load the positive of your block with ink


Line up the block with the registration angles on closest side of the printbed.

Lower the print block down onto the paper and in alignment with the registration angles on the far side of the printbed

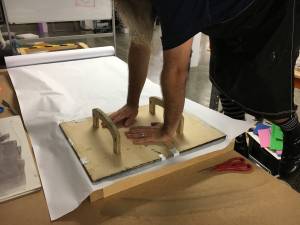
Press the block down with your body weight


Carefully pull the block off the paper and admire your handy work (or complete failure as a human being)

Draw you wallpaper through the printbed to load up ready for you next print

Reload ink onto your block


Rinse (not really) and repeat process until you have your ceiling height length of paper.


The Thermo reactive pigment work pretty well and is even sensitive to body temperature ( put your hand on the dry ink and it changes.

Print Test 4 Also ran a test with Little Bird Electronics Red to clear Thermo Pigment
https://littlebirdelectronics.com.au/products/thermochromatic-pigment-red-20g
In this test i added a lot more pigment (1-2 sherbet spoons per 1-2 teaspoons of medium.)
and did not use the timber backboard with the handles - just the transparent arcylic block.
Without the timber in the way you could see what you are doing when lining up the block with the paper and the print bed.
You can aslo se where you need to apply more pressure to the back of the block to ensure that the positive seface has been pressed against the paper and uniformly spread the ink.
Workshop Plan
this is the workshop plan that we mostly followed in the trial of this wotkshop with Flying arts kids over 2x 3hour sessions
intro_to_illustrator_for_laserand_wallpaper_block_printing.docx includingn illustrator keyboard shortcuts and cheats
Workshop 1 Section 1
Demo of the laser and our wallpaper block-printing jig
20 min
Workshop 1 Section 2
Dimensions of wallpaper design
15min
Workshop 1 Section 3
Intro to designing for Laser in Adobe Illustrator
• Whats AI and vector Graphics • Set up a new document in Adobe Illustrator • Place some artwork • Navigating layers - lock off reference and digging down into a design • Selection and Navigation tools • Simple Drawing Tools lines • Line Thickness and colour • Transform, Grouping, Joining
• Paths, joining and find outlines and the Pathfinder tool • Text Tool • Trace reference material • Live Trace
40 min
Workshop 1 Section 4
2 Colour Block-print Designs in Pairs
90 min
Workshop 1 Section 5
Laser cut a design and reflection
20 min
TryIt and Feedback
The Kids seemed to love the workshop and really take to both the illustrator session and block printing session
- the yp engaged with the manual drawing/ tracing tools (not just opting for the live trace)
- they also engaged eagerly with the weeding and experimentation with colours and of course loved the Laser
- They weree not as interested in the wallpaper as a product but this could be an age thing
Woodford 2017 Delivery
The Edge deliver 2 Electrographic print making workshops at Woodford. In the lead up to woodford members of the team were asked to contribute block designs to be printed on fabric ( tshirts, wall hangings). Robust colour-fastness of the prints was achieved by adding Chromacryl Textile medium ( approx 5ml to 100ml of printing medium) and ironing the finished print. We also took EVA foam (craft foam) sheets which cut into designs and stuck down to plywood offcuts with 3m spray adhesive to create a printing block of their own design. This process allowed participants who wanted to make their own designs to rapidly produce a block in the short workshop duration (approx 1 hour for design & 1 hour for printing). Participants who were not confident in designing could chose from the premade range of laser cut/ CNC routed blocks. This gave us an excuse to show a video and talk about the Laser and CNC resources available to the public at the edge.
Both deliveries of the workshop were very successful with a range of participants from various ages and backgrounds( young and old serious crafts people and tourist) signing up and engaging deeply in the activity. there were a number of people who used the workshop as an opportunity to make a souvenir (tshirt/ wall hanging) to bring home from their festival experience.
Photos


References
This were you put external links like LED generator
Files
olaf.cdr
tree.cdr
lilyblock.cdr
featherpalmblock.cdr
assassinblock.cdr
horseblock.cdr
wallpaperblckfeather500x405.ai
 wallpaperblcktemp500x405.ai
printbedv2.dxf
{{ :workshops:prototypes:electro_graphic_wallpaper:geome.ai |
wallpaperblcktemp500x405.ai
printbedv2.dxf
{{ :workshops:prototypes:electro_graphic_wallpaper:geome.ai |

 wallpaperblocktigerprint1.ai
wallpaperblock_template_.ai
wallpaperblocktigerprint1.ai
wallpaperblock_template_.ai
 wallpaperblocktiger.ai


 wallpaperblckassassin500x405.ai
{{ :workshops:prototypes:electro_graphic_wallpaper:wallpaperblck500x405.ai |
{{ :workshops:prototypes:electro_graphic_wallpaper:wallpaperblcktree500x405.ai |
wallpaperblock_koi_ddesign_elysharei.ai
wallpaperblock_koi_ddesign_elysharei.ai
wallpaperblckbirdand_plant500x405.ai
horse_wallpaperprint.ai
wallpaperblckassassin500x405.ai
{{ :workshops:prototypes:electro_graphic_wallpaper:wallpaperblck500x405.ai |
{{ :workshops:prototypes:electro_graphic_wallpaper:wallpaperblcktree500x405.ai |
wallpaperblock_koi_ddesign_elysharei.ai
wallpaperblock_koi_ddesign_elysharei.ai
wallpaperblckbirdand_plant500x405.ai
horse_wallpaperprint.ai
Critical Success Factors
Which of the critical success factors does this Prototype target? For more details see SLQ-Strategic-Plan-2016-20
Enable Access
- [✓ michael, 2016-11-22]Provide life skills and early childhood literacy programs
- Increase free access to digital content
- Strengthen Queensland library infrastructure and discovery platforms
Engage Community
- Grow the State’s historical collection of Queensland culture and heritage
- [✓ daniel, 2016-12-01]Engage with communities of interest through dedicated centres of engagement
- Facilitate the community’s use of and interaction with content
Build Capability
- [✓ michael, 2016-11-22] Build capacity within our communities of interest
- Generate new revenue sources
- [✓ michael, 2016-11-22]Position our workforce for the future
Delivering of The Edge Promises
Aside from the SLQ Strategic Plan, there is The Edge's commitments to the community and the lens we look at it through. Here are a few more check boxes for you to answer
This empowers creative experimentation across...
- Art?
- Science?
- Technology?
- Enterprise?
It will inspire...
- Whimsy?
- Nostalgia?
- Curiosity?
- Awe?
Created by Daniel Flood on 2016/11/09 08:47.
contributors