Build a Spirulina Farm

Developed by Peter Musk 2018
Summary
This workshop introduces participants to the theory and practicalities of building an algae bio-reactor. The basic design could be adapted to grow other species of algae, which would suit alternative uses eg: biodiesel, pigments, fish food, etc.
Spirulina is promoted by the United Nations as an important contributor to food security for impoverished communities, due to the high efficiency with which it converts low cost inorganic nutrients into protein, essential oils and vitamins. Optimal growing conditions for Spirulina (saline and alkaline water) also have the advantage of naturally discouraging the growth of other organisms, reducing the chance of contamination and making this bioreactor safe for home use.
Spirulina was chosen because it has current use as a food supplement and protein source, and because retail supplies of processed algae are expensive. Spirulina also has the advantage of being available commercially as a pure strain, at relatively low cost compared to other useful algae species. Collecting from wild sources is not recommended due to the possibility of contamination with other, potentially harmful species.
This workshop was developed and delivered by Peter Musk as part of The Edge Workshop program in March, 2018.
Nutrient recipes and basic design concepts were modified from information supplied by SpirulinaGrowCo.com.au, who also supplied pure starter cultures.
Rationale
Biotechnology is the last frontier of the Maker movement - for good reason. Molecular Biology requires expensive and specialised equipment, certified and safe workspaces and difficult to obtain materials. While some activities that demonstrate important techniques and principles are already available, substantial projects require more people, time and money than most enthusiasts can afford.
This is why The Edge has sought to develop and disseminate systems that use robust, harmless and readily available organisms with attributes that make them useful for creative experimentation. Algae are simple unicellular organisms, which present an interesting set of challenges in constructing a suitable growth environment, as well as producing a variety of useful materials. At the same time, using these organisms confronts people with a new set of constraints around providing physical conditions that maintain the lifeform which require creative solutions.
Skills Introduced
Constructing an algae bioreactor requires participants to consider how to provide the requirements for growth of a simple photosynthetic organism. Physical parameters such as temperature, agitation, gas exchange and illumination are identified and addressed using commercially available equipment adapted from other uses (in aquaria, for example).
Nutrient supply is more complex, since the growth requirements of Spirulina are specific: low pH, salinity, and a suitable nitrogen source are key requirements. Other essential nutrients such as phosphorus, calcium, magnesium and potassium are common to most green plants, and identifying cheap, locally available sources of these (supermarkets and garden centres) is an added benefit. The importance of micronutrients in a closed environment is highlighted, but a ready source in unrefined sea salt is available.
Physical construction includes the manufacture of a simple air-lift pump to circulate and aerate the liquid growth medium which illuminates how simple physics can be used to solve problems with cheap and available materials. Some use of hand tools (drill, saw) is involved.
Monitoring the conditions in the culture introduces the use of temperature probes and pH test strips.
Materials
| Part Number | Description | Quantity |
|---|---|---|
| 1 | Fish Tank pump (3.5L/min or more) | 1 |
| 2 | Submersible heater (50 -75W) | 1 |
| 3 | 500 - 600mL clear starter container (with lid) | 1 |
| 4 | 5 - 10L translucent container (with lid) | 1 |
| 5 | 30 - 50L translucent container (with lid) | 1 |
| 6 | Waterproof Digital temperature sensor | 1 |
| 7 | Flexible airline tubing (6mm OD) | 2 x 2m |
| 8 | Non-return valve | 1 |
| 9 | 3-way bleed valve (air control valve) | 1 |
| 10 | 15mm suction cups | 4 |
| 11 | PVC conduit (15mm OD) | 500mm |
| 12 | Bubble stone or bubble wand | 1 |
| 13 | Harvest mesh (Polyester Swiss voile) | 0.5m |
Optional (useful for harvesting, nutrient preparation and culture monitoring)
| Part Number | Description | Quantity |
|---|---|---|
| 14 | pH test strips (pH7 -12) or test meter | several or 1 |
| 15 | PVC flexible tubing (15 -20mm OD) | 2m |
| 16 | clean 20L bucket | 1 |
| 17 | 500-600mL clear backup container | 1 |
| 18 | zip-lock bags (for nutrients) | several |
| 19 | alfoil (for weighing nutrients) | 1 |
| 20 | bamboo skewer or chopstick | 1 |
| 21 | 50-60mm diameter disc of white plastic (recycled) | 1 |
Tools
Hand saw (to cut rigid PVC pipe)
Drill and 5-6mm bit (to make air lift pump)
Clamps (to hold conduit in place)
Scissors (for cutting air hose and harvest mesh)
Electronic scales (at least 0.1g accuracy)
Black permanent marker
Ruler or measuring tape
Light microscopes to view samples of Spirulina culture provide a good introductory activity
Instructions
Step Zero:
The following should be prepared before the workshop:
- healthy, growing Spirulina culture (allow 50 - 100mL per participant)
- 2 -3 sachets of growing nutrients per participant, each sufficient to make 5L
- wet mount slides of Spirulina culture (if microscopes are available).
Consider OHS implications of using hand tools if participants are unskilled (clamps to hold conduit in place for cutting and drilling will reduce the risk of injury)
Background Information
OPTIONAL
Prepare wet mounts of Spirulina from growing culture, and begin with participants looking at what they are about to grow.
Two forms should be present - a linear and a spiral form. Both grow as filaments, and should be easily visible at 50X or better. Staining is not required
Depending on interest, some discussion of the biology of the organism could be useful:
- Spirulina platensis is a blue-green algae, which is actually a photosynthetic micro-organism closer to a bacterium than a plant. Cells of blue-green algae (or cyanophytes) do not have a rigid cell wall or a nucleus like true plants, but have a form of chlorophyll that allows them to convert sunlight and air into sugars that fuel growth. When other nutrients (mainly nitrogen, phosphorus and a variety of metal ions) are present, the organism can make the proteins, fats and vitamins that make it a useful food supplement.
- Spirulina is a very efficient way to grow protein. To grow an equivalent mass of protein from corn or eggs requires about 8 times as much water as Spirulina and beef needs almost 30 times as much. The dried biomass is about 60% complete protein, containing all essential amino acids. Spirulina contains as much in the way of micronutrients and antioxidants as blueberries, and is rich in iron.
- Wild Spirulina grows in the saline, alkaline waters of lakes in the Rift Valley of Africa, hence it has a fairly high optimum growth temperature (30 - 37C) and also a high optimum pH (10 -12). In these conditions it is a major food source for flamingos, and it is the red beta-carotene pigments in the algae which turn the feathers of the flamingo pink (though these pigments are masked by the green photosynthetic pigments while it is actively growing).
- Growing at high pH and in saline water means that Spirulina cultures are unlikely to become contaminated with other organisms not adapted to these extreme conditions.
- Once established, and with sufficient nutrients, Spirulina will double in biomass every 2-3 days, and a 20L farm should produce about 10 - 15g in a week (or 2 to 3 teaspoons of concentrated, wet green goodness every few days). Under ideal conditions, the farm will grow by 80mg (wet weight) per litre per day.
- LIGHT: The algae requires a light/dark cycle for growth - about 16hrs of light a day is optimal. If using artificial lighting, only red LEDs are required for growth (625 -650nm), and a warm white is preferable to cool white because this type contains more red light. Artificial lighting will be 10 -100 times less intense than sunlight, and so growth will be slower.
- TEMPERATURE: Spirulina grows well above 25C, and 30-37C is optimal. Above 40C or below 2C the culture will begin die. Low temperatures are a way to slow the growth of backup cultures so that continual feeding and harvesting is less necessary to keep them viable.
- NITROGEN: Potassium (or sodium) nitrate is an optimal nitrogen source , because it is very soluble, but this can only be obtained through a chemical supply company. Other nitrogen sources such as ammonium sulphate (max 300mg/L) or urea (max 15mg/L) will work, but toxicity limits the total available, and so growth will be slower.
- PHOSPHORUS: mono- or di-ammonium phosphate has the advantage of being soluble, but again is only available from a chemical supplier. The garden fertilizer superphosphate (calcium phosphate) at 50mg/L can substitute, but may be more difficult to dissolve completely.
- OTHER NUTRIENTS: suitable sources are available as garden fertilizers or household chemicals, as described later.
Step One: Make an air-lift pump
A farm requires that the growing algae is gently circulated, so all the cells get some time exposed to light, and aerated so that oxygen can be removed and carbon dioxide added. Both of these requirements can easily be met by using a simple air-lift pump. This device uses air bubbles to lift the liquid culture up inside a pipe above the water level, and let it fall back down again, like a mini-waterfall.

First, cut a length of 15mm rigid conduit that will fit inside your growing container.
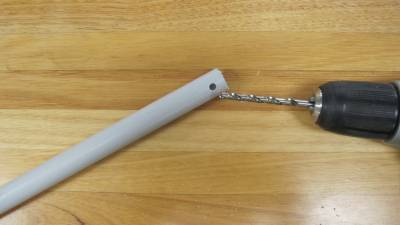
Use a 5 or 6mm bit to make a hole in the conduit, a couple of centimetres from one end.
This hole will take the air tubing, so you do not have to drill all the way through the conduit.

Cut a length of air tubing long enough to reach from the farm to where you are going to put the bubbler pump, and push a few cm of the tubing into the hole (pointing away from the near end).
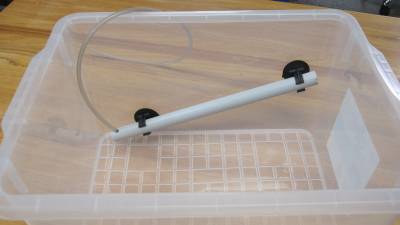
Attach two of the suction grips to the conduit, and mount it at an angle inside your farm container. The end with the air tubing should be lowest.
Step Two: Mount the heater
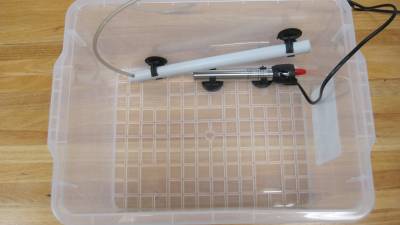
Submersible fish-tank heaters usually have a dial that allows you to set their operating temperature - set it to the optimum growing temperature of 30 - 37C.
Attach two of the suction grips to the heater, and mount it on the wall of the farm below the air-lift pump.
Step Three: Set up the bubbler pump

Cut a length of air tubing long enough to reach from the bubbler pump location to the farm container, and attach it to the end of you bubble stone.
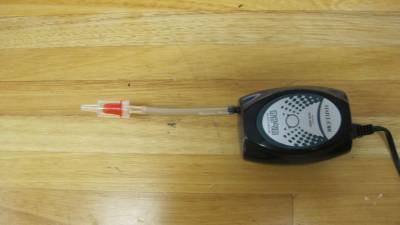
Cut a short length of air tubing and use it to attach the non-return valve.
You can check that the valve is the right way round by turning on the bubbler pump - if correct, you can feel air coming from the open end of the valve.

Attach the end of the t-valve to the air tubing.
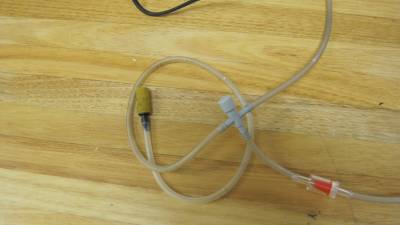
Connect one arm of the t-valve to the end of the air-lift pump hose, and the other arm to the tubing leading to the bubble stone.
Put the bubble stone into the farm container.
Step Four: Test the system
Add enough clean water to the farm container to fill it a few centimeters below the raised end of the air-lift pump.
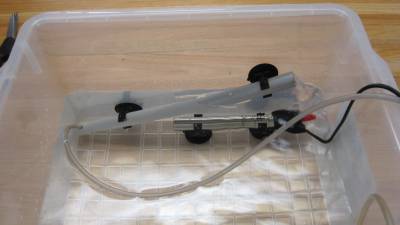
Turn on the bubbler pump, and adjust the air flow with the t-valve so that a gentle flow of water comes from the raised end of the air-lift pump.
The bubble stone will take the unused air, and help aerate the system.
If no water comes out of the air-lift pump, try lowering the raised end closer to the level of the liquid. Avoid a vigorous flow from the air-lift pump (or the bubble stone), because excessive agitation can damage the cells of the algae.
Step Five: Nutrient preparation
Water
Tapwater is not suitable for growing algae because it contains chemicals added during treatment to prevent their growth. Standing water in the sun or boiling it will not remove these chemicals, but there are other methods that can neutralize them and make tapwater safe for your farm:
- aquarium water conditioning tablets (used as directed)
- adding 1g of ascorbic acid (Vitamin C) per litre of tapwater and shaking before use. If you are using the supplied nutrient sachets to make up 5L of growth medium, then add 1 heaped teaspoon (which will be about 5g) of Vitamin C per 5L of tapwater before use.
pH
pH is a measure of acidity. Low pH numbers indicate an acidic substance (lemon juice is pH 2) and high numbers an alkaline (or basic) substance (drain cleaner is pH 14).
Spriulina grows naturally in salty, alkaline lakes under the blazing African sun, and the growth solution used in your farm has a pH of 9 - 10. Because not many other organisms can survive under these conditions, the risk of contamination is negligible.
Macronutrients
Some nutrients are required in higher quantities, and these are listed below:
| Nutrient | Quantity | notes | Source | |||
|---|---|---|---|---|---|---|
| (g per L) | (g for 5L) | |||||
| Sodium Bicarbonate | 16 | 80 | Supermarket | |||
| Potassium nitrate | 2 | 10 | sodium nitrate can be substituted | Science supplies | ||
| Sea salt (unrefined) | 1 | 5 | avoid iodised salt which will be toxic to the algae | Supermarket | ||
| Ammonium phosphate | 0.1 | 0.5 | calcium superphosphate at 0.05g/L (0.25g/5L) can substitute but is less soluble | Science supplies | ||
| Iron sulphate | 0.01 | 0.05 | dissolve 1g in 100mL cold green tea, then add 1mL/L (5mL or 1tsp/5L) | Hardware (garden) | ||
| Magnesium sulphate | 0.1 | 0.5 | Supermarket (Epsom salts) | |||
| Potassium sulphate | 0.5 | 2.5 | Hardware (garden) | |||
| Calcium chloride | 0.1 | 0.5 | Hardware (spa water hardener) | |||
Note that iron is best added when mixed with green tea, otherwise it tends to become insoluble as it combines with some of the other nutrients. making a solution as described also makes it easier to measure the required amount.
Micronutrients and Trace Elements
Your growing algae will also need a variety of other nutrients in very small quantities (you can see a list in a recipe for Zarrouk medium, or Jourdan medium which are used in laboratory experiments). These are difficult to obtain except from scientific suppliers, require specialized equipment to weigh the small amounts needed, and also tend to be insoluble at higher concentrations.
By using unrefined sea salt, these required micronutrients can be added as the impurities found naturally in seawater.
Post-harvest nutrients
Each time you harvest the Spirulina you remove some of the nutrients that have become incorporated into the newly grown cells of the algae. To keep your farm productive, these nutrients need to be replaced at a rate of 1 teaspoon of post-harvest nutrient mix for each 3 teaspoons of harvested Spirulina. For each teaspoon of nutrients you add, add a quarter teaspoon of the iron/tea solution, too.
Make up the post-harvest nutrients as a dry mixture (making sure that everything is well mixed).
| Nutrient | Quantity (g) |
|---|---|
| Potassium nitrate | 40 |
| Ammonium phosphate | 2 |
| Magnesium sulphate | 2 |
| Potassium sulphate | 10 |
Step Six: Populating your farm
Spirulina is native to Africa, so the only way to get a seed culture for your farm is to buy a pure culture from a reputable source. Because it is a living organism, purchase from overseas suppliers runs the risk of death in transit, as well as requiring importers to meet stringent biosecurity procedures. The best option is to purchase from a local grower, for example:
- CSIRO maintains an national Algae reference collection, which supplies pure cultures for scientific research, but at substantial cost.
- SprulinaGrowCo is a commercial supplier, with starter cultures (and nutrients) available for home growers at more affordable rates.
- other commercial growers may make cultures available, but you will need to locate and negotiate with them individually.
When you obtain your starter culture, it is important to gradually increase the volume by adding fresh nutrient solution rather than run the risk of contamination which is more likely if the culture is diluted excessively. It is best to add about 1/3 volume of nutrient solution every 2 - 4 days as the culture expands, all the while maintaining optimum light, temperature and aeration for rapid growth. Make sure the culture becomes a deep, dense green (or use the Secchi disc described later) before adding more nutrient. This might mean using a variety of small, clean transparent containers of increasing volume until you have 10L or so, which can be put into the farm container.
Aeration can be introduced using the fish tank bubbler, running at a gentle pace by adjusting the three-way valve as described previously (your container will be too small for the air-lift pump). Temperature could be increased if necessary by placing your small container on a USB heat mat, or some other method you have available. Placing next to a window should provide enough light.
Step Seven: Monitoring culture density with a Secchi disc
The easiest way to measure the density (and health) of your culture is to use a Secchi disc. This simple device consists of a disc of white plastic about 50mm diameter with the pattern below drawn on in black permanent ink. The disc is mounted on a bamboo skewer or chopstick and lowered into the culture until you can no longer see the pattern: a 2cm disappearance depth correlates to a density of about 0.5g/L dry weight, and 0.3g/l at 4cm.

Harvesting or dilution during the growth phase is optimum at 3cm or less.
To make your Secchi disc:
- cut a 50mm diameter circle of white plastic (which can be cut from a clean white plastic food container lid)
- draw the pattern on the top side of the disc
- make a small hole in the centre
- push a bamboo skewer through the disc, gluing it in place if necessary a couple of centimeters from the point of the skewer
- mark the skewer at 1cm intervals above the disc
Step Eight: Make a back-up culture
It is a good idea to have more than one culture growing at any time, so that you can recover from contamination, temperature fluctuations, the actions of pets or small children or anything else that causes the loss of your farm.
This is as simple as keeping some Spriulina growing slowly, in a smaller container , but with aeration and light to maintain healthy growth. Growth can be slowed by maintaining a lower temperature - the algae will survive and grow slowly at 15 - 25C. Gentle aeration and low light will also help to slow growth.
Step Nine: Harvesting
Once the culture reaches a Secchi disc reading of 3 or less (and has a pH above 10), it can be harvested. This is easily done by siphoning the liquid through a washable fabric with a fairly open weave such as Swiss voile (curtain backing). Nut milk bags also work, as does 50 micron nylon mesh purchased from a specialist supplier.
Peg the fabric loosely over the top of a clean 20L bucket, and use flexible PVC tubing or a hand pump to siphon the culture into the bucket. Gentle agitation, or encouragement with a utensil of your choice will help to concentrate the harvest in a manageable volume. Pour the liquid back into the farm container, and add the post-harvest nutrients as required (1 teaspoon per 3 teaspoons harvested algae).
Rinse the harvested material with a few litres of clean water (if you use de-chlorinated water, you can add this to your farm too).
This process benefits from an additional pair of hands.
The harvest can be eaten fresh, stored in the fridge for a couple of days or frozen for later use.
Troubleshooting
Sometimes, through disaster, contamination or the action of pets or small children, your farm might become contaminated or unhealthy. A healthy culture should be a deep green, and have a faint seaweed smell.
If your culture has a bad smell, or there are brown bits floating on top, do not eat the product.
The dead bits can be fished out, and a bit of sodium bicarbonate added to increase the pH above 9, but this is why the back-up culture is required. You might need to clean the farm container, and start again.
Development notes
measuring pH
Using a cheap, stab-type pH meter is a good way to monitor the health of your growing culture. Alternatively, pH test strips can be used, though these are expensive and single use only. Monitoring pH is a good way to pick up problems at the earliest possible stage.
Workshop participants could be introduced to the use of red cabbage juice as an indicator of pH that is cheap and readily available. If a range of test solutions with known pH are available, making some cabbage juice and using it could be a useful additional activity in this workshop.
establishing the culture
This is a crucial part of the preparation, and takes a fairly long time - rushing is prone to disaster. It is also dependent on weather conditions if an external heat source is not available. Have a Secchi disc pre-made so that this process can be monitored effectively.
Any clean, transparent container of suitable size can be used - PET water bottles, kitchen storage containers, etc. Maintaining gentle aeration is important.
aeration
A dual-outlet bubbler is preferable, but more expensive. 3.5 L/min is the minimum output, and higher is preferable.
artificial lighting
LED strips can be used if natural light is unavailable, but remember they are 10 - 100 times less powerful than sunlight. Warm white, or all red are sufficient for photosynthesis and growth (blue only helps initiate flowering). Using a 5m LED strip will add about $25 to the cost of each kit, if purchased direct from China.
Spriulina requires a day/night cycle for healthy growth (max 16hr light per day), so a timer would also be necessary.
Bill of Materials (BOM)
| Material | Quantity | Cost | Supplier |
|---|---|---|---|
| Arduino Nano v3 | 1 | $3.40 | AliExpress |
| MAX7219-dot-matrix-module | 1 | $2.10 | AliExpress |
Feedback
1. Feedback:
Solution:
2. Feedback:
Solution:
3. Feedback:
Solution:
4. Other observations:
Source Files
Workshop handout: workshop_handout.docx
Suppliers and Costings (2017): algae_bioreactor_costings.xlsx
Created by Peter Musk on 2018/03/09 12:14.
contributors