Contra Cabinet
Summary
From sign
NOT Contra -
The Edge’s Arcade Cabinet

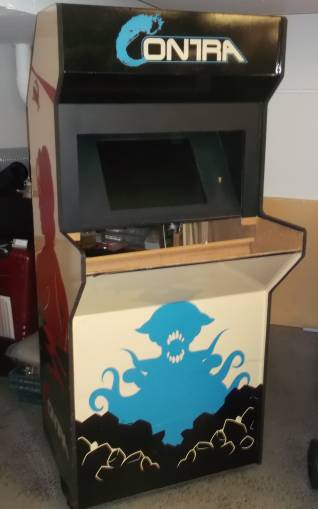
This cabinet was originally built by Peter Musk and others at The Edge as part of the May 2015 Brisbane Powerhouse “IRL Digital Festival”, where it was a part of a series of cabinets made to showcase a series of classic games.

Most the other cabinets found new homes, however after being stripped of it’s computer, ‘Contra’ was left in the Fabrication Lab’s junk store where it languished for many years.

In mid 2017, after a few false starts and looking for a break from larger projects, some of the Thursday Hack the Evening group decided to repair and recommission the cabinet to a modern system for public use.

Attempting to leave as much of the original intact possible and using only found pieces, the rebuild was completed near the end of 2017. It was installed in its current location, adding it’s ‘NOT’ sign, during the end of year holidays.
Resources
Materials
MDF for the top. (From internal stock)Buttons/switches. (In box labeled 'Arcade Machine')Control hardware. (Same)New screen. (Maybe? Maybe current one is good enough.)
Tools
- MultiCAM CNC: Cut new control panel and (maybe) screen frame
- Soldering/electronics
- Basic hand tools
- Vinyl cutter: For new panel graphics
Jobs
Restore
Decide on layout and make new panelWire up remade panelWork out layout/design for new screen.Install new sound systemFind, install new PC and set up OS and basic games- Install MAME on PC
External USB ports- External headphone port
- New graphics for front panel
- Tidy up existing graphics(tape?glue?)
Future
- CNC new panel
- Remember to allow for pockets for the joysticks.
- Removable control panel system
- Top should be removable with no tools (Magnets? Catches?)
- Token accepting (Start 15min(?) countdown timer to allow fair play)
- Display case for carts
- Multi cart reading
- LED 'current games' display: Led Dot Matrix 64x16pixel
- New player one joystick: https://www.ultimarc.com/ultrastik_info.html
- Trackball. If we can find a way to disable when not in games
Cabinet and Hardware
NOTE: Theses segments are in rough chronological order. However further progress on the same item is added to that item.
Old top
This is kept stored inside the cabinet for future reference and to keep all the original woodwork in the same place.
It uses a gutted xbox controller for the cabinet's original use. Buttons were salvaged but microswitches left intact.
When the replaceable panel system is built, it would be nice to reinstate it that as one of the options.
Layout
Measurements
New top
Layout
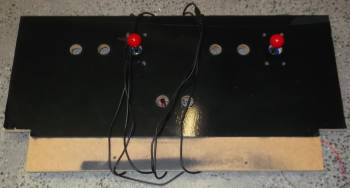
Based on a modified Street Fighter layout that seems to be one of the most versatile single panel options.
http://www.slagcoin.com/joystick/layout.html http://www.slagcoin.com/joystick/layout/hybrid36_m.png
New panel drawn out and cut using hand tools, a bit rough but will do.
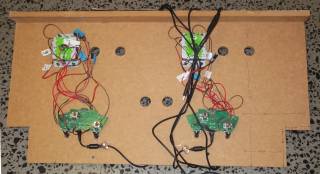
IPAC2 controler wired up. Tested.
New control panel Painted.
Replace screen
The old LCD TV screen was a missing it's power supply and a few other parts.
A newer much better computer screen was found in the piles of equipment. Old screen was removed and front cut to fit new one.
Fix viewing angle
The cabinet's original design was based on plans with a few design problems for the current use and included a large overhang above the screen that prevented any adults not sitting down from using it.
This was the only major piece of rebuilding that was done to the cabinet and a decision was made to not change as little as possible while making it usable.
All materials were salvaged from previous changes or recut to suit the new angles and major joins were filled and sanded but minor imperfections were left.
Test fitting
Bog and sanding
Finished
Sound
- A sound system with external volume control and optional internal lighting was installed.
External USB/Volume
Four external USB ports were added, two on the lower part of the cabinet, two above the main panel.
- 3d printed sockets were used: https://www.thingiverse.com/thing:650689
Replace top sockets with:
Securing and Cooling
Originally fans were planned to keep the cabinet cool due to having a large LCD monitor and a PC running inside it,
however during testing it was found that leaving speakers or other parts out at the top created enough of a chimney effect to provide more than adequate cooling.
As just cutting slots in the top would be ugly and allow dust ingress, louvered down vents were donated and installed. The cabinet now stays cool.
Once it was realised that the cabinet would end up being installed in open public areas and games started to be donated, a simple lock was installed.
As the cabinet is just screwed together anyway, something that would prevent opening without tools was chosen as adequate.
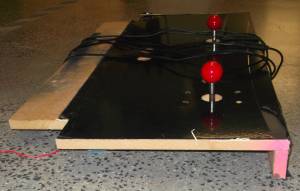
Analog Joystick
Cheap, robust but functional analog joystick for playing games that require smoother control.
Analog stick is mounted on an acrylic plate to allow easy replacement as final design will likely be Ultimarc UltraStik 360 installed as Player One's main joystick with a trackball replacing the current stick in a new peice of acrylic. It was done this way to experiment with analog inputs and play with a budget option as the UltraStik will be close to $100 instead of about $20 for this one.
- Joysick Library: https://github.com/MHeironimus/ArduinoJoystickLibrary
- Curve correction: https://www.chiefdelphi.com/media/papers/2421
- Ultimarc UltraStik: https://www.ultimarc.com/ultrastik_info.html
Cutting the hole for the new joystick and building the actual joystick:
Underside and finished control:
'Fix' button and Lighting
Computer and Software
Tasks
- A new computer was found, Linux was installed, along with a bunch of open source and donated games and the current menu system written.
- Graphics card
- etc
- Graphics? Test GL? (New computer?)
- Screensaver. (Pulls from directory on machine)
- Map joysticks and keyboards to same devices each time. (https://ubuntuforums.org/showthread.php?t=1595666)
- Auto start and menu. (Mostly done)
- Power switch? Wake on power? http://forum.arcadecontrols.com/index.php?topic=134179.0
Useful links
Linux:
Emulator/Frontend:
- nestopia duck-hunt.nes
https://www.reddit.com/r/RetroPie/comments/4a8ncv/ipac2_config_on_retropie_works_with_mame_nes_snes/
Games
Donated
- N64: Mario Kart64
- N64: Super64 Mario
- N64: Yoshi's Story
- Atari 2600: River Raid
- Atari 2600: GORF
- Atari 2600: Pole Position
- Atari 2600: Mario Bros
- Atari 2600: Stargate
- PC: Welltris
Loaned
- SNES: *Super Mario* All*Stars
- SNES: Tetris & Dr Mario
- PC: Jazz Jackrabbet
Shareware
- PC: Commander Keen
- PC: Quake
Open Source
Photos
Development notes
Hardware/cabinet:

Cabinet is made from CNC (for the sides) and hand cut(for the rest) MDF(?size?). Painted on the edges and decorated with vynal and masked spraypaint.
Improvements can be made by routing corners to create curves, by hand or machine. And by using laminate or push in edging strips.
Most minor pannels are removable to give easy access. However this does compromise strength in some ways.

Screen is a standard LCD set back at an angle and installed into a wooden bracket. There is plenty of room to install a CRT without it's case for a more tradtional look.
The pannel the screen is installed in is a removable peice to allow modifcations later. Screws fix in from the back.
The front has a sheet of 1mm PETG(Acrylic or polycarb also works fine) to protect the screen from touches, keep dust out and allow for easy cleaning. This does cause problems with reflections in some areas.

Back door is hinged, due to the materials and methods, the whole frame does twist when the door is opened, requiring a slight lifting to close.
The bottom 30cm of the cabinet at the back is open, allowing access to machine controls. This is fitted with wooden bars preventing machine removal.
Cabinet is fitted with a latch and lock, allowing the contence to be secured when in public or semi-public places.
A light duty lock is fine, as a screwdriver is all that is required to get in anyway by removing panels anyway. Planning and glue can be used to trade security for ease of future modication.

Due to the large bottom opening and simple electronics, ventlation is done entirely passivly. Two lovoured external type vents are installed on the back near the top, allowing hot air to escape.
A more secured design or powerfull gaming machine may require a fan drawing air in at the lower back and exausting at the top.

The control panel has been made to be easly replaceable, keeping any connections back to the electronics simple plugs and requiring either few or no tools to replace. It's hand cut MDF but new versions can be CNCed.
A more solid/secure cabinet would have fully screwed in top. It's not recomened to glue this in place due to changing nature of games and controls.
Current layout is 'modified street fighter' allowing most games to be mapped in some sane way to the controls.
This is the main reason why the removable top was chosen, to allow for layout changes. More than likely this design will change over time as it's turned out to be non-ideal for systems such as SNES.

Cabinet includes internal hooks and storage for cables, spare parts, spare control panenels and other peices, keeping everything together. This was extensivly taken advantage of during the restoration to hoard parts until needed.


Electronics:

As flexabilty was in mind, the cabinet's electroncs are as generic as possable. Allowing changing out for diffrent systems as required.
The current primary goal was a simple Linux PC based MAME/Emulator/PC Game system, the computer dosen't need to be very powerful but some requirements must be meet.
(Insrt specs here)
This allows anything from somewhat current PC games to original arcade emulators. A much more powerfull 'gaming' PC could be easly installed.
For low energy use, screen could be replaced with a modern ultra low power LED backlit LCD tied to a a raspberry Pi 3 running RetroPi or similar.

Sound is done through two second-hand speekers from a TV with black grills over the top and a cheap 15W amplifier connected up to the PC.
External volume control is installed bewteen the PC and amp, allowing easy control despite many diffrent games having diffrent volume levels as well as complete muting.
An external headphone socket will be fitted in the future.

RGB LED lighting is fitted behind the speeker grills for future work.

The control panel is built around a Ultimarc  I-PAC 2 Arcade Controler. ( https://www.ultimarc.com/ipac1.html )
Chosen for flexabilty and software surport. However any similar device will work fine. Including arduino based designs.
Controls are standard off the shelf microsswitch style arcade buttons and joysticks. Excact choice of buttons and styles will depend on chosen layout.
https://www.aliexpress.com/wholesale?catId=0&SearchText=arcade+button+microswitch  https://www.aliexpress.com/wholesale?catId=0&SearchText=arcade+joystick+replacement

Four external USB ports have been installed. Two on the right hand side of the screen(Soon to be 1 USB, 1 headphone).  (http://www.ebay.com.au/itm/1M-3-5mm-USB-2-0-AUX-Socket-Extension-Lead-Panel-Cable-Car-Dashboard-Flush-Mount-/362025141079?  )
As well as two on the right side below the control panel.  ( http://www.ebay.com.au/itm/1m-Car-Dashboard-Mount-Flush-Mount-Dual-USB-Socket-Extension-Lead-Panel-Cable-/401357279542?  )
This allows games to be brought from home, controlers such as analog joystick or gamepads to be connected, as well as a keyboard and mouse for matinance work.

A button on the right hand side of the control panel connects to the power switch on the PC, allowing easy switch on/shut down.
Feedback/Problems
- Keyboard controller(IPAC2) sometimes stops responding to some keys. Unplugging and re-plugging(power cycle) fixes this.
- These panels take a pounding. After 6 months of use every single switch came loose. Hot glue has now acts as as thread lock to hold them in place.
- Children always find a way to break things. Even if you have no idea how they do it.
- Hide the keyboard and mouse. People are too used to computers and will try and use them.
References
Files
This is where you put files for laser cutting, Excel sheets of suppliers etc..
Project Progress
| Project | Percent Complete | Project Lead | Status | Budget Req | Budget Approved | Next Major Milestone | Subsequent Milestones to complete | ||||||||||||||||||||||||||||||||||||||||
| Contra Cabinet | 95% | Byron | Basic layout complete … | > $10 | All hardware is now operational … | - Lighting & Sound to be revised ? |


