Virtual Reality
Resource developed by Michelle Brown in 2018, current as of 2020.
History of XR (VR, AR, MR)
The first actual VR head-mounted display (HMD) was created in 1968 by computer scientist Ivan Sutherland. Sutherland was one of the most important figures in the history of computer graphics, having developed the revolutionary “Sketchpad” software that paves the way for tools like Computer-Aided Design (CAD).

XR is a recent term that captures a variety of new technologies mainly focused around, VR, AR and MR. MR is the abbreviation for Mixed Reality, where usually a person is included in the environment, for example videos capturing someone painting in virtual reality.
More info on the history of XR via these links;
https://www.vrs.org.uk/virtual-reality/history.html
https://www.digitaltrends.com/cool-tech/history-of-virtual-reality/
Virtual Reality
What do we mean by Virtual Reality?
In basic terms Virtual Reality (VR) is the computer-generated simulation of a three-dimensional image or environment that we can interact with in a seemingly real or physical way by using specific equipment, such as a headset or mobile device inside another component. A person becomes part of a virtual world or is immersed within this environment and whilst there, is able to manipulate objects or perform a series of actions.
We learn about the 5 main senses; taste, touch, smell, sight and hearing; however these are the most broadly discussed senses, there are others such as balance and kinesthetic sense.
Everything that we know about our reality comes by way of our senses. In other words, our entire experience of reality is simply a combination of sensory information and our brains sense-making mechanisms for that information. When you present your senses with made-up information, your perception of reality can also change in response to it.
So basically VR can be a version of reality that isn’t really there, but from your perspective it can be perceived as real.
What can Libraries use VR for?
VR is not just for gaming and the technical savvy; from 2015 until now there has been a massive boom in creating experiences that not only help train and educate people, but also to deliver creative multimedia opportunities in arts and film practice.
Libraries these days are not just about books and information, they are community centres featuring digital learning and experiences, hands on workshops and access to equipment like 3D printers.
Some examples being used at libraries across the globe include library tours (virtual!), training and education programs, workshops and access to virtual reality labs and equipment.
Avenues that VR can be used for
- Digital Storytelling; Short films, documentaries etc. An example of a local Aboriginal and Torres Strait Islander owned and operated organisation using VR technology for storytelling of culture is Virtual Songlines

- Education and training; Flight simulation and Medical VR are common examples but more recently companies like Brisbane based Equal Reality are using VR to immerse workers in equality training. Including; leadership, gender diversity, disability inclusion, cultural inclusion, sexual harassment & bullying.

- Art and new media; there are several VR apps where you can create in the virtual environment, for example, Google’s Tilt Brush and an animation program called Quill. These programs have been used by artists to create immersive installation pieces, short films and many more creative experiences.

- Architecture, Engineering and 3D modelling; many architects and real estate organisations are using virtual reality to model works and display them for clients etc.
- Gaming; VR gaming is on the rise and even the general public can learn to make games for VR platforms
- Social interaction; Facebook spaces, VR Chatrooms etc. Next wave of social media

- Spatial Audio; or ambisonics, is a full sphere surround-sound technique that uses a dimensional approach to audio to mimic the way we hear in real life (360 sound)
Differentiation between VR headsets
6DOF VR (six degrees of freedom, as in walk around a virtual space) The six degrees of freedom: forward/back, up/down, left/right, yaw, pitch, roll

6DOF headsets will track orientation and position, the headsets knows where you are looking and also where you are in space. This is also referred to as roomscale or positional tracking. Minimum room specs – 2m x 2m cleared space (room to move around in the headset), trackers for the headset need to be wall mounted or on portable stands. The two main devices of 6DOF are the HTC VIVE and OCULUS RIFT.
There is also Playstation VR, but this requires a Playstation console rather than a PC to connect.
3DOF VR (three degrees of freedom) Stationary experience, can move head and see 360 degrees and standalone VR. 3DOF can track your head orientation, i.e., it knows where you are looking. The 3 axis are roll, yaw and pitch. Oculus Go is an example of this as an all-in-one virtual reality headset, no mobile phone or PC required to connect.
Mobile & Gear VR These are basically googles that hold a smart phone (like the Google Cardboard or Google Daydream) and have varying degrees of functions and controls.
More info: http://publiclibrariesonline.org/2016/02/virtual-reality-in-the-library-creating-a-new-experience/
Virtual Reality
Loanable Kits
State Library has kits of this item available for loan to libraries within the Regional Libraries Queensland and Indigenous Knowledge Centres network. Libraries can place a reservation through the Aurora catalogue (availability is subject to existing reservations, loans and associated return dates).
The kits are for use by patrons within the library only, as part of supervised library programming. They will not be listed in the public online catalogue for personal reservation.
Please contact Access Services, or phone 07 3842 9014 with any queries.
Kit 1 contains:
- Alienware laptop
- Vive Headset, 2 hand controllers, 2 light boxes with stands
- Google Pixel phones with Daydream headsets and hand controls
Kit 2 contains:
- Alienware laptop
- Vive Headset, 2 hand controllers, 2 light boxes with stands
More information is available on setting up and the applications included within these kits.
Usage Recommendations
- Virtual Reality is not recommended for children under 13 years. Older children should be supervised by an adult during use
- If users experience discomfort, disorientation, nausea, headaches and/or eye strain, use should cease immediately
- Playing areas should be at least 2 metres by 1.5 metres.
HTC Vive
Setup
If you would like a visual step by step, plus other hints and tips, watch the Vive – Set up Vive for Room-scale tutorial. The steps below outline a similar process.
1. Choose your playing area, making sure it is at least 2 metres by 1.5 metres.
2. Gather the Vive components within your kit.
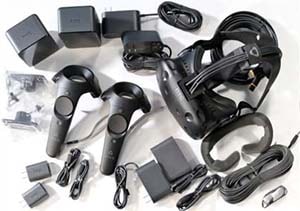
3. Install the 2 base stations on their stands, at opposite corners of your playing area, ensuring they have an unobstructed view of each other and no more than 5 metres apart. Connect their power supplies (with the right angle DC plugs) and power the units on. After booting they should display a green light and channel indicators. One station should display Channel B, one should display Channel C.
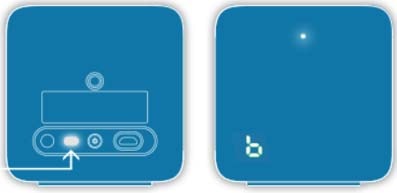
4. Grab your Vive hand controllers and ensure they are charged. Power up by pressing the lower button. When fully charged, you should see a green light. If the controllers are not charged, plug them into their respective USB chargers.

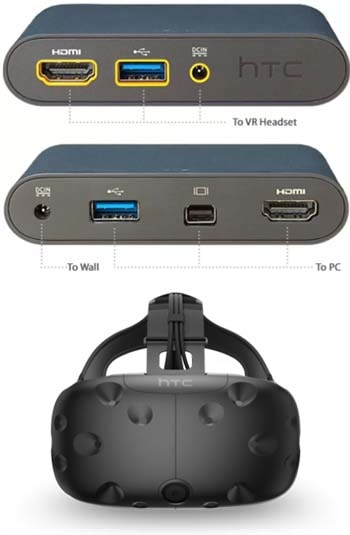
5. Grab the Vive headset and link box. You will notice that the link box has ports on both sides, with one side having ports marked in orange. Uncoil the headset cables gently and plug their corresponding cables into the orange side of the link box.
Plug one end of the additional supplied HDMI and USB cables into the corresponding ports on the other side of the link box, as well as its power supply (with straight DC plug).
Plug the other end of these HDMI and USB cables into the corresponding ports on the laptop. (HDMI port is at rear, USB is on left hand side.)
Power on the laptop.
6. Place your hand controllers and headset on the floor in the centre of your playing zone, in clear view of the base stations.
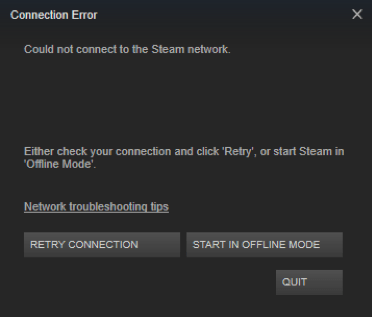
7. VR apps within this kit run through SteamVR. SteamVR can run either online (through your library wireless network) or offline. It is recommended that you do connect the laptop to your library wireless network to allow SteamVR updates to occur, however it is not a requirement to use the Vive kit.
Note : If you do run the laptop offline, a 'Connection error' will appear. Just select 'Start in offline mode'.
8. SteamVR should open automatically when the laptop is started. If for any reason it doesn’t, double click its icon from the desktop.
Note : Please allow any updates to complete before using the Vive kit.
![]()
9. Click the VR icon at very top right of the SteamVR window on the menu bar.

10. A small SteamVR status panel will open, showing the status of the various hardware components.
The 5 component icons should be green to reflect that they are connected, active and ready. If any of them are not, double check that they are all powered up (and fully charged in the case of the hand controllers). You may also need to raise one or all of them off the floor so that they are 'seen' by the base stations.

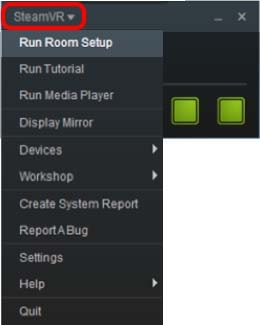
11. Click the SteamVR drop down in the top left corner of the SteamVR status panel.
Select 'Run Room Setup' (the top option in list)
Select 'Room-Scale'.
12. The wizard will take you through the following steps to calibrate the Vive for your paying area. Please follow the prompts to complete the following stages:
- Clear your space : will take you through the step of clearing and setting up your space, but It is recommended that you have your space selected and cleared before you get to this stage.
- Establish tracking : place hand controllers and head set in the middle of the space where they can be seen by the base stations. Ensure the icon for each is green. If an aren’t green, move or raise the location of each component until it registers.
- Locate your monitor : standing in the middle of the play area, point one of the controllers at your PC monitor, press and hold trigger until progress bar completes.
- Locate floor : place both controllers on the floor in centre of play area then click ‘calibrate floor’ button.
- Measure your space : click past explanation screen. Grab one hand controller. Hold down the trigger, then slowly walk the perimeter of your play area, holding the trigger throughout. Release trigger when completed. (You will feel the controller ‘ticking’ in your hand during the tracing process. The perimeter will also trace out onscreen.)
- Click ‘next’ on ‘Set your play area screen’. Your setup is complete! Click Done.
13. Return to the Steam home page and click on the 'Library' menu in the menu bar at top left.
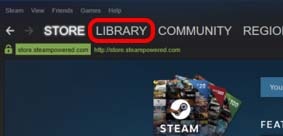
14. Select the VR app you would like to run and press the 'Play' button.
Tips
- The base stations should be no more than 5m apart.
- The boundaries of your play area are represented in the VR environment by blue ‘grid walls’. When one of these walls appears whilst moving in room-scale, stop moving as you will be about to reach the boundary of your play area (which could be a real wall!)
- Some experiences can be enjoyed seated (a revolving chair is recommended)
- You can press the controller power button at anytime whilst in a VR environment to reveal the SteamVR menu within the Vive headset viewer. Use the trigger to make selections. Otherwise, override control from the laptop. (This is probably preferable when hosting demos)
- Click top button on controller at any time to reveal options dial on virtual controller. Swipe across touchpad to scroll options. Select home if you wish to exit environment mode.
Beginner Apps
The Lab
The Lab is a great VR experience for those beginners who are looking to get a little more adventurous. As the name suggests The Lab has a laboratory setting, in which there are 8 ‘experiments’ to experience. This give the user the chance to play 8 different mini-games within the app. For the complete lost, look out for the white board once you get into the main lab environment listing the ‘open experiments’.
The Lab is quite interactive, so you will need to access the various controls on your hand controller for various functions:
• The large round touch pad enables you to teleport from place to place. (This is useful when you can’t move any further in room-scale because you have reached the boundary of your play area) • The trigger is used to pick up objects, scratch your robo-dog etc. • The top button is used primarily to exit mini-games.
Explore the lab area and move from experience to experience. Grab up the globe in front of each experience ‘display’, hold down the trigger and pull it to your face to enter the mini-game. To exit again, click the top button to reveal the globe and repeat the grabbing of the globe.
Explore each environment, experiment with seeing what you can pick up and interact with, and you will gradually get clues on what to do next. Experiences to be had range from defending a medieval castle with your longbow to robot repair in a futuristic workshop.
Tilt Brush
Google’s Tilt Brush allows the user to unleash their inner Picasso, but in a completely immersive way. You can draw in 3D and surround yourself in your creation. You can then either save it or wipe it away in an instant.
One of your hand controllers acts as a ‘picker’ tool, becoming a 4 sided panel, including a colour selection palette with paint selections, a brush selector where you can choose from options such as oil, ink, velvet and stars, a tool selector, where you can insert a straight edge, undo an action and select an environment for your drawing. There is also a Sketchbook panel which holds controls such as the trashcan symbol where you can clear your drawing.
Your ‘selection’ controller uses the trigger to select options from the colour and tool pickers on the other controller. The selection controller is also used to draw, again by holding the trigger.
Google Daydream
Setup
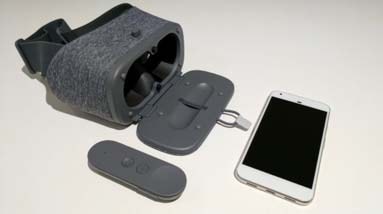
1. Gather your Google Daydream hardware: the headset, phone and controller (each phone and controller pair in the kit are colour coded for easy matching).
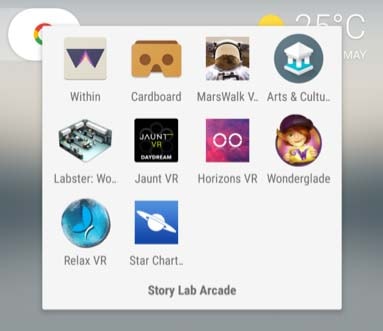
2. Power up the phone. Once at the start-up desktop you will see a single folder named ‘Story Lab Arcade’. This contains all the VR related apps installed on the phone.
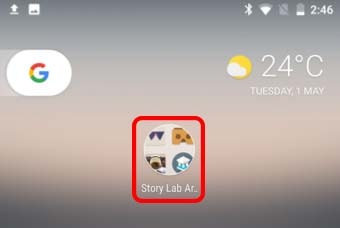
3. Once inside this folder, various apps are listed, as well as the ‘cardboard’ folder which contains s further selection. Tap the app you wish to experience.
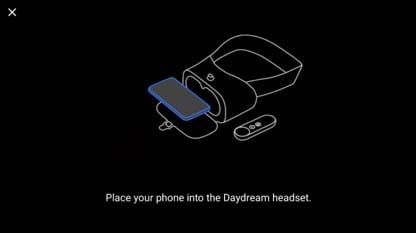
4. Most apps will prompt you to place your phone into 'Daydream headset'.
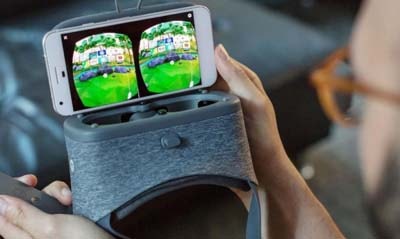
5. Otherwise, it will launch straight into the app, which will be obvious by the VR split screen which appears.
Insert the phone into the headset and secure the strap to the peg.
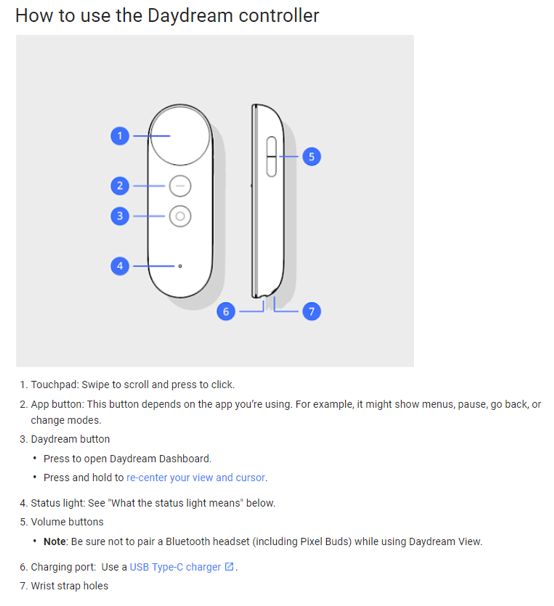
6. You will require your controller for most apps.
It should pair automatically with the phone. You will get an onscreen message when this is happening.
Button function will change between apps.
General functionality is indicated to the right. There will usually be onscreen prompts within the app to assist.
For more information on controller use, visit https://support.google.com/daydream/answer/7184597?hl=en
Resources
Posters
Usage Recommendations
- Virtual Reality is not recommended for children under 13 years. Older children should be supervised by an adult during use
- If users experience discomfort, disorientation, nausea, headaches and/or eye strain, use should cease immediately
- Playing areas should be at least 2 metres by 1.5 metres.