~~REVEAL~~
:workshops:prototypes:machine_learning:ideepcolor:ideepcolor_workshop_output_faded_75.jpg
Machine Learning 01 : Interactive Colourisation with ideepcolor

The purpose of this workshop series is to explore how Machine Learning (ML) can be used in the Digital Media Lab (DML) at the State Library of Queensland. In our first workshop we will be using ideepcolor, to interactively recolour some images from the State Library flickr photostream.
Summary
This workshop is a practical, hands-on demonstration of how computers can be used as “intelligent agents” to help us perform a task that otherwise would be difficult and time-consuming.
The workshop is not an introduction to coding or math, but we will give a of general overview of how ML is defined and where it is commonly used today.
We've chosen an approach that demonstrates the power and limitations of ML and leaves you with an understanding of how install an ML environment, along with ideas on how to use State Library resources to explore ML further.
Outcomes
- machine learning overview
- introduction to Xubuntu
- basic use of the command line
- introduction to Conda
- using State Library flikr photostream
- using ideepcolor
Getting started
Before we start, please make sure you are a State Library member - you will need your account details to log-on to the DML computers in future as well as access all the great resources available from lynda.com.
Background
Machine Learning(ML) is a subset of Artificial Intelligence (AI) which is is a fast moving field of computer science (CS). A good way to think about how these fields overlap is with a diagram.

Machine Learning - Why Now?
While many of the concepts are decades old, and the mathematical underpinnings have been around for centuries, the explosion in use and development of ML learning has been enabled by the creation and commercialisation of massively parallel processors. This specialised computer hardware most commonly found in Graphics Processing Units (GPUs) inside desktop and laptop computers and takes care of the display of 2D and 3D graphics. The same processing architecture that accelerates the rendering of 3D models onscreen is ideally suited to solve ML problems, resulting in specialised programming platforms, Application Programming Interfaces (APIs) and programming libraries for AI and ML.
Common Machine Learning Uses
One way to think of ML is as a recommendation system.
Based on input data (a lot of input data1))
- a machine learning system is trained
- a model is generated
- the model is used can make recommendations (is implimented) on new data.
:workshops:prototypes:machine_learning:ideepcolor:8725096366_d1fe677cc5_o.jpg
One extremely common application of this is image recognition.

:workshops:prototypes:machine_learning:ideepcolor:2020-02-21_14_19_57-8725096366_d1fe677cc5_o_fb.jpg
When facebook asks you to tag a photo with names, you are providing them with a nicely annotated data set for supervised learning. They can then use this data set to train a model than then recognises (makes a recommendation) about other photos with you or your friend in it.
Snapchat filters use image recognition to make a map of your features, then applies masks and transformations in real-time.

Deep Learning
Today we are going to go a little “deeper” inside ML, exploring deep learning. Deep learning used multiple layers of algorithms, in an artificial neural network, inspired by the way the human neural networks inside all of us.

Interactive Deep Colorization
Lets take a look at the subject of our first ML workshop Real-Time User-Guided Image Colorization with Learned Deep Priors (ideepcolor), by Richard Zhang, Jun-Yan Zhu, Phillip Isola, Xinyang Geng, Angela S. Lin, Tianhe Yu and Alexei A. Efros.
Here is a talk about the details of their paper.
I encourage you to watch the above talk in full….
but the TLDR version is that they have:
- trained a neural network on millions of images
- combined this with simulated human interaction
- produced a model that recommends an initial colourisation
- that takes user input to refine the colourisation.
The user input is provided through a Graphical User Interface (GUI), and the end result can be exported, along with information about how the model made its recommendations.
You can check out a video of the demo in action here.
Introduction to Linux
The majority of scientific computing and research is performed on Linux based operating systems. For this workshop, we need to use a few basic linux commands, for a more background on Linux you can check out our CCCLabs wiki.
The Xubuntu Operating System
Our workshop will run off a “live System” USB on the DML computers, which normally run Microsoft Windows 10. We will be using a particular flavor of linux called Xubuntu, and its already running on your DML machine. Your username and password is “edgeuser”. 2)
Xubuntu has a desktop environment which look similar to most of us, and many of the applications will also be familiar. During the workshop we will be using a combination of the command line inside a terminal application, and the Graphical User Interface (GUI).
The Command Line
To get started, lets do a quick intro to the command line. First open a terminal with ctrl+alt+T. You should see this:

Now and type the command
pwd
This means “print working directory” and will show you where you are in your file system - i.e. your current directory 3).

You are inside the edgeuser directory, which is inside the home directory.
Now type
ls
This will list the contents of your current directory.

Next lets open a folder within our desktop environment, to compare with our terminal output. Double click on the “home” folder on your desktop.
Move the folder over so you can see your terminal. Compare the output of the ls command with the contents of your home folder. They will be the same.
Now in your terminal, lets create a new directory with the “make directory” command
mkdir test
Notice how your home folder updates straight away with the new directory?

Lets try a few more commands. starting with the change directory command (cd). Type
cd ideepcolor
This changes us into the ideepcolor directory, which contains all the files we need for the workshop ,which we've already downloaded from the ideepcolor github.
Now we will use the list command again, but with two options.
ls -Al

Conda
Now its time to enter our deep learning environment, created using the Conda package manager.
Once inside this environment we will be able to launch the ideepcolor GUI that we saw in the demo.
Conda Package Manager
As the name suggests, package managers deal with packages, collections of files that are bundled together and can be installed and removed as a group. It is usually used from the command line.
Conda Environment Manager
A Conda environment is a directory that contains a specific collection of python packages that you have installed using the Conda package manager.
Lets try a few Conda commands.
conda env list

This shows us all the Conda environments we have, and where they are installed.
Lets activate our ideepcolor environment - its called ideepcolor2 5) with
conda activate ideepcolor2

You should see (ideepcolor2) in front of your prompt now.
Python
Its time to start up the GUI for ideepcolor, which is a one line python command.
Python files end with “.py” and the one we want to use is called “ideepcolor.py” and is inside the ideepcolor directory. First up make sure your are in the correct directory - check out your command prompt. You should see

Our command has three parts :
python(runs python)ideepcolor.py(the name of the file we want to execute with python)--backend=pytorch(the option to use the pytorch implementation of ideepcolor)
Put it all together
python ideepcolor.py --backend=pytorch
And your should get a whole bunch of output

And bingo! The ipython GUI pops up

The ideepcolor GUI
Lets go through the instructions provided by the research team:


- Adding points: Left-click somewhere on the input pad
- Moving points: Left-click and hold on a point on the input pad, drag to desired location, and let go
- Removing points: Right-click on a point on the input pad
- Changing point size: Mouse wheel changes the patch size from 1×1 to 9×9
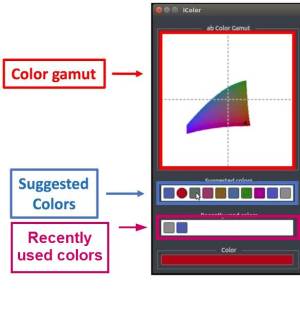
Changing colours: For currently selected point
- choose a suggested colour (middle-left)
- choose a color on the ab colour gamut (top-left)
- Choose a recently used colour (bottom-left)
- Load image: Click the load image button and choose desired image
- Restart: Click on the restart button. All points on the pad will be removed.
- Save result: Click on the save button. This will save the resulting colorization in a directory where the image_file was, along with the user input ab values.
- Quit: Click on the quit button.
Tips on Interaction
- The GUI can be slow to update - check the terminal for some feedback on what ideepcolor is doing in the background
- The gamut is limited to a recommended colour range. Grab a recently used color if you want a fresh colour for a new point
- Always check out the first (leftmost) suggestion when adding a new point
- There is no zoom - so to work at higher resolution increase use the
--win_sizeoption - Toggle of the gray button and just use the left image if you want a really big image.
State Library Flickr
Now its finally time to find an image to work with! Jump on the State Library of Queensland Flickr albums and have a browse. When chosing an image, there is a few things to avoid in images:
These artifacts will “confuse” the ideepcolor model, resulting in less useful automatic colourisation, requiring lots of user input.
")
- scratches and other damage
- out of focus features
- washed out areas
Results
Below is a the results from a five minute session of deep colouring. With the initial image on the left.

What is going on?
When we save from the GUI - we get a folder that contains an input image like the one below - with the user input points marked.

Lets have a closer look at user inputs. I spent the most time around the eyes - the coloured squares indicate my input.

The only other points added are for the hair.

Also saved is the final output image.

While there a number of areas that could be improved on - specifically the bleed of blue around the left eye, and the strangely light right ear, for a five minute attempt the results are impressive.
Going Further
ML is such a big and fast moving area of research there are countless other ways to explore and learn, here are a few two-minute videos to pique your interest:
Make sure you check out the resources in Lynda, which you will have free access to as a State Library of Queensland member
https://www.lynda.com/learning-paths/IT/become-a-machine-learning-specialist
And apply to book some time on the Production PC (make sure you mention machine learning in your applications) in the DML.
If you want to fully install ideepcolor on your own computer, check out the brief installation guide.
Resources
Example exports from ideepcolor in the workshop.
Success One, Fail One, Success Two (comparison with photoshop)
Zipped photographs of ANZAC day.
Zipped outputs from ANZAC day. anzac_coloured.zip