Steampunk LED

This is a small manually powered gear-driven generator made from ply and acrylic, with a Joule thief circuit.
This kit requires no tools, glue or soldering. It takes 60 - 90 minutes to build.
A pdf with illustrated step by step instructions is included for use by a facilitator.
It is also a really cheap kit (current estimates have it less than A$3.00 in materials, not including laser cutting time).
Project developed by Daniel Flood and Peter Musk for the Independent Schools Queensland Makerspace Roadshow, and delivered at six locations across Queensland between April and September, 2016.
The target audience was P - 12 teachers with little or no experience with technologies, though the activity has been successfully completed by 12yr olds and in one case a 6yr old girl (with some grudgingly accepted assistance from her father).
Summary
Science
This device is an energy converter that takes kinetic energy as an input, and produces electrical energy, and subsequently light.
Using a large gear to drive the small cog attached to the generator increases the rpm to a point where the output voltage is useful. The motor used can act as a generator because it contains permanent magnets set around coils of conductive wire which are attached to the shaft of the motor. When the shaft spins, these coils are moved through a magnetic field and a voltage is induced in the wire, available through the black and red tails on the motor/generator.
Turning this available energy into something useful is due to the Joule Thief circuit, and in particular the toroid. In simple terms, as energy moves through the wire wrapped around the ferrite toroid, a magnetic field is induced in the toroid, which rapidly collapses as the transistor reaches a threshold voltage and switches on. The collapsing magnetic field induces a spike of higher voltage energy in the secondary toroid wire, which is directed through the LED and causes it to glow if the threshold is reached. As this occurs, the transistor is turned off, and the entire cycle begins again. Because this happens very rapidly (about 200,000 times a second, depending on the specific characteristics of the resistor and transistor), our eyes see a continuous light rather than a flicker.
A useful analogy is to recall how clamping and then releasing a garden hose can cause a trickle of water to gush forth, though only for a moment. The Joule Thief achieves this effect repeatedly, and much faster by using well designed electronic circuitry. For a more detailed explanation (and examples of many variants and applications) - see References below, and find the 'Joule Thief' link in the sidebar.
Educational Applications
This activity involves several aspects that could be used to stimulate learning about basic scientfic and technology concepts:
- Simple machines: The gears used have a ratio chosen to produce sufficient rpm in the motor/generator to make it work. Redesign of the gears (trying some other ratios) could be an investigation linking maths, machines and energy. The gears were generated using a freeware program (geargenerator.com - see link in References below)) that exported an svg file capable of being imported into graphics software for editing.
- Simple circuits: Although the Joule thief circuit includes some electronic components, it is still a model for a simple circuit. Concepts of resistance, short circuits and polarity could be explored.
- Motors and generators: this project uses a motor as a generator, and explaining this can be a practical introduction to motor theory.
- Electronics: This activity gives an opportunity to discuss how LEDS and transistors work (particularly as their orientation is critical for success). The science behind Joule Thief operation (involving oscillating magnetic fields induced in the toroid) is more complex, and maybe more suitable to physics students.
- Design and Technology: A functioning device can be considered the starting point for further design challenges - the large gear protrudes over the edge of the chassis, and students could develop other ways of turning it than using their fingers. Could it work attached to a wind generator? a bicycle? a water wheel? And where else could a Joule Thief circuit be used to make small constant trickles of electrical energy do something useful? (in fact, they can be used to charge a phone from a 'dead' battery, or to charge a garden light from a small solar cell, for example).
For facilitators
A version of the instructions that follow for use during workshops is here (note that some modifications have been made since this was produced):
Files to make your own are here:
For Participants
A visual instruction sheet suitable for insertion in the MakeIt version of this activity has been developed: makeit_steampunk_insert_a4.pdf
Materials
Body:
- 4 x M3 30mm Philips drive pan head machine screws
- 1 x M3 12mm Philips drive pan head machine screws
- 9 x M3 nuts
- 1 Mabuchi RF 300 EA low rpm DC motor, with 7-10mm bared and tinned tails
laser cut from steampunk_led_body_cutfiles_v2.zip steampunk_led_extra_parts_v2.zip
- 1 each of top, middle and bottom plates (4mm ply)
- 1 set of 12 spacers (4mm ply) - included in top plate design
- 1 small wooden gear (6mm ply)
- 1 large acrylic gear (3mm acrylic)
- 1 M3 hex nut spanner (4mm ply) - included in middle plate design
- 2 motor supports (4mm ply) - included in top plate design
Joule Thief circuit:
- 1 red, green or yellow long leg, low power LED
- 1 NPN transistor (3904 or equivalent)
- 1 1K resistor
- 1 toroid (OD: 12mm, ID: 6mm)
- 17cm Figure 8 (paired) speaker wire (14/0.14 gauge), with 7-10mm bared ends
laser cut from steampunk_led_circuit_v3.zip
- 1 printed Joule thief circuit diagram, on 0.6mm polypropylene backing
Tools
This activity was designed to require no tools for participants.
Facilitators may find having a couple of Philips head screwdrivers and some wire strippers on hand will assist in dealing with emergent difficulties.
An LED test rig (consisting of an LED with alligator clips attached) can help troubleshooting the Joule Thief circuit.
Instructions
Step One: Building the backbone
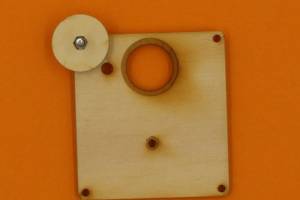
Begin by assembling the Top plate - the bits you will need look like this:

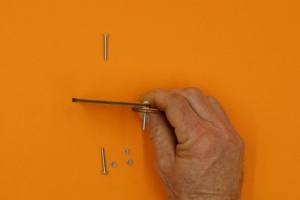
Take out the four long screws - these go in the corner holes as shown.
Make sure the plate looks like the image, with the top uppermost (you can tell the bottom of this plate because it has some etching on it) . The screws must go in from the top.


Thread a nut onto each screw as you insert it, and this will prevent things from falling out when you move the plate.
You can use the wooden spanner provided to tighten the nuts.

Step Two: Getting the first cog ready
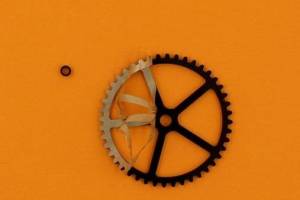
When you have got the corner screws in place, stand the plate face-up again, and find the large acrylic cog.
This cog has a small spacer in the center, which you will need later, but you can push out the waste pieces from between the spokes.
If you twist them as shown, there is less chance of breaking the cog (but be careful).


Now you can push out the spacer, and peel the protective paper from all the bits.

Step Three: Attaching the first cog
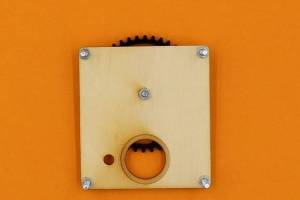
Find the short screw, and slip the little spacer on to it. Then push the screw through the hole in the middle of the big cog.


Now insert the screw (with the cog attached) though the smallest hole on the top plate.
Thread a nut on from underneath, and tighten with your wooden spanner.
Give the cog a spin to make sure it is moving freely.

Step Four: Get the Middle plate ready
Locate the middle plate (it has the rectangular hole), and the packet of circuit parts. When you open the parts packet, these are the bits you need for now:


Take up the LED, and you should see that one leg is longer than the other.
LEDs only work when electricity flows through them in the right direction, and the different legs help you to insert the LED correctly (the long leg is the positive terminal).

The LED legs go through the two smallest holes on the middle board, and the long leg hole is marked with an “L”.
Push the LED legs through, then bend them apart a bit on the back to stop it falling out.


Step Five: Winding the toroid
The ring shaped object in your kit is actually a magnet, called a toroid. To make it work in this circuit, it needs to have two strands of wire wrapped around it.
Using paired wire makes it easy to avoid having overlapping wires, which would stop it from working.
First, cut a length of paired wire about 210mm long. It is easiest to strip both ends of the wires at this stage, but this can also be done later.
To start the winding, thread the toroid onto the wire, about 3cm from one end, and bend the wire around as shown below:


Now take the long end of the wire, while keeping hold of the toroid with your other hand, and loop the wire back through the centre of the toroid.
Then, pull the wire tight.


Continue threading the wire through, until there are 4 or 5 loops around the toroid. More loops actually reduces the effectiveness of this device, and it will still work with 4.


When you have finished the loops, you can trim the ends of the wire to about 3cm if necessary (scissors will work).


If it has not been done for you, separate the protruding wires (use a knife or cutters, or just pull them apart with your fingers).
Do this on both ends.


If the ends of the wires have not been stripped, do it now. Look closely and you will see one wire has a black stripe, while the other is all white (or grey).
Take a plain wire from one side of the wound toroid, and a black striped wire from the OTHER side, and twist them together.
You end up with this:

Step Six: make the Joule thief circuit
The coloured circuit diagram has holes to take the parts of the circuit (you can push out any hanging chads with a pen).
Start with the transistor
The transistor is the small black thing with 3 legs. It goes in the blue holes.
Like the LED, the transistor only works when it is attached in the right orientation. If you pick it up, you will feel that it has a flat side, and a curved side (just like the blue diagram).
Insert the transistor so the curved side matches the blue picture (you might need to separate the legs a bit first).
In the picture below, this means the curved side is at the top, and the flat side faces the toroid.


Push the transistor down so it is close to the surface of the circuit board, and bend the legs apart at the back to hold it in place.
Then add a resistor
Now find the resistor - this only has two legs, and it works which ever way you put it in. Resistors can be brown or blue, and have stripes.
Bend the legs a bit, and insert them through the brown holes. Push it down onto the board, too.


When you look at the back of the circuit board, two wires are now adjacent: the middle one from the transistor and one from the resistor.
Twist these wires together as close to the board as possible. Then fold the twisted pair over and make sure they do not touch any other wires.

Now add the wound toroid
The printed circuit has a place for the toroid, outlined in green. take the plain single wire, and push the end through the hole at the end of the outlined green line.


Look on the back, and you will see this wire is beside the other leg of the resistor. Twist these two together.


The striped single wire from the toroid follows the solid green line, and pushes through next to a transistor leg.
Insert the striped wire, and twist these two together (bend them away so nothing is touching).


The joined toroid wires go through the hole at the bottom on the diagram, and can hang free until the next step.

Step Seven: Hooking up the motor
Locate the motor supplied, and the packet of small wooden bits. Open the packet, and find the small wooden cog.


Push the wooden cog firmly on to the motor shaft (it has to be a tight fit).


Take the black motor wire through the hole at the end of the black line on the circuit.
It comes through next to the joined toroid wires, and you can twist all these together.
(The cog is missing from the following images, but should already be on your motor)


Now take the red wire on the motor, and push it through the hole at the end of the red line on the circuit.
Twist it together with the other transistor leg that it is next to.


Step Eight: Attaching the Joule Thief to the Middle plate
The LED you put into the middle plate now needs to be hooked into the Joule Thief circuit (and this is a bit fiddly).
The two LED legs go through the orange holes on the circuit, with the long leg going through the hole marked “long”.
It helps to straighten the LED legs a bit first, and then you have to guide both legs through their respective holes at the same time.


As you can see, the motor fits into the round hole, and the toroid will fit into the rectangular hole when everything is in place.
The LED legs come through next to pairs of twisted wires on either side of the circuit, and each leg is twisted onto the adjacent pair.
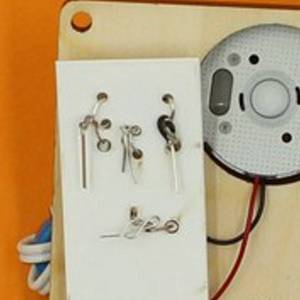
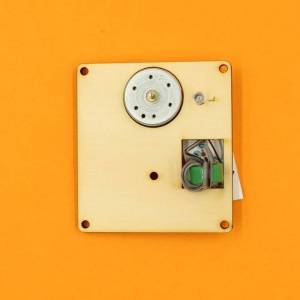
Make sure that none of the twisted wires are touching another lot of twisted wires, and test your circuit by giving the cog on the motor a sharp spin (anticlockwise).
The LED should flick on, but if it does not, try spinning the cog in the other direction (remember: the LED only works with current flowing in one direction).
A sharp spin can best be made by grasping the cog tightly between thumb and middle finger, and then snapping your fingers.
troubleshooting
If the LED still does not light up, check that there are no loose wires, and that nothing is touching where it shouldn't.
Most times, poorly twisted wires are the problem, but sometimes the transistor or LED may be inserted back to front.
It is not recommended to twist the wires with pliers since the wires may break (especially the transistor legs). Use great care if disassembly is required.
Do not go further if you can't get the LED to glow - it is hard to solve circuit problems once everything is assembled.
Step Nine: attaching the middle plate

Turn the top plate upside down, and mount the middle plate onto the corner screws, making sure the small cog engages with the large cog.
There is a 5mm hole in the top plate to take the protruding LED.
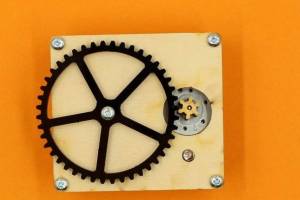
In the packet of wooden bits, there should be 12 small tubular spacers (you might have to pop them out of their carrier first). Put three spacers onto each screw (even though only two per leg are shown).


Step Ten: Attach the bottom plate
Find the bottom plate, and also the two circular wooden motor supports from the pack of wooden bits.
Place the motor supports so the holes in these pieces sit over the bump on the bottom of the motor.


Without dislodging the motor supports, guide the bottom plate onto the corner screws.


You may need to press down firmly on the bottom plate to attach nuts to the corner screws (pressure also helps keep the motor support in place).
Use the wooden spanner to tighten the nuts.
Assembly is finished, and spinning the large cog in the correct direction (clockwise) with your finger should make the LED glow.


Production notes
Instructions
The line drawing instructions were prepared by tracing from some of the images in this wiki. Editable (Adobe Illustrator) files for future development are here: steampunk_instructions.zip
Laser cutting the chassis boards
We used 4mm and 6mm interior grade AA Hoop Pine ply, which has a non-formaldehyde glue to reduce soot and stickiness.
On a Trotec Rayjet CO2 laser the following settings were used:
| Power | Speed | |
|---|---|---|
| Cut | 85% | 2% |
| Etch | 80% | 90% |
The design files below contain additional templates to cut extra spacers and motor supports if these are required (having a few spares can be useful).
If design modifications are necessary, the cutfiles are here in Adobe Illustrator format:steampunk_led_cutfiles_v2_ai_versions.zip
Making the circuit boards
To make the circuit boards, we first printed the pdf in the cutfiles in colour on an A4 sticker. The design has a rectangular border which is used for registration.
After fixing the A4 sticker onto a sheet of 0.6mm polypropylene, a sharp knife was used to trim along the black border lines so the top left hand corner can be placed flush with the origin on the laser bed (To find the top left, hold the printed sheet so the clusters of holes in each circuit are on your right - the toroid is to the left).
With the material in place, the Holes (registered) cutfile was used to cut the holes to allow insertion of circuit elements, and also cut the sheet into individual circuits. This cutfile has a rectangular border which should be placed 5mm in from top and side of your laser bed template for the registration to be effective - then start cutting from the machine origin.
The files below contain pdf, and cutfiles to make the circuit boards.
Using the Trotec Rayjet laser cutter, settings were Power:30%, Speed: 2%.
Preparing Circuit components
Motors
Initial prototyping used motors recovered from DVD tray drives. Subsequently, equivalents were sourced (see parts list below).
Motors were supplied with very thin connecting wires, with short bared ends. For participants to be able to twist the motor's wires into the circuit, each motor had these ends stripped to about 1cm, and tinned manually.
Some batches of motors had 6mm long shafts, and later batches had 4mm shafts. This is why the 6mm small cog was used - this thickness ensures the small cog will engage with the acrylic cog regardless of shaft length.
Suggestions have been made that using a motor rated for a higher voltage might make the device more efficient (ie: able to work at lower rpm), but this has not been investigated.
Toroids
The toroids were intially wound by hand using recycled CAT5 wire. This used smaller, cheaper toroids (OD: 10, ID 5), but was a very labour intensive process (the twisted CAT5 wire had to be untwisted before use, and crossing over of the wires was a problem). The advantage of using this type of wire is that it is solid core, which makes twisting easier.
As the workshop became more efficient, it was decided that having participants wind their own toroids was a better option, and using figure-8 paired wire is a way to reduce the problem of crossed wires. Smaller gauges were tried, but the very fine stranded core was difficult to twist, and more tinning added too much prep labour. Using the specified gauge seems to work, and participants have no trouble winding a toroid in a few minutes.
The required toroid ID will depend on the thickness of wire available, so if another gauge is chosen, check that 4-5 loops can fit your toroid before proceeding.
LEDs
Even with the Joule thief circuit, this device produces a very low voltage, which is why only red, green or yellow LEDs are recommended. Flashing or super-bright LEDs will not work, and blue or white are problematic.
LEDs must have long legs (20mm or more) to fit into the design - take care to specify this when purchasing, because cheaper LEDs often have short legs (10-15mm), and these will not reach.
LEDs with clear caps (rather than tinted) seem to be brighter, and provide an element of surprise when the device first functions.
Bill of materials and suppliers
This file contains a list of kit components, pricing and sources as of Nov 2016.
Dry gullies, dead ends and future tweaks
Plywood designs
A lot of trouble was experienced initially with participants mis-orienting the top and middle boards - there was no clear indication of which way was up for the middle board when the LED location was a single 5mm hole. By changing the LED mount to two 1.5mm holes, and adding the engraved 'L', it was possible to force the correct orientation (when the 'L' is visible, the board is the correct way round for assembly).
The engraving around the hole for the 12mm screw (which holds the big gear in place) is designed to act as a subtle nut trap, in order to prevent this screw from coming loose during use. This works intermittently, and there may be a case for using a 10mm screw in place of the 12mm one in the kit - this length better matches the actual distance implied by the design. It is recommended to encourage participants to tighten the final nuts firmly, as this will tend to push the 12mm screw into the surface of the middle board, and hold it in place better.
Laser cutting these plywood pieces takes a considerable time - billed at $60 per hour, this adds almost another $1.50 (50%) to the total cost of the kit. Commercial laser cutting would be even more expensive. Bulk production could benefit from making these boards from some alternative non-conductive material (perhaps by injection moulding), but the set up costs require much larger production runs to make this viable.
The 6mm ply small cog can be fragile, and prone to wear. It persists because a tight press fit is required to avoid using glue, and the compressability of wood allows this.. The hole size might need tweaking if you cut your own, depending on the kerf of your machine. As seen from the design files, this version uses a 1.75mm hole (not including kerf) to fit the 2mm motor shaft.
Circuitry
Winding the toroids took a few approaches to optimize. We tried using press connectors (the guillotine type used in telecommunications splicing - UY2 Y2 lock joint butt connectors), coupled with a short piece of CAT5 wire with a bared end. This approach gave an end with solid core, easy-to-twist copper, but while it worked on the bench, only 50% success was observed during a workshop trial. This approach was rejected in favour of the current design, which has 95% success in inexperienced hands.
Initially the circuit design was monochrome (with the goal of it being etched rather than being printed), and this proved hard for participants to interpret. Once a colour coded version was introduced, following instructions to assemble the circuit became much easier.
Many variants on the Joule thief circuit are available, and many were tried. No obvious gains in efficiency were observed, and this design was chosen because it is the easiest to draw in a clear diagram (less cross-over of wires and minimum components are the key).
Original designs resulted in a winding mechanism whereby the large gear turned anticlockwise, which led to a loosening of the screw holding it in place. This was resolved in the current version, by reversing where the the motor wires attached to the circuit.
Using hand tools
In some cases, participants have used pliers to tighten the twists. This often causes barely visible breakage (particularly of the transistor legs), and is not recommended. Emphasizing that the twist should be as close to the surface of the board as possible is a better way to get a tight join.
Critical Success Factors
Which of the critical success factors does this project target? For more details see SLQ-Strategic-Plan-2016-20
Enable Access
- [✓ peter, 2016-11-18]Provide life skills and early childhood literacy programs
- Increase free access to digital content
- [✓ peter, 2016-11-18]Strengthen Queensland library infrastructure and discovery platforms
Engage Community
- Grow the State’s historical collection of Queensland culture and heritage
- [✓ peter, 2016-11-18]Engage with communities of interest through dedicated centres of engagement
- Facilitate the community’s use of and interaction with content
Build Capability
- [✓ peter, 2016-11-18] Build capacity within our communities of interest
- [✓ peter, 2016-11-18]Generate new revenue sources
- Position our workforce for the future
Delivering of The Edge Promises
Aside from the SLQ Strategic Plan, there is The Edge's commitments to the community and the lens we look at it through.
This empowers creative experimentation across...
- Art?
- [✓ peter, 2016-11-18]Science?
- [✓ peter, 2016-11-18]Technology?
- Enterprise?
It will inspire...
- [✓ peter, 2016-11-18]Whimsy?
- Nostalgia?
- [✓ peter, 2016-11-18]Curiosity?
- [✓ peter, 2016-11-18]Awe?
Feedback
Kit had dropped holes from the laser cutter.
LED were short legs - hard to twist.
References
Joule Thief examples and theory: http://www.talkingelectronics.com/te_interactive_index.html
Gear generator software (runs in browser): http://geargenerator.com/#200,200,100,6,1,0,0,4,1,8,2,4,27,-90,0,0,16,4,4,27,-60,1,1,12,1,12,20,-60,2,0,60,5,12,20,0,0,0,2,-563
Another example: LED generator

