Arduino Create
![]()
This page will show how to setup the Arduino web editor with your Arduino micro-controller on (almost) any computer. This page includes instructions for both Windows 10 and macOS.
Arduino released a web-based IDE (Integrated Development Environment) that doesn't require you to download the desktop IDE and allows you to save your projects in the cloud.
We will be demonstrating this using an unofficial Arduino Nano v3 (not v3.3) purchased from China. It uses the cheaper CH340 (USB to Serial) chip and will require different settings than a genuine Arduino. Once the the IDE is setup both genuine and cheap Nanos work the same. Most of these instructions will work with other Arduino's as well.
You can tell if you have a genuine Arduino by looking at the colour, the PCB should be a nice teal colour. Cheaper brands commonly have blue PCBs.
Connecting the Arduino (macOS)
Plug the Arduino into any available USB port on your computer, make sure the LED(s) on your board turn on.
This step is not necessary but makes sure our USB port is working and that the Arduino is connected. You can skip to Arduino Create Plugin if you're feeling confident.
Let's launch the quick access bar and type the following and press Enter/Return
Command + Space
Terminal
Type the following command, followed by Enter/Return to execute. This will list all the usb/serial devices currently connected to your computer
ls /dev/cu*
If you've got the Arduino connected when running the above command you should see something like this:
cu.usbserial-xxxx
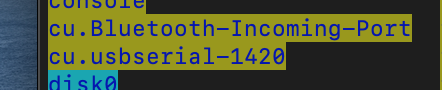
The usbserial is the important thing. To make sure this is the right device you can unplug the Arduino, and use the ls command to list all the devices again. If it doesn't show up: Bingo, that's your Arduino!
If you are using OSX High Sierra or earlier you and the above step didn't work you will need to download and install the serial usb drivers for your computer. This should not be required if you are using Mojave or later.
Connecting the Arduino (Windows 10)
Plug the Arduino into any available USB port on your computer, make sure the LED(s) on your board turn on.
Press the start button and type in Device Manager, press enter or click on the Device Manager application that shows up in the menu.

Under the Ports (COM & LPT) section you should find the device with the name USB-SERIAL CH340 (COMXX).
The COM followed by a number is which USB port you're using. This will be helpful when finding the device in the Arduino IDE.

Once this is done we know that the Arduino is working and that our computer recognises it. This can save a lot of troubleshooting later on if something doesn't work.
Arduino Create Plugin
You will need to download and install a plugin on your computer that allows the browser to talk to the Arduino.
Go to https://create.arduino.cc
Click on Getting Started, once on the page scroll all the way to the bottom where you will see the following, click the Arduino Create Plugin to download the plugin.

Follow the instructions on screen, once the file has downloaded run the file (ArduinoCreateAgent…exe) and install it. Once you've completed this step, go back to the website, and it should look something like this (You might need to hit the refresh button):

Sign up for an account
If you just completed the previous step you can just click the Go to web editor button, otherwise go to https://create.arduino.cc/editor.
You will most likely be prompted to sign in, if you don't have an account make sure you signup for one now.

Setting up the board
If it's your first time using the web editor you will be prompted to take a tour, this can be helpful.
We'll need to setup our board before we can upload any code/sketches to our device, at the top you'll see a drop down menu. Once clicked any Arduino boards connected will appear in the list on the COM-port that we identified in the Device Manager in a previous step. Click Change.

For macOS users it will look more like this:

In the search field on the left under BOARDS make sure you select the regular Arduino Nano (there are other variations). The COM PORT should already be correct, if it isn't you can change it to what was displayed in the Device Manager. Finally we need to select the FLAVOURS, select ATmega328P (Old Bootloader). Our particular board uses the old bootloader variant. Press OK once all these settings are correct.

Uploading a sketch and testing your Arduino
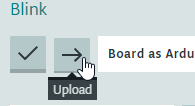
We will now make sure that everything works. We'll be using one of the example sketches available. On the left hand side click on Examples → 01. Basics → Blink. This will open the project/sketch in the main editor window.

All we need to do now is to Upload the sketch to our board by clicking the Upload button (Arrow).
If successful, the light on your Arduino should blink (1 second on, 1 second off). You will also see the teal bar at the bottom with the following message:

If this worked for you: Congratulations! You may now create your own sketches, find other's and experiment. If you're having any issues please check the Troubleshooting section below.
What's next?
To learn about the library and the code go to the Desktop Oddity (online) wiki page.
Troubleshooting
The first thing to do is go back and do the first few steps to make sure that all the previous steps have worked. If your Arduino's lights turns on when you connect and you successfully installed the Arduino Create Plugin connecting to Arduino Web should work!
Nothing is happening when I plug my Arduino to the computer
- Plug the Arduino into your computer's USB port. Avoid using USB hub. One or two light should blink for a few seconds, the lights are usually green and/or red.
- If this doesn't work make sure you try a different USB port, a USB wall plug or another computer.
- If your Arduino still doesn't work, it's most likely broken. Try getting a refund or asking for a replacement one.
- If you've ordered the Arduino from AliExpress or similar, there is a chance you will get a dud or two.
Arduino Web won't detect my Arduino
- Follow the steps in the Connecting the Arduino for your specific operating system, amke sure your OS can see it. If not
- If this fails, make sure you have the latest version of Windows 10 or macOS (currently Catalina)
- Redo the Arduino Create Plugin section, if you have it installed correctly it the page should be able to detect it
- Make sure you are using the latest version of Mozilla Firefox or Google Chrome as the plugin probably won't work in other browsers (Opera, Microsoft Edge)
My computer detects the Arduino and I've successfully installed the plugin but it still doesn't work
- It should work! You might want to download the Arduino client (Available for macOS, Windows and Linux) and see if it works there. Go to our Deskduino v2 page for instructions on how to download and setup the Arduino IDE on your machine.
- Issues could be caused by older drivers and Arduino installations, make sure you uninstall older versions.