The Rayjet 300, supplied by Trotec1) is suitable for laser engraving and cutting of wood, plastics, leather, paper and many other materials. The materials we use in-house are ply, acrylic, polypropelene and paper.
Rayjet 300 Laser Cutter
| TROTEC RAYJET 300 LASER CUTTER | |
|---|---|
| Inductions required | General induction, Laser cutter induction |
| Bookings | Required |
| Machine type | 80W CO2 (Educational version) |
| Commissioned | 2015 |
| Max. workpiece height | 200 mm |
| Machine size (W x D x H) | 1090 x 890 x 590 mm |
| Weight | approx. 135 kgs |
| Technical Requirements | PC, power supply with 110-240 V |
| Max. dimensions | 735mmx435, 6.5mm (material thickness) |
| Cutting Materials | Plastics (acrylic, polypropylene, polyoxymethylene), Timber, Carboard, Paper, Leather, Textiles |
| Approved materials only. Seek approval from FL Supervisor to use alternate materials prior to booking. | |
| Available materials | Various materials are available to purchase in the Fabrication Lab Shop |
| Job Layout & File Input | Design files are imported via USB Drive and must be of vector file format supported by Corel Draw (.svg, .cdr, .ai, etc.) in RGB. |
The Rayjet 300 is an education version of the Speedy 300. It is difficult to find a direct comparison in the literature but anecdotal research 2) yields:
- Speedy 300 is faster
- Speedy 300, 360 & 400 Can have a 'harsh environment kit' fitted - meaning a more sealed in cutting area.
- Speedy 300 uses JobControl - Rayjet 300 used Rayet Minimanager
Other than these points they appear to be functionally and physically very similar. The biggest issue with the Rayjet is the lack of Job Control software, which requires the laser be addressed as a printer.
Trotec Recommended Laser Material
Materials recommended for cutting/ etching on Trotec Rayjet Laser
| Material | Abbreviation | Trade name | ||
| Acrylics | ||||
| Poly(methyl methacrylate) | PMMA | Plexiglas®, Perspex® Altuglas® | Acrylite® | |
| Plastics | ||||
| Polyamide | PA | Nylon® | ||
| Polyoxymethylene | POM | Delrin® | ||
| Polyester | PES | Thermolite®, Polarguard® | ||
| Polyethylene terephthalate | PET | Mylar® | ||
| Polyimide | PI | Kapton® | ||
| Polystyrene | PS | |||
| Polymethyl-methacrylate | PMMA | Plexiglas® | ||
| Polycarbonate | PC | Lexan®, Makrolon® | ||
| Polypropylene | PP | |||
| Acrylonitrile butadiene styrene co-polymerisate | ABS | |||
| Polyethylene | PE | |||
| Polyurethane | PUR | Neopren® | ||
| Other Materials | ||||
| Glass (etching only) | ||||
| Natural & some synthetic Leather | ||||
| Metals (etching only) Including - Aluminium, Carbide, Coated metals, Cobalt, Gold, Silver, Steel, Chrome, Copper, Platinum, Tin, Brass, Zinc, Titanium & Eloxal. | ||||
| Paper & Cardboard | ||||
| Rubbers | ||||
| Natural and some synthetic rubbers, Microporous foam and Silicone Rubber | ||||
| Natural stone - Granite Ceramic Marble Slate Pebble | ||||
| Textiles - Polyester, Lace, Fleece, Silk, Cotton, Felt, Aramid, Synthetic & technical textiles | ||||
| Wood and timber – Veneers , solid timbers, balsa and some MDF and Plywoods |
http://www.troteclaser.com/en-US/Materials/Pages/Material-Overview.aspx on 9 May 2016.
Workflow Options
Order of Operations
The general order of operations is:
- Export design as PDF and DXF (if using another program)
- In CorelDraw, create new document using The Edge Standard or grab the template
- Import your design into CorelDraw (or create a new design)
- Check palette and colour settings (i.e. RGB)
- Convert all shapes to curves and group where appropriate
- Save Document
- Print from CorelDraw
- adjust print preferences in Rayjet Commander
- In mini manager
- Send job to laser
- Start cut from laser
For more detailed instructions, refer to The Edge laser cutter induction 3). Use The Edge Corel Draw settings.
CorelDraw
Why Use CorelDraw?
Trotec recommends the use of CorelDraw to design and/or as a final pre-cut check for the Rayjet. CorelDraw is popular in signwriting and laser cutter shops. This is the most common workflow in use at The Edge, and the only one available to new users. CorelDraw is available on the LaserCutter-PC and the Fabrication Lab laptops.
Importing Files in CorelDraw - Common Errors
The most common errors when importing external files into CorelDraw are; <datatables info=“false” paging=“false”>
| Problem | Solution |
|---|---|
| Missing or invisible lines | Export as DXF and PDF - try both |
| Lines the wrong colour | Select all and change line colour in Object Properties |
| Lines the wrong thickness | Select all and change line to hairline in Object Properties |
| Drawing scale is wrong | Export as DXF and PDF - try both, or rescale in CorelDraw |
Using Adobe Illustrator
Why use Illustrator?
- Extremely common graphic design software - most staff at The Edge have some familiarity, some are experts
- Defacto standard for vector design
It is an accessible resource at SLQ.
- The Edge DML has 16 licenses of the latest version of Illustrator
- The Fabrication Lab Laptops have Illustrator CS5 installed
- The Fabrication Lab Laser Cutter PCs have Illustrator CS5 installed
Illustrator Print Settings
To cut from Ilustrator - after clicking the Print option in the File menu you will be prompted by the following screen:
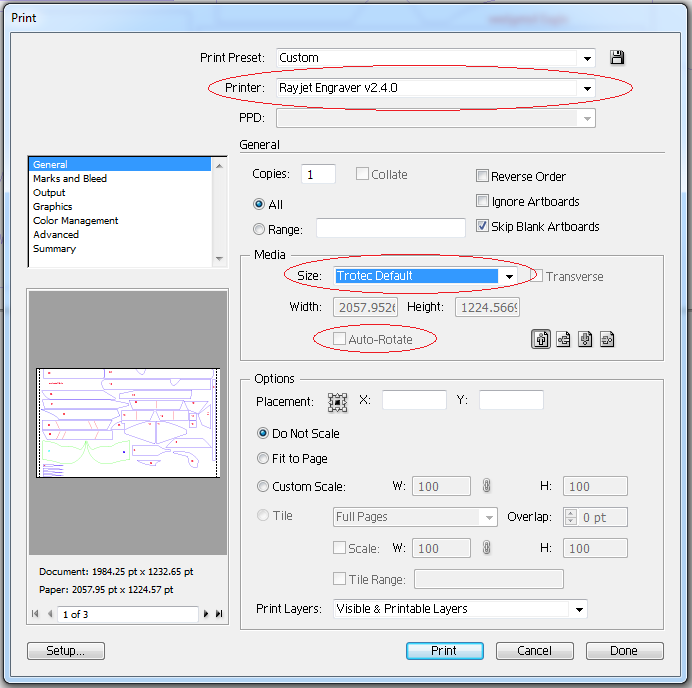
The only thing you should need to change is the Media → Size option, choose Trotec Default. Selecting this option will automatically turn off Auto Rotate.
In order to access the RayJet Settings click Setup in the bottom left corner, click Preferences (The RayJet should already be selected for you). Once done, click Print and then Print again in order to send the file to the laser.
External Illustrator Resources
Very useful page for setting up your document and preparing to cut using Illustrator, including templates: CutLaserCut.com (Also has a CorelDraw, Inkscape and AutoCad section).
A Trotec Speedy 300 specific training document from the Faculty of Environmental Design at The University of Calgary.
Using Inkscape
Why Use Inkscape?
Free Open source and under active development, has a thriving community of users and developers. Cross platform (windows/mac/linux).
It is an accessible resource at SLQ.
- All Fabrication Lab Computers have Inkscape installed
External Resources
http://atxhackerspace.org/wiki/Using_Inkscape_with_the_Laser_Cutter
This is currently an untested technique! Please update if you do implement or test
Cutting from Fusion 360
Why cut from Fusion360?
- The Edge has an Education site License for the Autodesk Suite
- It is a full feature suite
- web based storage, with local offline editing
It is an accessible resource at SLQ.
- The Edge DML has 16 licenses of the latest version of Fusion360
- The Fabrication Lab Laptops have Illustrator CS5 Fusion360
- The Fabrication Lab Laser Cutter PCs have Illustrator CS5 Fusion360
Reasons Not To Use Fusion360?
Fusion360 does not use printers. So while Fusion360 has integrated CAM (Computer Aided Manufacturing) it is a complex procedure to set-up and out of scope for current laser cutter usage. Instead individual sketches must be exported as DXF files then loaded into CorelDraw.
This is an older post covering one technique from the autodesk forums.
Tip for lasercutting from here to export without construction lines.
What I usually do for getting things either laser cut or waterjet cut is to extrude my design from the original sketch which includes all the constraints, dimensions and construction lines. Then I create another sketch on the top surface of that extrusion and project all the extruded elements into that new sketch. That sketch is then exported into a DXF.
UPDATE 23/03/2017
Fusion360 has been extensively used to generate many DXFs for cutting without problems, using the recommended workflow.
Cutting from Autodesk
External Resources
Here is an in-house guide used by London Metropolitan University. This is Trotec specific - which is handy.
This is currently an untested technique! Please update if you do implement or test
~~REVEAL~~
ARCHIVED: Laser Settings
| Material | Engraving | Cutting | ||||||
|---|---|---|---|---|---|---|---|---|
| Power | Speed | Air Assist | Power | Speed | Air Assist | Passes | ||
| Plastic | Acrylic 1.5 mm experimental | No | 100 | 4.5 | Yes | 1 | ||
| Plastic | Acrylic 3 mm | 60 | 80 | No | 100 | 1.7 | Yes | 1 |
| Plastic | Acrylic 4.5mm | 60 | 80 | Yes | 100 | 1.2 | Yes | 1 |
| Plastic | Acrylic 6mm | 50 | 50 | No | 100 | 1.7 | Yes | 2 |
| Plastic | Acrylic 6mm experimental | 50 | 50 | No | 100 | 1.1 | Yes | 1 |
| Plastic | Polyproplene (0.6mm) | 10 | 2 | Yes | 25 | 2 | Yes | 1 |
| Paper & Card | Paper-80gsm (regular paper) | 11 | 100 | No | 11 | 5 | Yes | 1 |
| Paper & Card | Paper- 350 gsm | 11 | 5 | No | 25 | 5 | No | 1 |
| Paper & Card | Paper- 200 gsm | No | 100 | 1.5 | No | 1 | ||
| Paper & Card | Cardboard-650gsm *Single Ply 3mm Natural /White | 45 | 100 | Yes | 25 | 2 | Yes | 1 |
| Paper & Card | Corrugated Card Single Ply 2.5mm (Pizza Box) | 11 | 30 | Yes | 25 | 3 | Yes | 1 |
| Paper & Card | Corrugated Card Double Ply 6mm | 40 | 100 | Yes | 40 | 2 | Yes | 1 |
| Paper & Card | Craft Cardboard Dense natural board 3mm | 70 | 100 | Yes | 75 | 2 | Yes | 1 |
| Paper & Card | Craft Cardboard Dense natural board 1.5 mm | 11 | 20 | Yes | 50 | 8 | Yes | 1 |
| Wood | Plywood 4mm | 80 | 95 | Yes | 85 | 2 | Yes | 1 |
| Wood | Plywood 6mm | 80 | 95 | Yes | 100 | 2 | Yes | 2 |
| Wood | Wooden Veneer 1mm | 11 | 20 | Yes | 50 | 8 | Yes | 1 |
| Wood | Fleece Back Veneer | 17 | 20 | Yes | 50 | 6 | Yes | 1 |
| Wood | Balsa Wood 1.5 mm | 40 | 100 | Yes | 30 | 4 | Yes | 1 |
| Wood | Balsa Wood 3 mm | 40 | 100 | Yes | 30 | 3 | Yes | 1 |
| Wood | Balsa Wood 5mm | 40 | 100 | Yes | 30 | 2 | Yes | 1 |
| Wood | Camphor Laurel 12mm experimental | Yes | 100 | 2 | Yes | 7 | ||
| Leather | Bovine, natural 5-6mm | 65 | 80 | Yes | 100 | 1 | Yes | 1 |
| Leather | Bovine, black 2.5mm | Yes | 65 | 1 | Yes | 1 | ||
| Silicone | Black 0.5mm | 20 | 4 | Yes | 40 | 4 | Yes | 1 |
| Silicone foam | White 2.0mm | Yes | 100 | 2.4 | Yes | 1 | ||
| Silk | White 40momies | Yes | 14 | 7 | Yes | 1 |
</datatables>

Laser Cutter Checks
The Edge standard checks for the Rayjet 300.
Laser Cutter Preflight Checks - Prepare Your Job
- Hot Work Permit active
- Material purchased, checked by supervisor
- Honeycomb correctly seated on bed
- Focal distance correctly calibrated to stock
- Starting position of laser is correct
Laser Cutter Preflight Checks - Supervisor Check
- Starting position of laser is correct - verified by Supervisor
- Bed is correctly seated - verified by Supervisor
- Focus alignment - verified by Supervisor
- All cut settings - verified by Supervisor
- power
- speed
- number of passes
- Auto focus feature disabled - verified by Supervisor
- Update Settings, apply and press OK
Laser Cutter Checks - During Cut
- Start job from Laser Cutter NOT software
- Avoid looking directly at the laser flash
- Prolonged exposure to laser flash may cause eye strain
- Abort job if material catches fire
- ALERT SUPERVISOR
- Pause Job to adjust
- ALERT SUPERVISOR
- repeat pre-flight check if needed
Laser Cutter Checks - After Cut
- Wait 30 secs for fumes to clear
- Remove Job
- Brush out or vacuum debris
Laser Cutter Checks - After Session
- Leave area clean and tidy
- Take your USB
- Show of your work on made today
General Tips
Text Engraving
When using text on the laser you will usually be stuck with a large quantity of engraving. For example, if every part of a kit of workshop material that needs to be mass-produced requires text, it will take a lot of time.
After some research I've found that there are a few fonts that are suitable to use. This means that when we convert to outline in illustrator, instead of creating multiple lines (one outer and one inner), it will only create a single line which makes it a lot more convenient.
Here is a link to a list of fonts that work well. Remember to remove any fill before converting!
CamBam Stick Fonts (Scroll down for download link and examples)
These are by no means perfect and most of the fonts have symbols missing. I recommend #4 as it seems to have most of the features.
Also - Inkscape now has built-in support for hershey text - an engraving font generator.
Using lower DPI to speed up Engraving and Cutting
Another way to speed up engraving (and even cutting) is to lower the DPI in the print preferences. Laser regular Paul Morris showed me the results reducing the DPI down from 500 to 125 DPI. Reducing the DPI by 1/4 reduced the engrave time.
Results shown below


He also did a low resolution cut, pictured below

the example on the left is at 500 DPI (default). The example to the right is at 125 DPI
Warped Plywood
While we have had issues with the stock plywood for the laser warping, the last batch we had was off the charts (10mm off true on an A2 piece of plywood). This warpage puts the laser out of focus and participants don't want to pay for it.
This week we experimented with clamping the plywood down with Nylon Nuts and Bolts, pictured below

We fed the bolts ( with a metal spring washer) up through the honeycomb and clamped the timber down with the corner of the nut. When I get around to it I'll make some acrylic washers/ clamps to grab the timber in a more secure way. The timber popped up when it was cut but at least it was cut etched and then flat.
Maintenance
Here are The Edge Laser cutter maintenance routines. There is a regular schedule, but maintenance is only carried out when required. The tasks below are based on the maintenance established when we first took delivery of the Laser and have been sourced from the Trello Fab Lab Equipment Logs.
Daily Maintenance: OPEN
- Check internal mirror and laser optics at open and clean if necessary
- Check “Last Cleaned” plate on Atmos Extractor to ensure maintenance is up to date
- Check that the machine was given general clean after last use
- Record Date, Time & Initials on “Last Checked” plate
Daily Maintenance: Every 2 Hours of Operation
- Check internal mirror and laser optics and clean if necessary
- Check for excessive debris on Lens Cone and in bed
- Check Lens retaining collar is screwed in tight
- Record Date, Time & Initials on “Last Checked” plate
- Wipe down inside of machine with baby wipes to get rid of dust
Daily Maintenance: CLOSE
- Remove cutting bed and clean debris from under bed. Wipe down with baby cloth
- Check and clean internal mirror and laser optics if required
- Remove Lense collar and clean thread on collar and Laser head
- Remove laser head nozzle and clean inside and out with baby wipes
- Wipe exterior down with baby wipe
- Power down Laser
- Delete all old cut files from RayJet software
Clean up files from desktop.not needed as edgeuser account refreshes on restart- Shut down laser computer
- Put scrap pieces into scrap box
Weekly Maintenance
Clean mirrors inside side panel.Not needed weekly - inspect only and clean if needed- Clean any debris from side housing
- Scrub air-intake with toothbrush
- Clean entire enclosure
- Check bed alignment plate screws (on bottom of bed) - tighten if needed
- Clean glass
- Check/replace top foam filter and clean top of extractor
- Photograph laser lens and note any damage in log
Lens and Mirror Cleaning and Inspection
The RayJet lens is the most delicate part of the machine. It has a relatively soft Zinc Selenide (ZnSe) Lens, which is vulnerable to scratches from cleaning with dust on the lens, scraping, drop or thermal shock. Trotec Lenses are manufactured by http://www.iiviinfrared.com/, which as of 11/2021 is down. However there is a web archive of theircleaning handling page here
For a comprehensive overview of cleaning a ZnSe lens, check out the ULO Optics cleaning page.
The RayJet can take ether 1.5 inch or 2 inch lenses. We have been supplied with two types of lens - one fits on top of the lens holding nut (2 inch lens - black ), the other below (1.5 inch lens -red). The current lens is a 2 inch top mounted.
The mirror located in the lens housing is much more robust, but still requires delicate handling.
Before you start
You will need:
- lens cleaning solution
- lens cleaning tissue
- a sheet of polypropelene or a clean cloth
- The lense loupe - and/or your glasses :)
Cleaning Lens and Mirror
This procedure is adapted from the officialtrotec manual
Never use a cleaning tissue twice. Dust accumulated in the cleaning tissue could scratch the lens surface.
Remove Lens and Mirror
- Move bed to about 10cm below lens assembly
- Turn off Laser or power down with the button on the front panel
- Move the lens to about the centre of bed, place sheet of poly or clean cloth under lens
- Loosen mirror nuts, remove and place upside-down on poly
- Loosen lens holding nut (turn clockwise for 2 inch top-seated lens - counter-clockwise for 1.5inch bottom seated lens)
- Remove lens by sliding straight out
- Place lens carefully on poly or cloth
Inspect and Clean Mirror
- blow off the mirror the squeezy blower
- Check the surface of the mirror again
- If necessary clean the mirror
- Spray with cleaner
- Put on gloves
- tilt to wash away coarse soiling
- Dab dry with a clean cloth
- Spray again and wipe clean with a new damp cloth (spray cloth with cleaner)
- if necessary dry with a clean cloth
- Replace Mirror
Inspect and Clean Lens
- blow off the mirror the squeezy blower
- Check the surface of the lens again
- If necessary clean the lens
- Hold the lens assembly by its edge and spray
- While holding the lens at an angle, flush both surfaces of the lens, to wash away coarse soiling
- Put the lens on a clean lens cleaning tissue
- Put on gloves
- Spray some lens cleaning liquid on one side of the lens
- Leave the liquid to take effect for approximately one minute
- Gently wipe it away with lens cleaning tissues soaked with lens cleaning liquid
- Dry this side of the lens with dry lens cleaning tissues and repeat the cleaning process on the other side of the lens
- Examine the lens. If it is still soiled, repeat the cleaning process until the lens is clean
- this process may have to be repeated - with baked on crud expect at least five cleaning cycles
- Carefully insert the lens holder with lens into the working head
- The side marked “top” is facing up. This is guaranteed by the design of the lens holder
- Tighten the lens holder - turning counter-clockwise for a 2 inch (black) lens and clockwise for a 1.5 (red) lense
Laser Cutter Air Filter Maintenance
How often should this be done? Maintenance of the Atmos500 is essential to keep fumes and particulates from the Fabrication Lab air. The top filter is augmented by a thin layer of rockwool insulation, which is the regular consumable for the filter.
Before you start
Always wear gloves and a respirator type mask. Collect a bin liner from the cleaning store.
- Unlock top filter with large allan key from service kit
- roll-up rockwool and place in garbage bag
- Check filth level on filter liner (the cream coloured foam)
- if there are visible beads of gunk, then discard into bin
- wipe down internals of top filter
- replace filter liner
- tear off a section of rockwool, make a layer about 1 inch thick
- lay rockwool on top of filter liner
- close and lock top filter
- update filter maintenance panel
Baseline Measurements
This is the base line measurement for the Atmos 500. Any time the filter components are changed refer to these settings.
- Activated Carbon only 27%
- Activated Carbon + (new) HEPA only 27-28 %
- Activated Carbon + (new) HEPA + fiber filter 29 %
- Activated Carbon + (new) HEPA + fiber filter + foam 34%
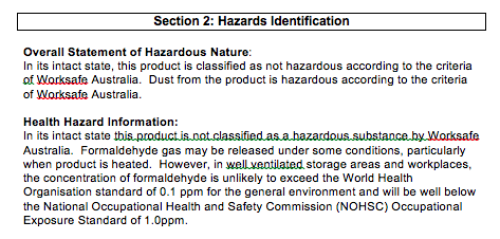
Approval for Laser Materials
All materials need to be tested to make sure they are safe to use in The Edge's Laser Cutter. Different materials can cause damage to the equipment and can be hazardous to the health and safety of the operator and other people in the Fabrication Lab.
All participants completing a Laser induction are informed of the Edge's policy that all new materials need to be approved before use in the Laser.
Users of the Laser can apply 14 days in advance to use a new material and are asked to provide a sample of the material and MSDS sheets pertaining to the material and any other treatments applied to the material.
The Latest version of the Guidelines for Laser Material Testing is always available on the wiki and is included below, along with the list of materials that Trotec recommend, and a list of compounds that are filtered readily by the extractor.
One of the compounds of concern is Formaldehyde which is found in a range of building materials (e.g. plywood, MDF) . The document below gives a good explanation of this issue and is provided on the website of our ply supplier.
http://revolutionwoodpanels.com.au/products/plywood/product/20/cd-pine-plywood.html
http://www.ewp.asn.au/library/downloads/ewpaa_formaldehyde_emmisions.pdf
Tested materials
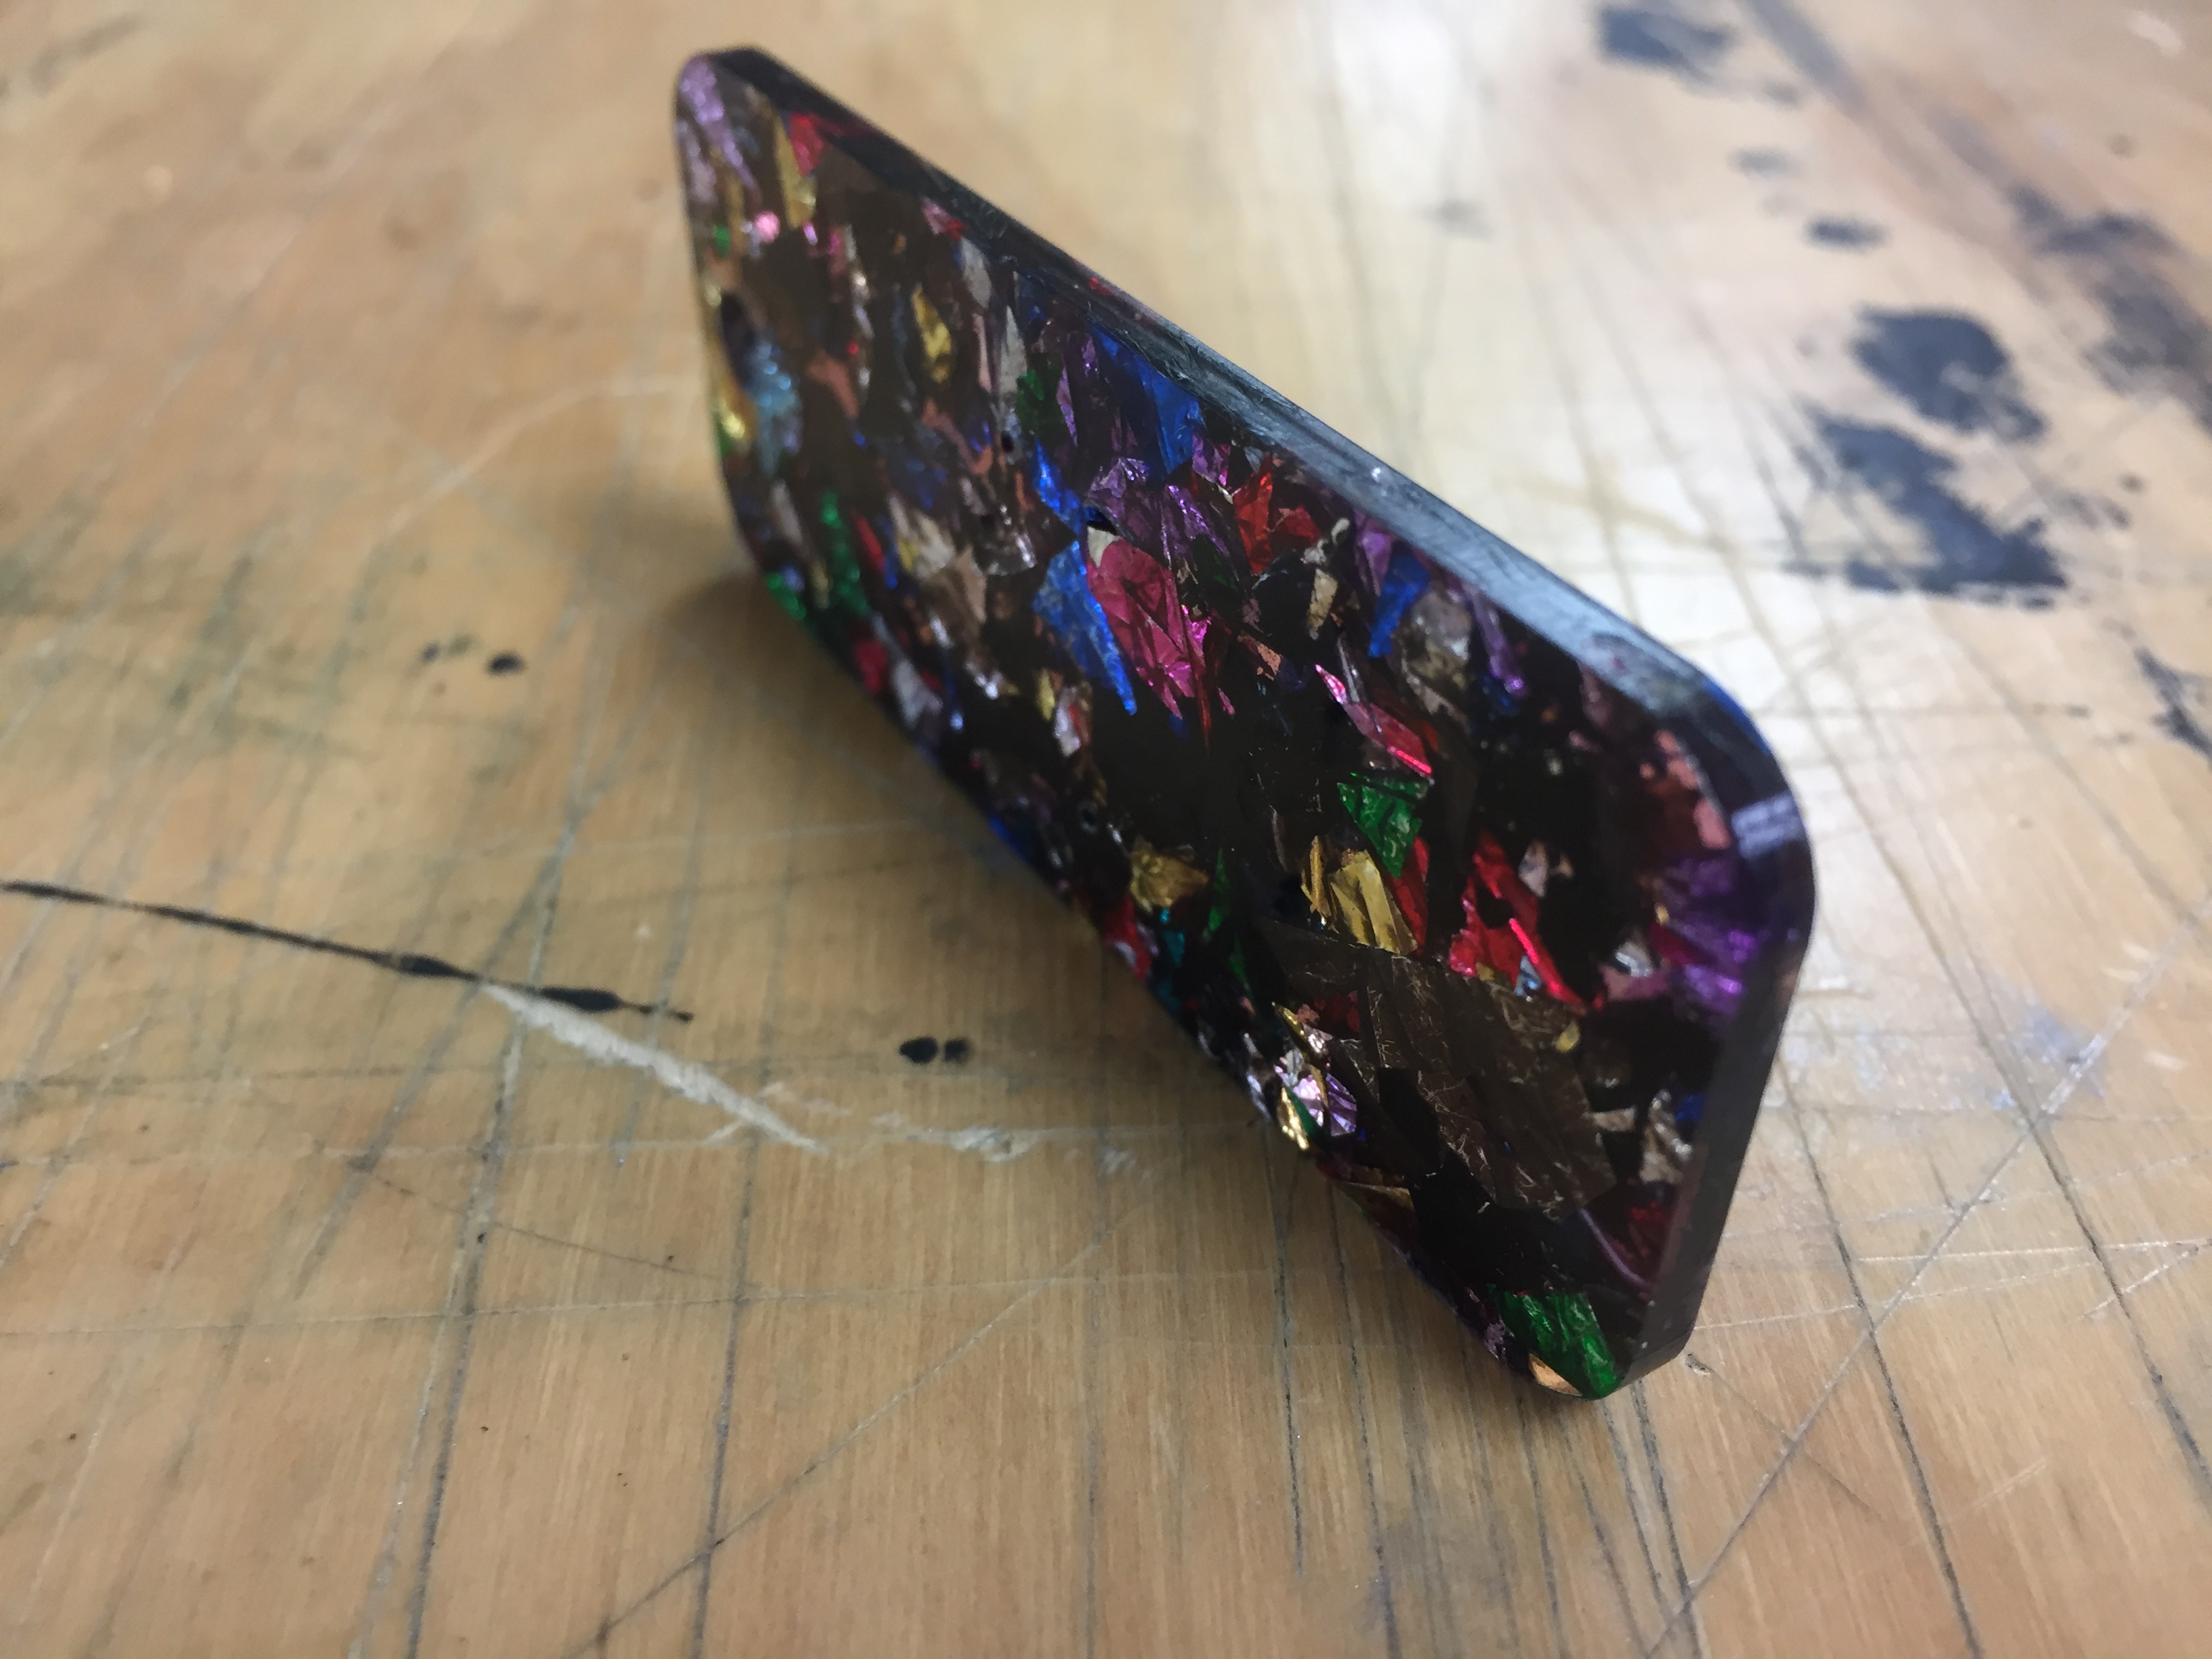
Premium Glitter Flake Acrylic
(Kaleidoscope Glitter Sheet)
- Test Date: 08/11/2017
- Test Completed by Mick Byrne / Phil Gullberg
- Supplier: Acrylics Online
- 3mm
Technical Data
Glitter acrylic can be cut, drilled, routed, laser cut, glued, formed, hot stamped, and silk screened like any other standard acrylic sheet. It is also ideal in applications that require other acrylic products to be used in combination with the Glitter without the need for mechanical fasteners or complex adhesives.


Suede
Test Date 13 Aug 2016 Test Completed By Mick Byrne.
Suede is a material recommended by Trotech so approved the app to use this completed tests on the laser. 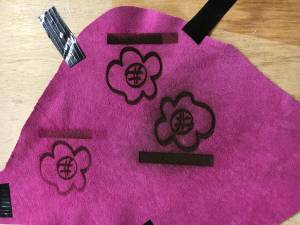
The first test (Far Right) was etched at the same settings as Balsa 40% power 95% speed- this was too much (sooty and could not see the gradation in the contrast bar. 2nd test (Far left) was 20% power 95% speed 3rd test (top) was 27% power 95% speed - I'd recomend somewhere between these last 2 settings
Plybrace F27 hardwood structural ply
-
Test Date 15 Aug 2016 Test Completed By Mick Byrne. A bunnings product name was provided by applicant and from there an MSDS was sourced for this material. This product is also certified as low Formaldehyde.
http://www.dashwoodtimber.co.nz/downloads/Structural_Plywood_Properties_&_Applications_Manual_March_2008.pdf5)
http://www.ewp.asn.au/library/downloads/ewpaa_formaldehyde_emmisions.pdf6)
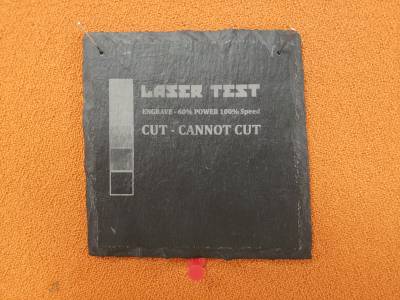
Slate
Test Date 28 Feb 2019 Test Completed By P. Gullberg.
This material can only be engraved ,not cut using the Rayjet. Settings come directly from Trotec's website.
The bitmap gradient and title test were engraved using error diffusion. The Rayjet struggles with the deeper engravings which end up looking like the more shallow engravings. The Engrave settings text is engraved using the Trotec recommended settings. Smoke levels were average.
Engraving: 60% power 100% Speed
Japanese Polyester
Test Date Aug 2016
PETG
Copper wire test passed and OK'd for laser
Peter Musk Nov 2017
Acrylic Felt
Sourced from Spotlight.
Tested (copper wire) on 15/11/17
Smoky but passed for laser cutting.
Peter Musk
Silicone Rubber 0.5mm Test Date 22 Aug 2017 Test Completed By Mick Byrne. Silicon Rubber is a material recommended for cutting on the Trotec Website. After a few cuts we arrived at the following settings
Etching 20% Power 4% Speed
Cutting 40% Power 4% Speed
Laser Cutter New Materials Testing Guide
Content
- Aim
- Method
- Approval to cut flow chart
- Notes on the flow chart
- Copper Wire Test Procedure
- Test Cut Procedure
- References
1: Aim
The aim of this document is to provide a guideline for the testing of the cutting and etching of new materials in the Edge’s Trotec 100w CO2 Laser Cutter.
Most of the tools in The Edge Fabrication Lab have been acquired with the intention of making these available to the public so members of our community can experiment with a range of fabrication technologies.
There is also an acknowledgement that members of the public and staff will want to experiment using different materials in equipment like The Edge’s Laser Cutter.
This section outlines a process to manage the risks of health hazards and damage to equipment that could occur from cutting/ etching different materials in the Laser cutter. These are guideline only and as such, do not cover all eventualities.
When testing new materials using the laser cutter extreme caution should be used.
Management of The Edge also reserves the right to the ban the cutting / etching of certain materials found to reduce the efficiency of the machine.
2. Method
The following Flowchart describes the process an authorized supervisor can undertake to assess a new material for approval to be cut/ etched on the Edge’s Laser cutter.
A: Approval to cut flow chart

B: Notes to the Flowchart
- Material Safety Data Sheet (MSDS/SDS) for the material. MSDS sheets can be obtained through Google searches or from http://www.msds.com. Examine the MSDS for ‘Hazards’ and ‘Hazard Identification’ sections, particularly hazards related to heating the material. For example from the Medium Density Fiberboard (MDF) MSDS:
- While the laser cutter is equipped with a HEPA air filter, ALL gas release may be hazardous, so any unapproved materials releasing toxic fumes may not be used without express exception permission from senior management of The Edge
- If unsure of a material or the data contained within the MSDS, contact the manufacturer and enquire about laser cutting of the material
THE FOLLOWING MATERIALS ARE KNOWN TO BE HAZARDOUS AND CANNONT BE CUT
- Polyvinylchloride (PVC) based materials
- Materials containing melamine resins
- Plastics containing Nylon
- High Density Foam or other materials containing polyurethane
- MDF or Plywood or other materials containing either urea- or phenol-formaldehyde
- Foam-core board or other materials containing Polystyrene or Styrene
- If you are unsure of the type of plastic you are dealing with refer to http://www.chymist.com/polymers.html or to the charts below
- If the material is a reflective material such as a glass or mirror surface, it is recommended to cut from the non-reflective side if available
C: Copper Wire Test
- Use appropriate PPE (personal respirator, eye protection)
- If you haven’t performed this test before, use PVC sample in the kit to establish a positive result
- Obtain a piece of copper wire about 5 cm long. Push one end of the wire into a small cork. (The cork is used as a handle so you are not touching a hot wire)
- Place one plastic pellet or sample near your Bunsen burner. This is the sample you will be testing
- Hold the free end of the copper wire in the burner flame until it is red hot and the flame no longer has a green color
- Remove the wire from the flame and touch the hot wire to the plastic pellet or sample you will be testing. A small amount of the plastic should melt onto the wire. If the wire sticks to the plastic sample, use a pair of tongs to remove it. (You do not want to burn a large piece of plastic). Place the end of the wire, with the small amount of plastic on it, into the flame. You should see a slight flash of a luminous flame (a yellow-orange color). If the flame turns green in color, then the sample contains chlorine
- Needs sentence here about whether test is passed when chlorine is or is not present
D: Test Cut Procedure
- If the material is found to be suitable for cutting, set up the material and focus the laser as per standard Edge Laser Cutter Induction procedure
- In CorelDraw, create a small 20mm x 20mm square set to RED Hairline
- For low density materials or materials LESS than 2mm thick:
- In the Rayjet print preferences, set the RED CUTTING setting Power to 5% and Speed to 5% with a single pass
- Select skip in the BLACK ENGRAVING option
- Set ‘Move job to Laser’ in the laser print spooler
- Perform this cut
- Move laser to top left corner away from material
- Remove material and examine cut. Mark the Power and Speed settings in the format POWER/SPEED next to the cut. i.e. 5/5
- If the cut did not penetrate the material completely, perform the procedure again from Step 8 using an increment of 5% in Power
- It is important to make successive cuts next to each other in an ordered pattern and note the power/speed for each cut
- Repeat the procedure increasing the power until a complete cut is made. At this point, fine tune the settings using 1-2% increments or decrements, taking notes on the test material for each cut
- For high density materials or materials more than 2mm thick:
- In the Rayjet print preferences, set the RED CUTTING setting Power to 5% and Speed to 5% with TWO passes
- Select skip in the BLACK ENGRAVING option
- Set ‘Move job to Laser’ in the laser print spooler
- Perform this cut
- Remove material and examine cut. Mark the Power and Speed settings in the format POWER/SPEED next to the cut. i.e. 5/5
- If the cut did not penetrate the material completely, perform the procedure again from Step 8 using an increment of 5% in Power
- It is important to make successive cuts next to each other in an ordered pattern and note the power/speed for each cut
- Repeat the procedure increasing the power until a complete cut is made. At this point, fine-tune the settings using 1-2% increments or decrements, taking notes on the test material for each cut
- Once successful cuts have been made, examine the cut edges. If these are smooth and straight note down the cut settings for use. If the edges are melted or beveled / rounded, you may need to increase the passes, in which case, perform the procedure from the 5/5 % setting start again
- Once settings have been found for cutting, test for engraving as follows:
- In CorelDraw, create a small 20mm x 20mm square set to filled with BLACK
- In the Rayjet print preferences, set the BLACK ENGRAVING setting Power to 5% and Speed to 50%.
- Select skip in the RED CUTTING option
- Set ‘Move job to Laser’ in the laser print spooler
- Perform this engrave
- Move laser to top left corner away from material
- Remove material and examine engraving. Mark the Power and Speed settings in the format POWER/SPEED next to the engrave. i.e. 5/50
- If you are not happy with the engraving, perform the procedure again from Step 8 using an increment of 5% in Power
- It is important to make successive engraves next to each other in an ordered pattern and note the power/speed for each engrave
- Repeat the procedure increasing the power until a good deep engrave is performed. At this point, fine tune the settings using 1-2% increments or decrements, taking note on the test material for each engrave
- If 100% power is reached and with 50% speed and the engrave is not sufficient, set power to 90% and reduce the speed until desire engraving depth is reached
Sections 3, 4 and 5 above all say 'perform the test again from Step 8, but there is no Step 8 - re-write needed
As with normal operation, the laser cutter must always be monitored during operation in case of smoke, fire or flare up
3: References
Harvard Fab Lab, n.d. Laser Training Checklist, Retrieved 27 May 2015 from http://isites.harvard.edu/fs/docs/icb.topic1198394.files/training_checklist_LASER.pdf
David A. Katz, Identification of Polymers ©1998 Retrived 31 Aug 2015 http://www.chymist.com/polymers.html
Active Carbon Absorption of Chemicals
The Atmos 500 uses a three stage process to remove airborne contaminants. The first stage filters large particles, the second and activated carbon bed, the third is a HEPA filter (small particles).
Of the three the activated carbon stage is the most important for removing smells and potentially toxic out-gasses caused by the laser cutting process, and is most critical to the operation of the fabrication lab.
While most organic compounds will adsorb on activated carbon to some degree, the adsorption process is most effective on higher molecular weight and high boiling point compounds. Compounds having a molecular weight over 50 and a boiling point greater than 50 degrees centigrade are good candidates for adsorption 7)
These charts are adapted from More information about the Regeneration of Active Carbon - Lenntech
Chemicals with very high probability of being adsorbed by active carbon
<datatables>
| 2,4-D | Deisopropyltatrazine | Linuron |
| Alachlor | Desethylatrazine | Malathion |
| Aldrin | Demeton-O | MCPA |
| Anthracene | Di-n-butylphthalate | Mecoprop |
| Atrazine | 1,2-Dichlorobenzene | Metazachlor |
| Azinphos-ethyl | 1,3-Dichlorobenzene | 2-Methyl benzenamine |
| Bentazone | 1,4-Dichlorobenzene | Methyl naphthalene |
| Biphenil | 2,4-Dichlorocresol | 2-Methylbutane |
| 2,2-Bipyridine | 2,5-Dichlorophenol | Monuron |
| Bis(2-Ethylhexyl)Phthalate | 3,6-Dichlorophenol | Napthalene |
| Bromacil | 2,4-Dichlorophenoxy | Nitrobenzene |
| Bromodichloromethane | Dieldrin | m-Nitrophenol |
| p-Bromophenol | Diethylphthalate | o-Nitrophenol |
| Butylbenzene | 2,4-Dinitrocresol | p-Nitrophenol |
| Calcium Hypochloryte | 2,4-Dinitrotoluene | Ozone |
| Carbofuran | 2,6-Dinitrotoluene | Parathion |
| Chlorine | Diuron | Pentachlorophenol |
| Chlorine dioxide | Endosulfan | Propazine |
| Chlorobenzene | Endrin | Simazine |
| 4-Chloro-2-nitrotoluene | Ethylbenzene | Terbutryn |
| 2-Chlorophenol | Hezachlorobenzene | Tetrachloroethylene |
| Chlorotoluene | Hezachlorobutadiene | Triclopyr |
| Chrysene | Hexane | 1,3,5-Trimethylbenzene |
| m-Cresol | Isodrin | m-Xylene |
| Cyanazine | Isooctane | o-Xylene |
| Cyclohexane | Isoproturon | p-Xylene |
| DDT | Lindane | 2,4-Xylenol |
</datatables>
Chemicals with high probability of being adsorbed by active carbon
| Aniline | Dibromo-3-chloropropane | 1-Pentanol |
| Benzene | Dibromochloromethane | Phenol |
| Benzyl alcohol | 1,1-Dichloroethylene | Phenylalanine |
| Benzoic acid | cis-1,2- Dichloroethylene | o-Phthalic acid |
| Bis(2-chloroethyl) ether | trans-1,2- Dichloroethylene | Styrene |
| Bromodichloromethane | 1,2-Dichloropropane | 1,1,2,2-Tetrachloroethane |
| Bromoform | Ethylene | Toluene |
| Carbon tetrachloride | Hydroquinone | 1,1,1-Trichloroethane |
| 1-Chloropropane | Methyl Isobutyl Ketone | Trichloroethylene |
| Chlorotoluron | 4-Methylbenzenamine | Vinyl acetate |
Chemicals with moderate probability of being adsorbed by active carbon
For these chemicals active carbon is only effective in certain cases.
| Acetic acid | Dimethoate | Methionine |
| Acrylamide | Ethyl acetate | Methyl-tert-butyl ether |
| Chloroethane | Ethyl ether | Methyl ethyl ketone |
| Chloroform | Freon 11 | Pyridine |
| 1,1-Dichloroethane | Freon 113 | 1,1,2-Trichloroethane |
| 1,2-Dichloroethane | Freon 12 | Vinyl chloride |
| 1,3-Dichloropropene | Glyphosate | |
| Dikegulac | Imazypur |
Chemicals for which adsorption with active carbon is unlikely to be effective
However it may be viable in certain cases such as for low flow or concentrations.
| Acetone | Methylene chloride |
| Acetonitrile | 1-Propanol |
| Acrylonitrile | Propionitrile |
| Dimethylformaldehyde | Propylene |
| 1,4-Dioxane | Tetrahydrofuran |
| Isopropyl alcohol | Urea |
| Methyl chloride |
Factors that influence the performance of active carbon in air
- Type of compound to be removed: In general compounds with a high molecular weight, lower vapor pressure/higher boiling point and high refractive index are better adsorbed.
- Concentration: The higher the concentration, the higher the carbon consumption.
- Temperature: The lower the temperature, the better the adsorption capacity.
- Pressure: The higher the pressure, the better the adsorption capacity.
- Humidity: The lower the humidity, the better the adsorption capacity.
1) source: Wastewater Engineering; Metcalf & Eddy; third edition; 1991; page 317|
Read more: http://www.lenntech.com/library/adsorption/adsorption.htm#ixzz4880i9cJh
Troubleshooting
This area is for known issues with the Laser Cutter and how to solve them.
Oval shaped circles
Problem: Circles being cut on the laser are not round but rather a slight oval shape. It is usually easier to spot on smaller circles.
Solution: Make sure the lens and mirror have been cleaned properly and that the lens has been fastened. If this doesn't solve the problem the cause is most likely buildup of debris on the track the lens sits on. If there is any resistance when sliding the lens down the track there is most likely a buildup. To remove the buildup use an angled awl together with a wet wipe wrapped over it and slide it up and down the track. you can also use cotton-tip buds but will most likely need something sharp to get all the way to the back. Rinse and repeat until the lens slides in and out smoothly
Issue #2
Problem: Problem here
Solution: Solution here