Table of Contents
Science Kit #2: Chemistry @ Home
Summary
This activity introduces participants to a range of chemical experiments that can be completed with materials available from the supermarket, pharmacy and hardware shop. The kit includes some basic scientific glassware, stock bottles with solutions and solid reagents as well as instructions detailing several different experiments. The intention was to give participants an opportunity to familiarize themselves with safe procedures for working with chemicals (including disposal), to learn about scientific glassware and how to use particular items and to take home a kit that can be replenished at minimal cost from readily accessible sources.
The finished kit included instructions for a series of 7 experiments that could be conducted with the materials supplied. Bespoke packaging was developed so the completed kit could be a Christmas gift.
Developed by Peter Musk, December 2016.
Materials
| ACTIVITY | 1 | 2 | 3 | 4 | 5 | 6 | 7 | Supplied |
|---|---|---|---|---|---|---|---|---|
| Test tubes | 6 | 1 | 3 | 6 | ||||
| Test tube rack | 1 | 1 | 1 | 1 | ||||
| Mortar and pestle | 1 | 1 | ||||||
| 3mL plastic capped vial | 1 | 2 | ||||||
| Filter paper strips | 5 | 5 | ||||||
| Reagent bottles | 6 | 1 | 2 | 4 | 6 | |||
| Reagent containers | 8 | |||||||
| Droppers | 6 | 2 | 3 | 5 | 6 | |||
| Joule Thief kit | 1 | 1 | ||||||
| Test tube brush | 1 | |||||||
| Measuring cylinder (250ml) | 1 | 1 | ||||||
| Reaction jar/container | 1 | 1 | 1 | |||||
| 9V battery | 1 | |||||||
| Bared copper wire (thick) | 70 cm | 2 @ 30cm | ||||||
| Insulated copper wire (red) | 1 @ 30 cm | |||||||
| Insulated copper wire (black) | 1 @ 30 cm | |||||||
| Bared copper wire (thin, braided) | 6 @ 7.5cm | |||||||
| silver coin | 1 | |||||||
| peg | 2 | |||||||
| vegetables | 1 | |||||||
| Styro cup | 1 | |||||||
| hotplate | 1 | |||||||
| saucepan | 1 | |||||||
| Galvanized nail (20mm) | 1 | 6 | ||||||
| liquid detergent | 1 | |||||||
| Wax taper | 2 | |||||||
| Coloured felt pens | 3 | |||||||
| Bamboo skewer | 1 | 2 | ||||||
| Sticky tape | 5 cm | |||||||
Chemicals for this kit were sourced from hardware or pharmacy according to the list attached below.
Glassware, plasticware and other materials are listed in this spreadsheet (note that the kit included only those items highlighted and listed above).
Vegetables for Experiment 4 (red cabbage, beetroot, grape juice) were obtained fresh from a supermarket.
Tools
- Electronic balance (0.1g accuracy or better)
- copper wire (bare, unvarnished)
- galvanized nails (approx 15-20mm)
- plastic container (1L takeaway container is OK)
- bamboo skewers
Instructions
Experiment 1: Mixing Two things to make new things
Chemistry can happen when different substances are mixed together, but not always. Mixing is easy to do if the substances are first dissolved to make a solution.
If new substances are made that do not dissolve readily, or have a different colour then you can see that a reaction has occurred.
You will need:
Solutions of the following substances (at least 20mL of each) - recipes in Appendix 1 below
Group A:
- copper sulphate
- iron sulphate
- manganese sulphate
- calcium chloride
Group B:
- sodium carbonate
- sodium hydroxide
Equipment for the experiments -
- clean test tubes for reactions
- test tube rack
- dropper bottles for each solution
What to do:
- Put one clean test tube in the rack for each reaction you wish to do.
- Use a dropper to draw up 2mL of one of the chemical solutions from Group A, and squeeze the liquid into an empty test tube.
- Use another dropper to put 2mL of a solution from Group B in the same test tube. Gently shake to mix, but any reaction should be almost instantaneous.
- Try different combinations, but you will only see a reaction if you mix one from Group A with one from Group B (and maybe not even then).
- Completed experiments can be flushed down the sink, with plenty of water.
What is happening?
When chemicals dissolve, the particles that they are made of separate. Adding another dissolved chemical means different combinations of particles can be made – and sometimes the new products are different colours, or they don’t dissolve.
When a particle from one dissolved chemical reacts with a particle from another dissolved chemical to make something which does not dissolve (and so a solid is formed), this new solid is called a precipitate. The unused particles stay dissolved (or they might form a different solid precipitate mixed with the first).
Sometimes the new substance formed has a different colour, too, and so you may see a coloured precipitate.
Experiment 2: Silver into gold
Coating objects with a thin layer of metal can give them properties that are useful. Zinc helps stop corrosion, chrome is tough and gold looks appealing. This chemistry does not always happen automatically, however, and sometimes a source of extra energy is needed.
You will need:
- copper sulphate (200mL)
- bare copper wire (100mm - stripped electrical wire is fine)
- 2x30cm pieces of insulated copper wire, with 2cm stripped ends
- a bright steel nail or 5c coin (clean off any oil or rust)
- 9v battery, best with a battery clip that has two free wires (bare the ends)
- a container of at least 250mL capacity (an empty jar works)
- a couple of clothes pegs or small bulldog clips are helpful
What to do:
- pour the copper sulphate solution into your container
- bend the 100mm piece of bare copper wire into a U-shape, and twist the bare end of one of the pieces of insulated wire tightly onto the centre
- check against the level of the copper sulphate solution, and bend more if you need to so that almost all of the 100mm wire will be under the surface of the liquid when you dangle it in there later
- attach the bare end of the other piece of insulated wire to the metal object (you might need to find a metal clip and twist the wire onto that if you are using a coin)
- dangle the target object so that it is completely submerged in the solution (but not lying on the bottom), by bending the insulated wire so it hangs over the edge of the container (this is where the cloths pegs come in handy)
- dangle the bent copper wire in the solution too, but make sure it is not touching the object
- the other ends of the insulated wires will connect to the battery: one wire to each terminal. If you have a battery clip, then you can just twist the appropriate wires together. If not, wrapping the bare end of the insulated wire tightly around the battery terminals should work, but you will need to twist tightly to make sure of a good connection (or try holding the bare wire down on the terminal with a small piece of tape)
- the positive terminal should connect to the bent copper wire, and the negative to the object being coated - you can tell the negative when the experiment is going, because lots of small bubbles will be produced there.
- plating takes only a few minutes, but to get an even coating it is a good idea to stir the solution occasionally, and move the object around so different sides are closest to the copper wire.
What is happening?
All chemistry involves the electrons that exist around the outside of every type of atom. With the right approach, these electrons can be lured aside on their way to a chemical reaction, and made to do something useful: this is what happens in a battery.
When we use a battery as a pump to push electrons into a piece of metal, the surface of the metal can undergo chemical reactions with passing particles. Passing hydrogen particles from the water are turned into hydrogen gas (hence the bubbling) and If dissolved metal atoms bump into these extra electrons, solid metal is formed.
Because copper metal is a pinkish colour, you can see that a coating has been formed. If a sooty black powder is left on your object, wash or wipe it off and there should be a clean copper metal layer underneath, firmly bonded to the surface.
Experiment 3: Reversible Colour Changes
Flowers, fruits and vegetables can contain natural chemicals which give them their distinct colours. Sometimes, these colours change with time (when fruit ripens, for example) and by doing some simple experiments, you can investigate whether changes are due to some new pigment being made, or if some chemistry might be causing the effect.
You will need:
- a couple of tablespoons of grated beetroot, shredded red cabbage or coloured flowers (reds and purples work best)
- (optional) mortar and pestle for grinding the vegetable material
- test tube, or other small, clear reaction container
- 10mL white vinegar (which contains 0.8M acetic acid) with dropper
- 10mL sodium carbonate solution (0.5M) with dropper
What to do:
- grind or mash the coloured vegetable matter of your choice with a few mL of water to extract the coloured juices
- pour the coloured liquid that results into your reaction container (try to avoid the chunky bits)
- add the vinegar a drop at a time, stirring between each addition – you should see the colour change, and then stop changing
- now add the sodium carbonate solution similarly – it will take more drops this time, but the colour should first change back to the original, and then change again as you add more
- you can keep alternating adding the two solutions, and the colour will keep changing back and forth
What is happening?
White light (including sunlight) is made up of a mixture of all the colours of the rainbow. A pigment looks coloured because it absorbs only some of the colours present in white light and reflects the others (something that looks red absorbs all the blue light, for example, and reflects the red light into our eyes).
The colour of light which is absorbed by a chemical compound (such as a pigment) is determined by the chemical structure of the pigment molecule, and this structure can change slightly depending on how acidic the surrounding environment is. When you add vinegar, you increase the surrounding acidity, and sodium carbonate has the opposite effect (sodium bicarbonate does the same). Chemists measure acidity on the pH scale, and refer to the opposite of an acid as a base (or an alkali, if it is very soluble).
The effect of dilute acids on pigment molecules is usually reversible, which is why you can keep on changing the colour back and forth.
Now you know what colour your pigment is in different environments, you can use it to test other things from around the home – try toothpaste, lemon juice, soda water or kitchen cleaners (it helps if what you test is a liquid, and preferably not coloured). Is there a pattern?
Experiment 4 : Where is that smell coming from?
Many artificial scents and flavours as well as natural ones are made up of chemicals that evaporate easily, and react with special receptor molecules in our noses. Artificial scents can be manufactured by reacting two different types of chemical, with the addition of a few drops of acid to make things go faster.
You will need:
- a few mL of an organic acid eg: acetic acid (vinegar) and a dropper
- a few mL of organic alcohol eg: isopropanol (rubbing alcohol) or ethanol (methylated spirits) and a dropper
- capped plastic vial
- styrofoam cup (to cut up and make a float)
- heatproof container (a saucepan works well)
- hotplate with thermostat (temperature of 50-60oC required)
- a few drops of concentrated hydrochloric acid, and dropper
What to do:
- cut the bottom off a styrofoam cup, or find a flat piece of buoyant material 4-5cm diameter that you can make a hole in easily
- cut a hole in the float big enough to take the plastic reaction vial, and push the vial into the float
- use a dropper to add 1mL of your organic acid to the reaction vial (about 20 drops)
- use a clean dropper to add 1mL of the organic alcohol to the same reaction vessel
- using a clean, dry dropper, add a couple of drops of concentrated hydrochloric acid to the reaction vial, close the lid and mix
- fill a saucepan or other heatproof container with water to a depth of 10cm to make a water bath
- place the water bath on your hotplate, and set it to heat to 50-60oC. Do not let the bath boil or the cap will pop on the reaction vial.
- put the float with the reaction vial into the water bath so the mixture is surrounded by hot water
- allow reaction to proceed for 30-60 min, checking to make sure the water level remains enough to keep the reaction vial floating freely (add water if necessary)
- carefully remove the reaction vessel from the water bath, and pop open the cap
- hold the vial 5cm from your nose and waft any vapour towards you (try waving over the top of the vial with your hand). A new scent should be obvious, depending on which combination of acid and alcohol you used (see Appendix 2 for examples)
- some concentrated acid will remain in the mixture, so dispose of with care (eg:flush down the sink with plenty of water)
What is happening?
The acid and alcohol react to make a new compound called an ester, a type of chemical which often has a strong odour. The structure and shape of the ester molecule determines which receptor in your nose it can reacts with, and so what you smell. Some people have different nose receptors to others, so not everyone can smell the same things. Many natural scents and flavours are esters (see Appendix 2), and these are made in nature using a wide variety of organic acids and alcohols found in living organisms.
This reaction happens very slowly at room temperature (which is why you need to heat it up), and the extra hydrochloric acid also helps make the reaction go faster. The extra acidity from the hydrochloric acid helps start the reaction, but is released again when the reaction is completed (and so it remains in the liquid). Something like this which makes a reaction go faster, but does not get used up is called a catalyst.
Experiment 5: Fire and Foam
Some chemical reactions produce a gas rather than a solid, and when a few drops of detergent are included in the mix, peculiar foams can result. Different gases can be used to make bubbles that burn, cause a glowing ember to burst into flames, or extinguish the fire that results. Other chemistry can produce gases that stink or poison you, but we will not be investigating them.
What you need:
- solutions of potassium permanganate and sodium carbonate (10mL of each)
- 10mL of 5M hydrochloric acid solution (DANGER – read safety advice)
- 6% hydrogen peroxide solution (about 10mL)
- liquid detergent (a few drops)
- white vinegar (about 10mL)
- test tubes, or other reaction vessels
- wax taper (or small candle) and matches to light it
- Galvanized nail (about 10-20mm long)
What to do:
To make bubbles of oxygen….
- use a clean dropper to put 2mL of potassium permanganate solution into a test tube, and add 1 or 2 drops of liquid detergent
- add 2mL of hydrogen peroxide solution, and fizzing should form a foam of bubbles containing oxygen gas
- if you light the taper, then blow it out, the glowing ember that results should burst into flame when it touches the oxygen bubbles
- if the wet bubbles stop this happening, try again without the detergent, but have the glowing taper ready to insert after you add the hydrogen peroxide – the oxygen formed will be towards the surface of the liquid
To make bubbles of hydrogen…
- gently place a galvanized (zinc coated) nail or screw into a test-tube (don’t drop it in, or it might smash through the bottom of the tube)
- add 1-2 drops of liquid detergent to the bottom of the tube
- use a clean dropper to add 5mL of 5M hydrochloric acid
- the bubbles of hydrogen gas produced are flammable, and will burn and pop when toughed gently with a lit taper
- if you want to try to capture the hydrogen gas without the detergent, remember it is much lighter than air, and will rapidly float upwards when formed (an inverted container completely covering the mouth of the test tube is required)
To make bubbles of carbon dioxide…
- use a clean dropper to add about 2 mL of sodium carbonate solution to a test tube
- add 1-2 drops of liquid detergent
- use another clean dropper to add 2mL vinegar (acetic acid)
- the bubbles of carbon dioxide produced are not flammable, and will extinguish a flame (this is how some fire extinguishers work)
- if you want to make a mini-fire extinguisher, instead of using detergent, prepare a delivery tube that can fit into the top of the test tube (this might be a stopper with a hole through it, and some narrow tubing pushed through to direct the flow of gas)
- use more of the reactants (vinegar and bicarb) to make the gas flow for longer, but keep the same proportions
What is happening?
Each of these reactions produce a gas where there was not one before. The atoms that make up these gases are present in the reacting chemicals, but combined in a way that keeps them from blowing away. As compounds are broken apart and their atoms re-combined during a chemical reaction, some of the new compounds produced can be gases, which form the bubble seen here.
Not all gases have the same chemical properties, and not all of them are lighter than air (which is mainly nitrogen), but all gases have more space between their particles than liquids. This means gases are less dense than the liquid they form in, and so they float to the surface.
Household chemicals can also be used to make chlorine, which is a toxic, choking gas that dissolves in your body to make hydrochloric acid. Not recommended.
Experiment 6: Revealing Rainbows
Using liquid paints allows you to create a wide variety of hues, simply by mixing different colours together: yellow and blue to make green, for example. Manufacturers use the same technique to produce the variety of colours found in a packet of felt pens, with the darkest colours (browns and blacks) usually having the most ingredients. A simple technique can be used to separate the different coloured chemicals present based on how soluble they are.
What you need:
- different coloured felt pens (black and darker colours are best)
- bamboo skewer and sticky tape
- absorbent paper (coffee filters work fine, but most printer papers are coated and will not work)
- a plastic container deep enough that the filter paper hanging from the skewer almost touches the bottom, and narrow enough that the skewer can bridge the top
- methylated spirits, vinegar and water to make the solvent mixture (quantities will depend on the size of your container)
What to do:
- cut the longest strip you can from the absorbent paper, about 5cm wide
- use different coloured felt pens to make separate dots or lines about 2cm from the bottom of the strip of paper
- fold the top of the strip over the skewer, and attach it in place with a piece of sticky tape
- hang the strip down into the container by balancing the skewer across the top
- prepare enough solvent mixture to fill the container up to the bottom of the paper strip (the liquid must not cover the coloured ink samples, or the ink will simply wash away). The solvent is a mixture of water: methylated spirits : vinegar in the ratio 1:2:2 by volume. Different ratios can be used to change the results.
- remove the paper and skewer, then add the solvent to the container
- replace the paper and skewer, making sure the liquid does not cover the samples of coloured ink. As capillary action draws the solvent up the paper, it will carry the coloured inks along with it but each colour will move at a different rate.
- when the solvent has moved up far enough to separate the colours, remove the paper from the container, and put it aside to dry.
What is happening?
The coloured chemicals in inks stick to paper through weak chemical bonds. The solvent molecules interfere with these bonds, and the coloured chemicals become dissolved in the moving liquid. As they move along with the solvent, the inks continue to make and break bonds with the surface of the paper, which slows down their progress. Because different chemical compounds make bonds of different number and strength, each coloured compound will move at a different speed, and will separate over time, just like runners in a race.
The chemicals used to make the solvent play an important role in this process because their different properties determine how soluble each ink is, and so how fast it moves. This is why changing the ratios, or using different solvents (acetone is another common ingredient) will change the final pattern you see. Similar methods are used in forensic analysis to identify inks and dyes by their individual components.
Experiment 7: How many lemons does it take to light an LED?
A lemon battery is made by pushing pieces of two different metals into a juicy lemon, and connecting them with a wire – electricity will now flow through the wire. The lemon in this experiment provides a liquid containing dissolved particles that carry positive or negative electrical charges, and their movement is what completes the electrical circuit. In this experiment, we will use a salty solution instead, to save lemons.
What you need:
- 6 pieces of braided copper wire about 7.5 cm long, with the insulation removed
- 6 galvanized (or zinc plated) nails, about 2 – 3 cm long
- 2 pieces of copper wire about 30 cm long, with the insulation removed
- 2 pieces of copper wire about 30 cm long, one red and one black, with about 3cm bared at each end
- 2 bamboo skewers
- a shallow container almost as long as the skewers (at least 15cm)
- solution of 0.2M sodium chloride (enough to fill the container to about 1cm from the top)
- Joule Thief circuit kit (with LED)
What to do:
- starting about 5cm from one end, attach the 6 galvanized nails along one of the 30cm pieces of copper wire about 2cm apart by looping and twisting the wire tightly around their heads.
- similarly, start about 5cm from one end of another 30cm piece of copper wire, and attach the 6 pieces of braided copper wire along the wire about 2cm apart by looping the braided piece over the wire, and twisting tightly to hold it in place. Bend the free ends down so they all hang in a row, like the nails. See picture below:

- fix the wire and attached nails to one of the skewers by twisting the short end of the supporting wire around it. Twist on the longer end, too, but leave several cm free for later use:

- fix the other wire with the braided copper electrodes to the second skewer using the free ends as before
- balance the skewers across the container. Make sure that the nails do not touch each other, or the braided wires
- follow the instructions in Appendix 3 to construct the Joule Thief circuit, attaching the 30cm pieces of insulated copper wire where the red and black motor wires are indicated respectively
- one end of the wire with the nails attached should be standing free from the straw. Twist together with the black wire from the Joule thief.
- twist the free end of the red wire to the wire on the other straw with the dangling braided copper wires attached.
- check again that the nails and braided wires are not touching each other, and pour the sodium chloride solution into the container, filling it so the nails and braided wires are submerged, but the wire running along the skewer remains above the liquid.
- the LED should glow faintly. If not, check that the twisted connections are firm.
- pick up one skewer in each hand, and move the apparatus so that one nail/braided wire pair is outside the container before immersing again. This is equivalent to taking one lemon battery out of the system
- continue reducing the number of pairs until the LED no longer glows, and you have found the number of lemons you would need to light an LED.
What is happening?
A Lemon Battery works because of the chemical properties of different metals. Some metals have a greater attraction for electrons than others. When two different metals are placed in a salty liquid, electrons will flow from one to another (in the liquid, the electrons are carried along on the electrically charged particles of the dissolved salt).
If a wire connects the pieces of metal, the electrons moving between the metals will flow through the wire, and through anything connected to it (like an LED). Movement of the charged particles dissolved in the liquid completes the circuit. Although the trickle of electrons is too small to light an LED, the Joule Thief circuit works like a dam, releasing the electrical energy in short bursts that have enough power to make the LED glow.
If you use a lemon instead of the salty liquid, the acid in the lemon juice has particles that carry electrons too, but using salty water is less wasteful.
Appendices
Appendix 1 : Making Solutions
The substances listed below are as obtained from general sources, and may be less concentrated than something purchased from a scientific supplier (particularly the acids). Using more concentrated stocks increases the danger, and changes the final result, so this is not recommended.
Scientists measure concentration using molarity, which measures the number of particles of a substance in a solution, rather than grams per litre or percentages. This is abbreviated as 'M', and can be seen in the descriptions below.
- Check if what you want to dissolve is in the list of special cases before proceeding.
- Use deionized water for best results, but tapwater will work for most things.
- Heat the water to speed dissolving of solids if necessary, and stir well. Boiling is not necessary.
- After dissolving, carefully pour the liquid solution into a stock bottle and discard any solids that remain (filter if you wish).
- Always label your stock bottles (include the date and safety information). Labels are provided for this.
Copper sulphate (0.5M)
12.5g (about 3 teaspoons) in 100mL water
Iron sulphate (0.5M)
7.5g (about 2 teaspoons) in 100mL water
Manganese sulphate (0.5M)
7.5g (about 2 teaspoons) in 100mL water
Calcium chloride (0.5M)
5.6g (about 1 and 1/3 teaspoons) in 100mL water
Sodium carbonate (0.5M)
4.5g (about 1 teaspoon) in 100mL water
Sodium chloride (0.2M)
1.2g (about 1/4 teaspoon) in 100mL water
Potassium permanganate (0.2M)
3.2g (about 3/4 teaspoon) in 100mL water
SPECIAL CASES
Sodium hydroxide (0.5M)
WARNING: 	caustic - will burn skin and eyes - avoid skin contact
		heats strongly when dissolving - dissolve in cold water only
2g (about 1/2 teaspoon) in 100mL cold water
Hydrochloric acid (1M)
WARNING:	highly corrosive - will burn skin - avoid direct contact with skin
		releases corrosive vapour - avoid breathing fumes
		heats explosively if added to water - **always add  ACID to WATER**
		use cold water only
10mL acid added to 90mL cold water
Hydrochloric acid (5M)
WARNING:	highly corrosive - will burn skin - avoid direct contact with skin
		releases corrosive vapour - avoid breathing fumes
		heats explosively if added to water - **always add ACID to WATER**
		use cold water only, stir while adding
50mL acid added to 50mL cold water
Appendix 2: Recipes for scented esters
| Alcohol (common name) | Carboxylic Acid | Ester name | Scent |
|---|---|---|---|
| propan-2-ol (isopropanol) | acetic acid (vinegar) | propan-2-yl acetate | juicy fruit |
| 1-pentanol (n-amyl alcohol) | acetic acid (vinegar) | 1-pentyl acetate (n-amyl acetate) | banana |
| ethanol (ethyl alcohol) | formic acid | ethyl formate | rum |
| methanol (methyl alcohol) | salicylic acid | methyl salicylate | wintergreen |
| ethanol (ethyl alcohol) | butyric acid | ethyl butyrate | pineapple/strawberry |
| butanol (butyl alcohol) | acetic acid (vinegar) | butyl acetate | pear |
| 1-pentanol (n-amyl alcohol) | butyric acid | 1-pentyl butyrate (n-amyl butyrate) | pear/apricot |
| methanol (methyl alcohol) | butyric acid | methyl butyrate | pineapple/apple |
| 2-methylpropan-1-ol (isobutanol) | formic acid | 2-methylpropyl formate | raspberry |
| pentanol (amyl alcohol) | pentanoic acid | pentyl pentanoate | apple |
| octanol | acetic acid (vinegar) | octyl acetate | orange |
| benzanol (phenol) | acetic acid (vinegar) | benzyl acetate | jasmine |
Appendix 3: Making a Joule Thief Circuit
Prepare the circuit board.
The coloured circuit diagram has holes to take the parts of the circuit (you can push out any hanging chads with a pen).
Start with the transistor
The transistor is the small black thing with 3 legs. It goes in the blue holes.
Like the LED, the transistor only works when it is attached in the right orientation. If you pick it up, you will feel that it has a flat side, and a curved side (just like the blue diagram).
Insert the transistor so the curved side matches the blue picture (you might need to separate the legs a bit first). In the picture below, this means the curved side is at the top.
Push the transistor down so it is close to the surface of the circuit board, and bend the legs apart at the back to hold it in place.


Then add a resistor
Now find the resistor - this only has two legs, and it works which ever way you put it in. Resistors can be brown or blue, and have stripes.
Bend the legs a bit, and insert them through the brown holes. Push it down onto the board, too.


When you look at the back of the circuit board, two wires are now adjacent: the middle one from the transistor and one from the resistor.
Twist these wires together as close to the board as possible. Then fold the twisted pair over and make sure they do not touch any other wires.
Now add the wound toroid
The printed circuit has a place for the toroid, outlined in green. take the plain single wire, and push the end through the hole at the end of the outlined green line.
Look on the back, and you will see this wire is beside the other leg of the resistor. Twist these two together.
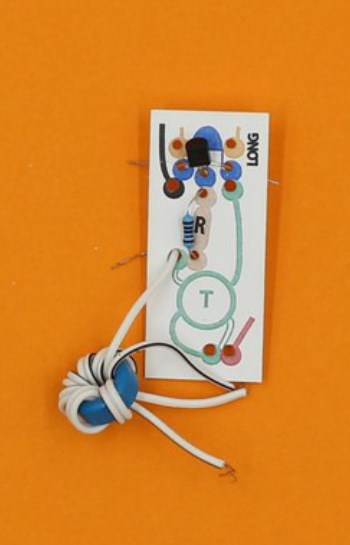


The striped single wire from the toroid follows the solid green line, and pushes through next to a transistor leg.
Insert the striped wire, and twist these two together (bend them away so nothing is touching).


The joined toroid wires go through the hole at the bottom on the diagram, and can hang free until the next step.

Attach the LED
There are two orange holes left on the circuit diagram, one of them labelled ‘long’. Have a look at the LED, and you will see one leg is longer than the other – this long leg goes through the ‘long’ hole. Turn the circuit over, and twist the LED legs together with the wire or wires beside them.
Attach the Lemon Battery
The circuit has two holes to take the wires from the lemon battery – one is red, the other is black.
The red hole is for the wire attached to the copper wires, and the black hole is for the electrode attached to the nails.
Insert the bared ends of the wires you have attached to the lemon battery electrodes, and twist with the adjacent wires.
Winding the toroid – if you need to.
The ring shaped object in your kit is actually a magnet, called a toroid. To make it work in this circuit, it needs to have two strands of wire wrapped around it. Using paired wire makes it easy to avoid having overlapping wires, which would stop it from working.
First, cut a length of paired wire about 210mm long. It is easiest to strip both ends of the wires at this stage, but this can also be done later. To start the winding, thread the toroid onto the wire, about 3cm from one end, and bend the wire around as shown below:


Now take the long end of the wire, while keeping hold of the toroid with your other hand, and loop the wire back through the centre of the toroid. Then, pull the wire tight.
Continue threading the wire through, until there are 4 or 5 loops around the toroid. More loops actually reduces the effectiveness of this device, and it will still work with 4.


When you have finished 4 or 5 loops, you can trim the ends of the wire to about 3cm if necessary (scissors will work).
If it has not been done for you, separate the protruding wires (use a knife or cutters, or just pull them apart with your fingers). Do this on both ends.


If the ends of the wires have not been stripped, do it now. Look closely and you will see one wire has a black stripe, while the other is all white (or grey). Take a plain wire from one side of the wound toroid, and a black striped wire from the OTHER side, and twist them together. You end up with this:
Production notes
Instructions
Each of the seven experiments also has a prepared instruction sheet:
For facilitators, a workshop plan is attached:
home_chemistry_kit_workshop_plan.doc
Instructions for the Joule Thief circuit have been reduced to a workshop handout:
joule_thief_circuit_instructions.odt
Instructions above are in word doc format for ease of editing, but a pdf of the InDesign formatted handout is here:
These were printed in colour and laminated for distribution with the finished kits.
Labels
Labels were produced for reagent bottles using the format here:
Hazard labels were also needed for some reagents, and should be attached to bottles as required. These are formatted for a 38 x 21 sheet of sticky labels:
Packaging
This kit was designed as a gift, and a bespoke box was produced and decorated using the design file here:
Critical Success Factors
Which of the critical success factors does this Prototype target? For more details see SLQ-Strategic-Plan-2016-20
Enable Access
- Provide life skills and early childhood literacy programs
- Increase free access to digital content
- Strengthen Queensland library infrastructure and discovery platforms
Engage Community
- Grow the State’s historical collection of Queensland culture and heritage
- Engage with communities of interest through dedicated centres of engagement
- Facilitate the community’s use of and interaction with content
Build Capability
- Build capacity within our communities of interest
- Generate new revenue sources
- Position our workforce for the future
Delivering of The Edge Promises
Aside from the SLQ Strategic Plan, there is The Edge's commitments to the community and the lens we look at it through. Here are a few more check boxes for you to answer
This empowers creative experimentation across...
- Art?
- Science?
- Technology?
- Enterprise?
It will inspire...
- Whimsy?
- Nostalgia?
- Curiosity?
- Awe?
Feedback
1. Feedback:
Solution:
2. Feedback:
Solution:
3. Feedback:
Solution:
4. Other observations:
References
This were you put external links like LED generator
Files
This is where you put files for laser cutting etc..