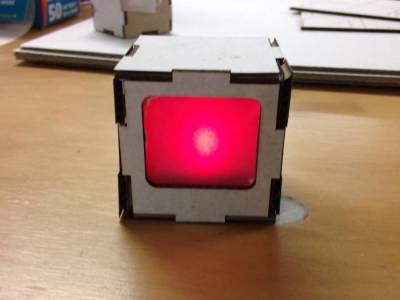
Pixel Box V2
THIS WORKSHOP HAS NOT BEEN RUN SINCE 2016, IS AVAILABLE FOR ARCHIVAL PURPOSES ONLY. ANYONE SEEKING TO ADAPT THIS WORKSHOP SHOULD CONSIDER THE FOLLOWING INFORMATION.
WARNING - This workshop makes use of small coin cell/ button batteries.

In December 2020, the Australian Government made mandatory safety and information standards for button/coin batteries and consumer goods that contain button/coin batteries (the standards). The standards included an 18 month transition period and became mandatory from 22 June 2022. From 22 June 2022 manufacturers, importers, wholesalers and retailers of button/coin batteries or consumer goods that contain button/coin batteries supplied to Australia, must comply with the applicable Australian mandatory safety and information standards. Supplying or selling non-compliant products to consumers in Australia is illegal. The four mandatory standards are as follows:
• Consumer Goods (Products Containing Button/Coin Batteries) Safety Standard
• Consumer Goods (Products Containing Button/Coin Batteries) Information Standard
• Consumer Goods (Button/Coin Batteries) Safety Standard
• Consumer Goods (Button/Coin Batteries) Information Standard
Summary
Pixel Box is a short - 10-15 minute - community engagement workshop. It has an art focus, basic electronics and a number of possible extension activities. These activities will be listed later in this document as they are developed.
Developed by Daniel Flood and William Connor from Pixel Box V1
Materials
These materials are per participant if not specified otherwise.
- 1 x CR2032 Battery
- 2 x LED (random colours)
- Laser Cut Housing (see below)
- Tracing Paper (70x70mm square)
- Quick Grip Adhesive or Hot Glue Gun
- Maybe some Scotch tape?
Tools
None
Instructions
Step Zero:
Prep all material prior to workshop. Ensure sufficient materials for the number of participants.
Step One:
Assemble inner box.
1. Unpack your kit and put the Paper, LED and Battery off to the side of your workspace.
2. Unpack the laser cut panels shown here.

3. Pop out panels and arrange accordingly.

4. Take the four A panels and, using glue to hold the panels together, begin to assemble the inner box as shown.
-tip- If you put the same colour facing outwards, it will be very easy to assemble.


5.Slot the B panel into the grooves at the back of the inner box and fix with glue.

6. Place assembly off to the side for drying.
Step Two:
Assemble outer box.
1. Take the four C panels and, using the same technique as the first box, assemble with glue. Slot the D panel into the grooves on the end.

2. Place assembly off to the side for drying
Step Three:
Assemble LED and battery assembly
1. Grab your LED, battery, E and F panels.

2. Slot the LED contacts into the E panel with the longer contact in the outer most hole and place the coin battery into the hole of the F panel (Negative side up).

3. Bend the short contact of the LED up to almost flush with the E panel. Attach the F panel to the bottom of the E panel and ensure that the long contact of the LED slips inside the slot next to the coin battery.
Bend the long contact up flush against the battery.


Step Four:
Insert LED and Battery assembly into inner box
1. Slot LED into the inner box.

Step Five:
Wrap tracing paper over open face of inner box
1. Take your tracing paper and ensure that it is flat and straight.
2. Wrap your paper over the exposed side of the inner box. -Tip- wrap it similarly to a gift at the corners to make the next step easier and ensure an even spread of your paper. maybe use some Scotch Tape to hold in place?

Step Six:
Slide inner box into outer box.
1. Take your inner box and slide it into the outer box. Ensure that the paper side is facing the D panel. Pay particular attention to the orientation of the D panel's opening and ensure that your LED is on the “Bottom of the opening” for that TV look.


Files
This is the most recent file laid out. pixel_box_004_final.cdr