Huge Signs - Construction Techniques
In keeping with the style and ethos of the Grumpus Project, these signs will be constructed mainly from cardboard (conductive cardboard being in short supply, the lights and controls will be various pieces of electronics).
In order to build a stable and strong frame for the 2 x 3m signs, new techniques were developed to make use of cardboard in this activity.
This documentation by Peter Musk, 2021.
Frame Building
In order to make construction sturdy and joining easy, some arbitrary specifications were adopted for the frame construction:
- main members to be 100mm external dimension square section, with 90mm internal sides all round
- material to be 6mm double ply cardboard (available in 1200 x 2400 sheets)
- high temperature hot melt glue to be used in assembly and construction
- folds are facilitated by crushing the cardboard along the inside of the bend - use a round tool, about 5mm diameter for best results (do not cut the surface layer if possible, to maintain strength).
Take note that the external fold of the 100mm beams needs to be at the back of the structure, giving a flat face for the sign to be placed on. This also avoids having too many layers of cardboard to cut through to make the joins described below (and pushing the joins out of square).
100mm beam fabrication
These elements will be joined using 90mm square section cardboard beams, and it soon became obvious that ensuring a consistent internal dimension of 90mm required special attention to measurements and fabrication of the 100mm main elements:
 Mark out a series of lines, 30, 110, 100, 100, 100mm as shown
The measurements shown were found to work best for 6mm cardboard. The 110 mm side allows for the external fold of the final wall, as shown below
 Glue is applied to the 30mm section, and the square tube rolled on to the line.
90mm internal connector fabrication
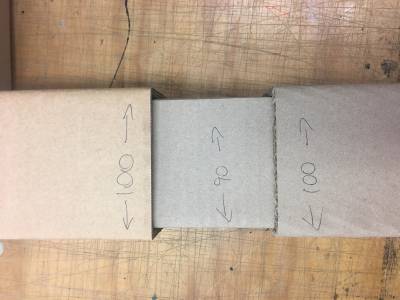
The internal connectors must have all sides at 90mm, which meant that the glued fold must be inside the section, as shown below:
 Mark out lines at 30, 80, 90, 90, 90mm as shown
These measurements allowed for the inner fold to make a 90mm face, as shown below:
One dimensional, straight joins
100mm beams are easily joined by inserting a length of 90mm beam inside the cavity. A tight fit is best, and judicious crushing can get a slightly overlarge segment to push inside the 100mm beam, if necessary.
Glue one end in first, and apply glue to the exposed 90mm part, then push the other 100mm beam on.
Two dimensional, T-joints
These joins will be used where needed to support the 2m length of the frame top, with joins at top and bottom. Avoid making a t-join where 100mm beams are joined together by the means above.
A 90mm square hole is cut into the cross beam (the resulting flaps shown are best removed), and a straight 90mm joiner glued into the end of another beam. Apply glue to the free end of the 90mm beam, and push into the hole - glue will adhere to the top and bottom inner face of the perpendicular beam.
Three dimensional, corner joints
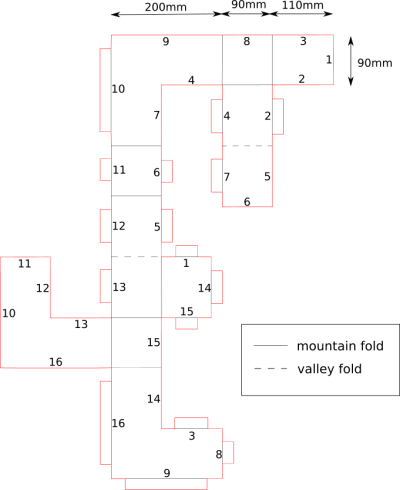
The sign frames will be deep enough to allow sandbagging for stability, and this means the corners will need to be connected in three directions. Rather than cut into a corner already weakened by the technique described above, a design for a 3-way 90mm joiner was developed, to be folded from a template (full sized design files available below).
Mountain folds (fold up from the page) need to be scored on the back of the cardboard. This includes the folds along the inner edge of each tab.
Valley folds (fold down into the page) are scored on the front of the cardboard.
Folding the 3-way joiner
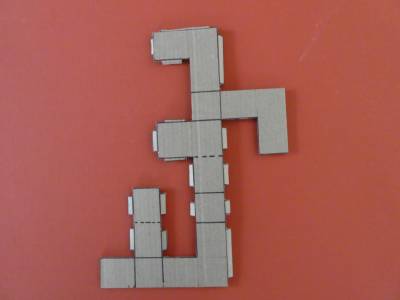
 Start by transferring the template to your material (this is a 1/3 size example)
 Fold the tabs down first all around.
 Do the internal folds, scoring along the back as required.
 Begin at the top, pressing firmly as you glue to keep the external dimensions to 90mm. Keep the outermost section (3.1.2) until last - do not it glue yet.
Design files
A4 and full sized templates (SVG format) are here: template.zip


