STORY LAB: ROBOT RACERS
A workshop for participants aged 8-12
This workshop was created by the Young People and Families team for State Library of Queensland’s Summer Festival: Art + Stories + Play program in January 2019.
Description
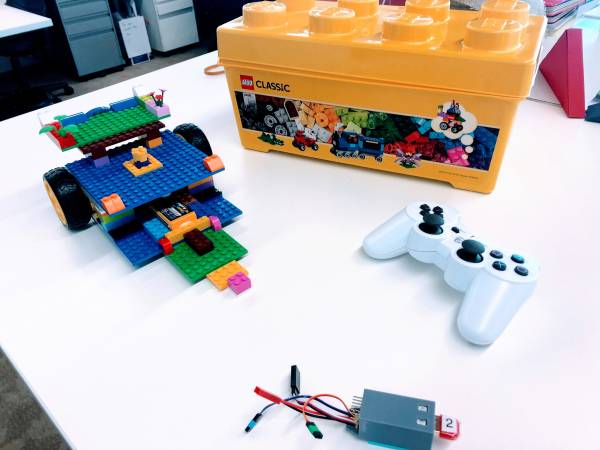
Using a custom-made robotics kit designed and produced by members of the Hack The Evening meetup at The Edge Fabrication Lab, participants can engineer a robot racer using Arduino controllers, motors, and Lego. Once their racers are complete, they design and fabricate a large scale race track. Then ready, set, race to compete for good times and glory.
Duration
5 hours, including a 45 minute and 15 minute break.
Participants
- Maximum 15 people aged 8-12.
- Participants work in teams of 2-4, depending on numbers.
- Each group collaborates on the creation of a single Robot Racer, using their own robotics an lego kit.
Facilitator experience required
This workshop can be facilitated by anyone! It’s a plug and play workshop with no prior experience necessary. You will need, or have the time to get familiar with the following:
- A basic understanding arduino chips are, an and what they do
- A basic understating of electronics.
- A basic understating of engineering with Lego.
Outcomes
- Introductory understanding of Arduino, and how they can be used in robotics applications
- Practical understanding of the components of an Edge Bot, how to connect them, and how they can be controlled via the Arduino
- Engagement in collaborative design process
- Realisation of a design
- A serious amount of fun
Venue requirements
- Flat floor workshop room or auditorium, minimum 7m x 12m in floor space
- 5 x Workshops Tables
- Projector or LCD Screen
About the BrickBot Kits
These custom robotics kits are currently in a prototype form and are not available to the public. They are designed and fabricated by members of the Hack The Evening meetup at The Edge Fabrication Lab right here at State Library of Queensland. The vision for these open source hardware & software robotics kits is that they be made available as a low-cost resource available to the public, particularly public library staff.
At a beginner level, Edge Bots are a perfect introduction to Arduino electronics and how they can work with physical components to creative physical computing outcomes. At a more advanced level, they can also be used as a resource to develop skills in coding for Arduino, either in the Arduino IDE or using C++.
If you're interested, check out the original entry on this wiki. It features information about the original use of the bots for a battle comp, and lists the code that runs on the Arduinos.
Material Requirements
- 5 x BrickBot Kits featuring custom arduino hardware including bluetooth unit, plastic enclosure, break out cables
- Standard lego base boards
- 1 x Medium Lego Classic Creative Brick kits
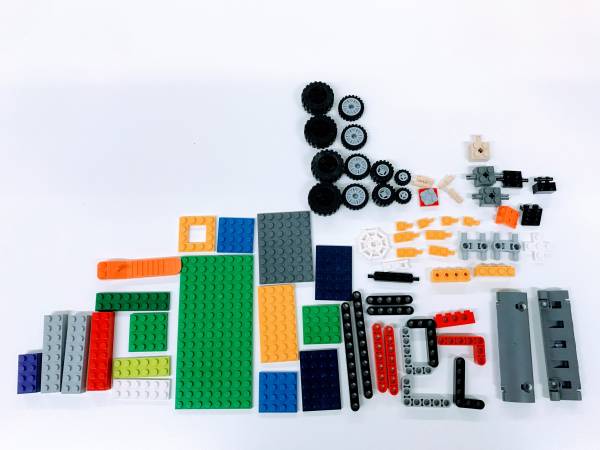
- A selection of Lego Technics parts.
- 2 x DC Motors
- 2 x 3D printed motor cases with lego base and top surface
- Playstation style bluetooth controller
- USB micro cable
- 12v Lithium Polymer balance battery charger
Notes:
- Each kit should be labelled 1-5.
- Boffins at The Edge though the the following Lego selection where the ultimate combination of parts for Robot Racer building. Each of our kits had these parts included separately in a bag, with other lego mixed up amongst each set.
Other materials
- 8 tables as workspaces
- Name tags
- Marker Pens
- Cardboard plaque for team names
- Audio system and playback device (optional)
- Various sound effects for Robot Racers Tournament including Mario Cart music (optional)
Track building materials.
- Painters tape
- Cardboard Boxes
- Any recycled materials or toys that can be made into a race track or obstacles.
- Children’s stools chairs for ‘pit crews’ to sit on.
Workshop Summary
4 hours total, plus 1 hour of breaks.
| 45 minutes | Intro, Team Building, Safety Briefing |
| 45 minutes | Robot Racer Construction & Testing |
| 15 minutes | Snack Break |
| 45 minutes | Robot Race Customisation, Testing and Fixes |
| 45 minutes | Lunch |
| 30 minutes | Practice Laps |
| 30 minutes | Racetrack Building |
| 60 minutes | Robot Racers Tournament! |
Setup
This workshop would ideally be run in a space where there is room for a simultaneous workshop space for building, and a racetrack space for racing. This means you could avoid changeover of the space in between.
In my case, I did not have that luxury, so these instruction are for the setup of a space that needs to be changed over at lunch. Prior to the setup of the space, take the painters tape and create the outline of your racetrack on the floor. For our space, I created a long skinny oval circuit with two long straights.
Divide the track into 6 sections - Home Straight, Section 1, Section 2, Section 3, Section 4, Section and Section 5. Each section should be a similar size. Label each section by taping out the number in each section. Once your racetrack is marked up, you can setup workstation for for the first.
The space should be setup in five workstations, all facing the presenter at the front of the room.
Each workstation should be numbered 1-5 to match the Robot Kit numbers. have two demarcated spaces in consistent colours.
- The Workshop Space - central to the table as a space for construction. The idea here is to minimise the amount of time that a robot gets picked up or passed around. The more that happens the higher the chances of the robot getting dropped or broken. This workspace allows for participants to rotate through the space when taking turns, by keeping the robot construction confined to one space.
- The Storage Space. As the name suggests, this space is for storage of any parts that will be required throughout the Robot Racer construction process. The idea of this space is that it’s contents are not to be touched without specific instructions from the presenter.
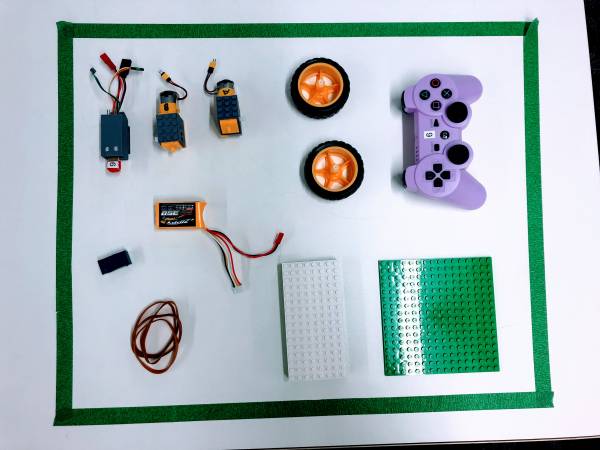
In each Storage Space, the following equipment should be laid out.
Whilst the goal of the workshop is having fun, learning robotics, and racing for glory, a level of friendly competition can help participants focus their energy throughout the session. Setting up a points board before the workshop will give you a headstart. I used a system where positive behavior could be rewarded through the subtraction of seconds from a teams best TIME TRIAL time during the tournament. Similarly, seconds could be added through
DETAILED WORKSHOP BREAKDOWN
Step 1: Intro, Team Building, Safety Briefing
(00:00 - 00:45)
Introductions
Upon entry to the workshop, I ask participants to sit on the floor in a circle in a clear space away from workstations. I also ask them not to touch any of the equipment on the workstations until the are instructed to do so.
A strong and through introduction is important for:
- Setting up a positive working environment
- Builds a feeling of trust
- Letting go of any nervous energy
- Building the foundations of a consistent and clear way of working - that there will be two types of working.
Introductions can include:
- Acknowledgement of country
- Introduce yourself as the presenter, your background, experience and interest in the workshop topic.
- Introducing any other staff that might be in the room.
- Unpack the ‘ground rules’ for collaborating together in a positive work environment. (Come up with these yourself - mine are Kindness, Generosity, Respect, Do your best).
- Explore ways of working: A: Instructional, where they are expected to listen, and respond when asked to. B: Free-working, where they will be required to self-lead their work in groups, and are able to freely chat and converse.
Team Building
Many STEAM workshops I have seen jump straight into the workshop content without making time to set up these important foundations. By focusing and uniting the group - the participants will work together better and achieve more.
Play a game!
Team Building helps form the working groups that we will be forming into for the remainder of the day. It is important to get groups set up as best possible early in the session to avoid any conflict or difficulty later on. I often begin with a group game to allow an opportunity for the group to get to know each other and have fun in a low-pressure way, but this is also an opportunity for me to gauge the dynamics of the room and allow me to make a more informed choice when it comes to group selection.
I like to choose a game that everyone will have the opportunity to succeed at, regardless of their athletic ability. I also try to choose a game that is based on a process of focus and concentration, rather than one based on physical exertion.
Team Selection
In the process of selecting groups for this activity, I take into account the following:
Ascertain how many participants are here with a friend or family member, and if they would like to work together. Ascertain how many participants are not here with a friend or family member, an if any of these participants have made a connection with someone else during team building, or have a similar energy. If there are female participants, allow them to identify if they would like to work with other female participants, or with anyone else in the group. Once this is done, create groups based on the preferences and personality dynamics of the group. If there are younger participants, paring them with older participants can help with skills sharing and focus throughout the day.
Team Naming
In this process, I ask participants to come up with a Team Name, Team Motto and Team Movement that represents them and their team values/personality. Give groups 2 minutes to come up with each , then share with the group. Write their team names up on the Points Board as they do so.
I also ask each group to write their team name on their cardboard plaque.
We are now ready to allocate each team to their workstations. Before participants travel, don’t forget to remind them not to touch anything
Role Allocation
In the first part of the workshop, participants are enrolled as mechanics to build their Robot Racer. To encourage sharing an establish a fair and equitable process for all participants, giving each mechanic a letter (A, B, C) an asking groups to rotate through their construction jobs using that letter system can help avoid conflict or tension that sometimes arises from turn taking.
For example, the first construction task is performed by mechanic A. The second is performed by mechanic B, an so on. ONce everyone in the group has had a turn, the process starts again at A. By referring to this sharing system
Safety Briefing
The safety briefing for this workshop can run as follows:
- Safety is the most important aspect of this workshop.
- Do not touch any of the equipment without being instructed to.
- Be careful with the equipment - some of it is delicate.
- IMPORTANT: Be careful when handling the battery.
- Do not put anything in your mouth.
- If something is broken, don’t pick it up or try to fix it. Get a staff member immediately.
Project Briefing
A clear briefing helps participants understand what they are in the workshop to achieve, an allows them to self-direct their focus as they work through each step of the workshop process. Participants who don’t understand what they are working towards and have no means of figuring out where they are up to in a greater process are more likely to lack focus.
So - I briefly unpack each part of the process. Having the workshop schedule breakdown somewhere in the room will help participants orientate where they are up to in the process an where they are heading next (or when lunch is happening - very important information).
This workshop can be unpacked through the following steps.
- What is an Arduino?
- Build Robot Racers
- Test Robot Racers
- Customise Robot Racers
- Driving Practice
- Build Racetrack
- Race for point & glory.
Step 2: Robot Racer Construction & Testing
(00:45 - 1:30)
About Arduino
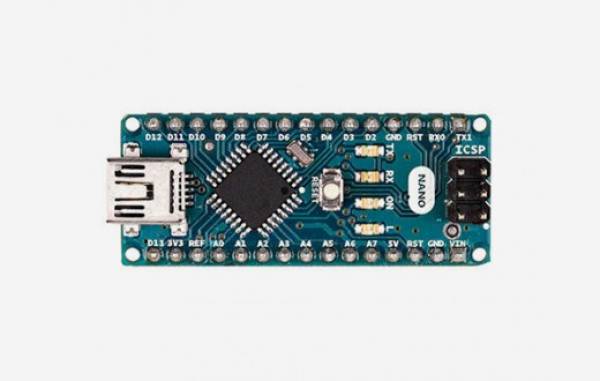
This robotics kit was designed by members of the Hack the Evening meetup group at The Edge using an open-source hardware and software platform called ‘Arduino’.
Pictured: Arduino Micro
Arduino boards are able to read inputs - in our case - data from the buttons/joysticks on a playstation style gaming controller - and turn it into a corresponding output - in our case activating two motors. You can tell an Arduino board what to do by sending a set of instructions (code) to the microcontroller on the board. To do so you use the Arduino programming language and the Arduino Software (IDE).
Arduino are an important technology in what is called Physical Computing, Physical computing means building interactive physical systems by the use of software and hardware that can sense and respond to the analog world.
So the people who designed and built this robot kit had an idea to connect this tiny computer to motors and a playstation controller. But Arduino can be used to connect to anything electrical! Check out some other cool Arduino project that have been created.
Arduino are also open source technology - which means they are cheap - and built on a culture of sharing. Millions of people have created things using Arduino and shared them for free online. This really is technology for good, with everyday people creating things to make life better.
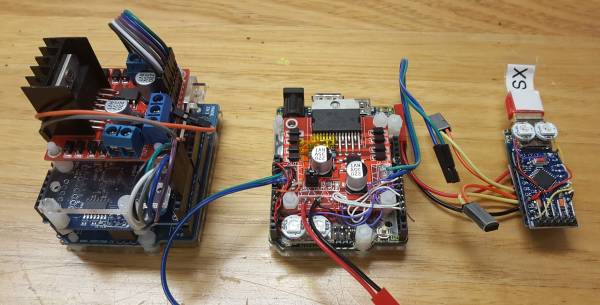
Pictured: (L-R) Robotics prototype 1, 2, an the current version we used in this workshop,3. The next step is to get the hardware created as a PCB (printed circuit board), making this open source hardware available to be ordered and taking this project to the next level!
Robot Racer Construction & Testing
Now we are in our teams, and know about the technology we are working with, we are ready to start building our robots. This step has four parts
- Chassis construction
- Electrical plug-in
- Testing
Chassis construction
Whilst there is no ‘correct’ way to build a Robot Racer chassis from lego, in this workshop I added a instructional process to the beginning of the construction process to give all groups an opportunity to have a strong an equal foundation. If everyone has a really solid chassis, it means there is less potential for catastrophic failure later on during the races. The lego construction does allow for a trial and error engineering process which is ideal for learning, but in a short period of time where you want to ensure a positive outcome for participants, sometimes providing the building blocks for success can help early on. Also, participants will be extremely familiar with Lego style instructions, and using these familiar skills early on will help them focus into the process.
This is the initial chassis that I asked each group to build. You can make changes if you’ve got better engineering ideas!
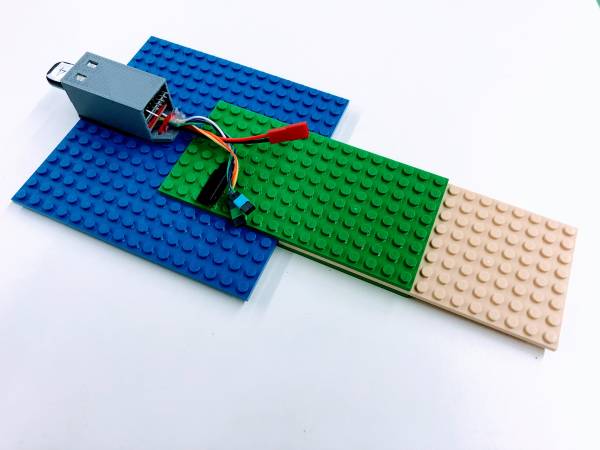
1. Mechanic A: Use a 16 x 16 base plate and attach it to a 16 x 8 base plate to create the ‘nose’ of your racer.
2. Next Mechanic: Extend the nose of your racer using another 16 x 8 base plate.
2. Next Mechanic: Attach another 16×8 base plate to the underside of the chassis in the same position as the original which creates a brace.
4. Next Mechanic: Now take your Arduino unit (handily housed in a 3D printed case with Lego plates on the bottom for attachability) and place it in the read centre of your chassis, wires facing forward.
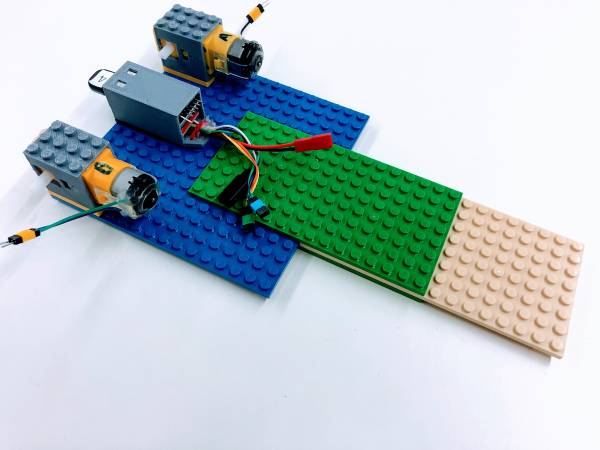
5. Next Mechanic: Take your DC motors and attach them to the rear left and right of your chassis, with the white axle rods facing outwards.
6. Next Mechanic: Use a 16 x 8 piece to top brace the two motors together.
7. Next Mechanic: Take your 11v battery, an place it in the centre of your chassis. We are trying to keep the weight of the racer distributed as close to the wheels as possible so the front is not unnecessarily weighed down.
By now, participants should be used to the convention of taking turns, so encourage them to now keep that process going autonomously.
We are also about to move from the fixed instructional process to a more collaborative free-thinking process where groups will be making design and engineering decisions for themselves.
The following tasks are the first steps to take as a group in completing their chassis.
- Reinforce your wheels and Arduino unit by building up around them using 2×8 brick and increase the amount of surface area your top brace. A rule of thumb here is that the more bricks connect your bottom base plate to the top brace, the stronger your robot will be. This is particularly important around the wheels where most of the power and movement is generated.
- Build a case around your battery to ensure that it doesn't’ fall out.
- Make sure all your wires are still accessible.
- Keep sharing and taking turns.
IMPORTANT:
At this point some more design orientated participants may want to start planning the customisation of their racer in terms of decorative and aesthetic additions. Whilst this thinking is definitely encouraged, it’s important to be clear about the order that things need to take place in. Decorative elements can get in the way of the engineering process, and the next step, which is attaching electronics. It’s not helpful to have more than one part of the Robot Racer being worked on at once. Groups are encouraged to identify what jobs need to be done, set an order that they need to be done in and allocated a mechanic to complete the job. Whilst some groups are working on a job, others can be finding pieces for the next one. Each group is given a limited an equal(ish) palette of Lego. In my workshops, I had a box of bulk Lego pieces which could be requested by participants. The basis for this is that groups needed to identify what parts they required and for what they would use it for, at which point we could search for the piece in the bulk Lego box. Groups who were spotted sneaking Lego from the box were penalised in points.
Electrical Plug & Play
The next step of the process is to connect and test the electronics in the Robot Racers.
Use one of the Robot Racer chassis to demonstrate as a group. I took everyone away from their workstations to the shared central space and demonstrated on the floor, so everyone was focused and not tempted to touch their Robot Racer whilst I gave my example.
It is CRUCIAL that plugin only ever happens on the floor. If this is done on a table, the risk is that the robot drives off the surface and crashes onto the ground into a million pieces.
Steps for plugging in your Robot Racer
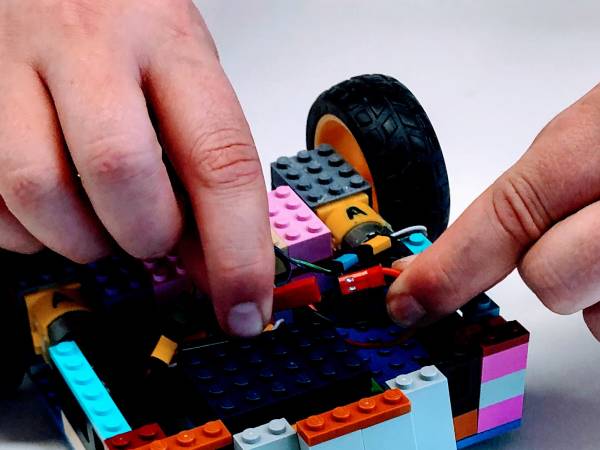
1. Plug the motor cable with the YELLOW pins into the wire with the GREEN plug. To start with, it doesn’t matter which one goes into which. What we are doing here is connecting an OUTPUT pin on the Arduino to the motor, to send it power.
2. Plug the other motor cable with the YELLOW pins into the wire with the BLUE plug. Now both your motors are connected.
3. Now take both of the RED wires, one has a plug an the other has a socket, and connect the two. If you’ve completed this step the two LED lights on the Arduino should flash YELLOW and RED while it is in setup mode. Once setup is completed one of the LEDs will remain BLUE.
4. Now it’s time to test that the instructions from the Arduino is being sent to the right place. You’ll know that the pins have been plugged in correctly if the Robot Racer drives in the correct directions when controlled using the Playstation style controller.
5. Pick up the controller and press P3. While the controller is pairing over Bluetooth the four lights on the rear will be flashing. You’ll know that the controller has paired when the flashing has stopped, and the number 1 light is now on.
6. Now to test your Racer using the joystick test. Your Racer has been coded to be controlled using the RIGHT joystick.
ON your joystick:
- Tap forward. Note what direction your Robot Racer drives.
- Tap backward. Note what direction your Robot Racer drives.
- Tap left. Note what direction your Robot Racer drives.
- Tap right. Note what direction your Robot Racer drives.
Did your Racer move in the right directions?
- If yes - you’re lucky! Your pins are all connected correctly and you are ready for the next step.
- If no - not to worry - follow the following step.
7. Troubleshooting your connections. If your Racer did not drive in the correct directions on your Joystick Test, it means that the pins on some of the cables are connected to the wrong plugs, and information is being sent to the wrong place. This is a great trial and error learning process to work through as it requires you to test your setup, observe how it’s working, and make adjustments based on what you’ve observed.
- Unplug the pins plugged into the GREEN socket. Flip the pins 180 degrees and replug. Complete the Joystick Test again. Did your Racer respond correctly this time either in a forward/back or a left/right motion? If one of your directions has corrected itself, leave the pins as is. If they have not correct themselves, change them back.
- Unplug the pins plugged into the BLUEsocket. Again, flip the pins 180 degrees and replug. Complete the Joystick Test again. Did your Racer respond correctly this time either in a forward/back or a left/right motion? If one of your directions has corrected itself, leave the pins as is. If they have not correct themselves, change them back.
- If neither of these solutions work, SWAP the pins from the BLUE plug to the GREEN plug and vice versa. Did your Racer respond correctly this time either in a forward/back or a left/right motion? If one of your directions has corrected itself, leave the pins as is. If they have not correct themselves, change them back.
- You’re looking for the perfect combination of pins to plugs - you’ll know you’ve found the right combination once your Joystick Test works correctly.
All of this process, from Steps 1-7 are ideally demonstrated to participants first, allowing the opportunity for everyone to see the process happen in front of them from beginning to end before they start it for themselves.
Now that that has happened, ask groups to head back to their workstations, put their Racer on the floor, to begin completing this process for themselves. This again, should be a shared process with everyone having a go.
Some groups will finish before others. Once groups have finished, instruct them to take turns having ‘Driving Practice’ within a defined space of the room. If Robot Racers start to be driven across the room freely, one of them is likely to get stood on an destroyed, leading to all kinds of trouble.
IMPORTANT:
- Robot Racers should never be driven anywhere but the floor.
- No-one should ever be using the controller whilst someone is holding or working on a robot. Unexpected thrusts of the motors can be a recipe for destruction.
Before the break, get groups to take their Robots and Controllers give a tidy up of their space; Racer in the workshop space, other bits including the controller in the storage space, and all excess Lego way in their lego tub. The first 3 groups to complete this task were rewarded, the last group was penalised.
Step 3: Snack Break
(01:30 - 01:45)
Snack Break. An extremely important aspect of any workshop.
I always make sure my groups take the snack break in a different space, preferably outside, to keep your workshop space focused, and allowing for any high energy randomness to take place elsewhere.
Before the participants re-enter the room, I often get them to shake off their outside energy, and reconnect with their indoor focused energy. I also remind them not to touch anything when they re-enter and to wait for instructions.,
Step 4: Robot Racer Customisation, Testing & Fixes
(1:45 - 2:30)
Once back in the room and behind their workstations, give your participants their next task - to customise their Robot Racer to give it unique looks, features and stories. This is the time for their imagination to kick in and shine. Because they are already likely to be highly skilled in Lego construction, the designs they come up with will likely be quite sophisticated.
The beauty of building with Lego is that if something doesn’t quite work out, you just pull it apart an try again.
As this customisation happens, the engineering of the Robot can also evolve to better suit the vision for the Robot Racer. This process is encouraged. As participants get more familiar with their task they will be able to make improvements based on what they have learnt so far.
During this process, flaws in construction and engineering can also become known. It’s important to let participants know that YES, there will be unfortunate accidents leading to unwanted robot destruction, but to not be upset by this! The process of learning is a process of trial and error and building on mistakes. A broken Robot is just an opportunity to rebuild a stronger robot.
Here are a few examples of some outstanding robots created in past workshops.
In the last 15 minutes of this process, I encourage groups to put their Racers to test to make sure that their customisations are secure and sturdy. Again, it’s important make sure that each group is working within the confines of their floorspace immediately around their workstation to avoid accidents.
Step 5: Lunch
(2:30 - 3:00)
If like me, you don’t have the luxury set up your racetrack area in a separate space, you will be required to do a changeover of the space during the participants lunch break.
I moved the workstation tables to the edges of the room t to become a ‘pit lane’ of the racecourse, where maintenance work can be done on Racers.
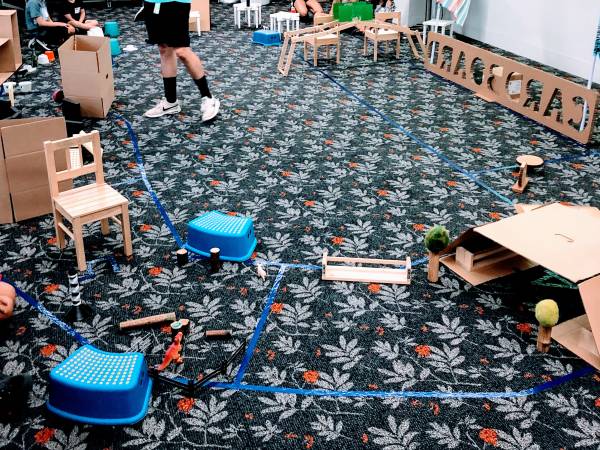
On the floor, you should have already pre-marked up a racetrack circuit using painters tape. Setup the stools on the edges of the room to create a ‘seating area’ for groups of race spectators. Prep your ‘junkyard’ bits and pieces into five boxes ready to give one to each group as racetrack building material. I organised my materials in themes so that each section of the racetrack had a different feel - for example - one section was made entirely of cardboard, another of timber, another was all plastic animal toys.
Step 6: Practice Laps
(3:00 - 3:30)
Practice Laps
Using the Playstation like controller as the means to race your robot is harder than it looks! A short amount of time to have a practice run on a blank race-course is a massive help to participants, particularly people that might be less experience driving cars in real or video-game environments.
Key things to communicate to participants about driving your Robot Racer are:
- The driver should be standing in the ‘inner oval’ of the racetrack. They can be accompanied by one ‘Pit Crew’ member to help out if the worst happens and there is a crash where debris needs to be cleared from the track, or worse if a Race needs to be serviced mid-race.
- EVERYONE else should be sitting in their seating area.
- The driver should turn their body so that they are facing the same direction as their robots trajectory. If your Robot Racer turns left, you turn left with it. This is to help your brain intuitively know which way to go next!
Practice Laps structure:
- Practice takes place on a blank racetrack.
- Each team has one team take part in a practice per race.
- Each driver starts their racer from their corresponding section of the track.
- All drivers start simultaneously. When they complete a full lap and arrive back at their origin they are finished and can pass their controller onto the next player.
Step 7: Racetrack Construction
(3:30 - 3:50)
Building a racetrack is an excellent way to add further agency and participation into this workshop. I found that it added another dimension of ownership over the Robot Racers tournament, and provided an additional set of tasks throughout the tournament which helped keep participants busy and focused.
During the lunch break, I went ahead and built my own ‘home straight’ section with a starting/finish line and a long open straight to get started. This allows participants an easy start to their race, and gives a little example of the type of construction possible.
My brief for the workshop building process was as follows:
- You will be given a box of junk that you can use to build your racetrack.
- This is an entry level racetrack. In racing games, the first track you compete on is always the easiest. That’s the kind of track we are building.
- Each team has a section of track. You may only build inside your section.
- You may place no more than three obstacles in your race track. Everything else can be perimeters or decoration.
- You must be able to fit the width of a Robot Racer through every section of the course.
- Race Officials will do a final check of each section of the course. The officials have the right to amend the course if it is found to have breached track rules. The decision of the racetrack officials is final.
- You have 10 minutes to build your course.
Example of a junkyard track created by participants at State Library:
Step 8: Robot Racers Tournament
(3:50 - 5:00)
Now, the moment we have all be waiting for as finally arrived. It is time to complete for fame and glory in….
![]() THE ROBOT RACERS TOURNAMENT
THE ROBOT RACERS TOURNAMENT![]()
Crowd goes wild. Etcetera.
For this part of the workshop, like to take on the the role of Racetrack Official and Master of Ceremonies, facilitating the process in a way which is slightly different to what they have experienced in the workshop so far. This is the fun bit of the workshop that everyone has been working hard towards, so it’s good to be playful in your approach. I also use music and sound effects to help punctuate the structure of the workshop and set routines, in a way that feels light and fun. I chose to use the soundtrack from Nintendo’s Super Mario Wii as the background and racing music.
That said - participants having too much fun can also be a problem! Excitement and good times can quickly descend into chaos, so it’s important to be clear about your racing rules and protocols.
The main races in the tournament structure are Time Trials. These are one on one races where the goal is to get through the course as much as possible.
Ground rules for Time Trials include
- Every participant will have the opportunity to race in a Time Trial.
- At the beginning of each race, I will announce the competing groups. At that point, nominate one group member as the driver, and one as the Pit Crew.
- Pit Crew are responsible for taking the Robot Racers from the Pit Area to the starting line.
- Drivers are responsible for testing that their Racer is working (joystick test) and competing in the race.
- ALL other group members are to sit in their grandstand seating area as spectators. Participants who are not in their seating area will be penalised.
- At the beginning of the race your team names will be announced. Competing teams and their supporters need to do their team gesture for bonus points.
- When the race is about to begin will hear the 3,2,1 GO. On GO, the race is underway.
- Pit Crew should stand back until they are instructed to step in by race officials. Pit Crew can only step in for two purposes; to pick up debris that has fallen off their Racer, or to perform maintenance on their Racer if the Racer is broken to the point it cannot move.
- In some instances, the Race Officials can step in to physically help stuck or broken robots, at their own discretion.
- In the event that a Robot Racer is destroyed and cannot complete the track, they will be awarded the finishing time of their competitor minus 15 seconds.
- A timekeeps (staff if possible) records the time of each racer, and records it on the whiteboard.
- At the end of each race, the Pit Crew takes their Racer back to their pit area, an can quickly do any repairs required before the next race. Both the pit crew and the driver should be sitting back down as spectators before the next race begins.
Officiating the Tournament
The winner of the time trial is decided by taking the fastest lap from each group, and subtracting or adding that groups positive or negative seconds that they have been accumulating throughout the workshop as either penalties or prizes. This process can take some time. Whilst one staff member does the maths, I often use this moment in time to do some reflection with the group, sharing together their favourite parts of the workshop, and suggesting ideas to make things better.
This process is ALOT of fun. There is yelling, screaming, chanting, Cries of joy, and sometimes sadness. This is an important time for the facilitator to try and manage everyone's expectations in a high energy environment. Encouraging good sportspersonship will be essential - particularly when announcing the winners of the the Time Trials. A reminder that the real reward is having fun, making amazing things, and learning some new skills is the real prize does not go astray.
At the very end of the Time Trial, if there was time I would get participants to pack up the racetrack an nominate one driver per group to compete in one of the following.
- Snacks - A game in which a driver from each team has to collect balls from the centre of the track, an move them back into their own racetrack section.
- Royal Rumble - Where the goal is to destroy your opponents Racer an be the last to survive.
At the end of the workshops, I instruct participants to leave their Racers in their pit area. If they, or their parents have phones with them, I welcome them to take a photo of their creation.
THE END
That is the end of this Robot Racers workshop resource. We hope you find it useful!
For questions in regards to this resource please contact the Young People and Families team at State Library of Queensland on ypf@slq.qld.gov.au or on 07 3842 9876.

