Rubber Band Power

This series of activities was developed by Peter Musk for National Science Week, 2020.
Acknowledgement
We acknowledge Aboriginal and Torres Strait Islander peoples and their continuing connection to land and as custodians of stories for millennia. We respectfully acknowledge the land on which we all meet today, and pay our respects to elders past, present and emerging.
Summary
Since their patenting in 1865 (though there is some evidence that ancient peoples from South America used them long before that) rubber bands have become ubiquitous. Initially made from natural latex extracted from the rubber trees found growing in the jungles of South America, modern varieties can include synthetic rubbers, or even be made from chemically distinct elastic materials, like the silicone bands used in medical procedures. Natural latex rubber bands are still readily available, however, and given their greater elasticity and durability they are the preferred choice when using rubber bands as energy storage devices.
Energy is stored in a rubber band as a change in the interactions between the long, tangled molecular chains that they are made up of. You can think of rubber as being made of lots of microscopic springs - stretch them out, and they will bounce back. Twisting the band has a similar effect, but you can store 4 times the amount of energy using this method rather than a simple stretch. Stretching a rubber band also makes it get hotter (you can feel this if you hold it against your lips - just don't let go). If you let this heat escape, then put heat back into the stretched rubber, it will revert to its original length - that right, heat it, and it shrinks. This is where the simple idea of rubber being made of tiny springs starts to fall apart, and entropy becomes important (which is a rabbit-hole for another day).
All these properties of rubber bands can be used to turn them into non-toxic, sustainable and reusable energy storage devices, and a rubber band can become the power source for devices that roll, spin, paddle and fly.
This workshop introduces several ways that rubber band power can energise your creations, with increasing levels of technical skill (and patience) required.
Skills Introduced
- Measuring. marking and cutting
- Design thinking
Materials
These activities were designed to use readily available household materials, such as paper, cardboard, plastic containers and of course, rubber bands. A few things scrounged from broken toys or the recycling bin can come in handy, but alternatives are always possible.
Not all rubber bands are the same, and those made from natural latex have the best properties for use as energy storage devices. Rubber bands also come in a wide range of sizes and thicknesses, and as a general rule the greater the volume of rubber in the band, the more energy it can store. Longer bands will store more energy than short ones, but thicker and wider bands will store more still. Thinner rubber bands also tend to break sooner, and all degrade with repeated use.
You can increase the rubber volume of your motor by using multiple bands, and so increasing the number of strands (just as you find inside a bungy cord). Professional quality rubber bands are usually made to measure from thick (5mm) latex rubber strips, available in bulk from specialist hobby suppliers, but this expense is not necessary at this stage.
For maximum power and reliability, the latex rubber band can be washed clean of the talc used to keep them fresh, then lubricated with glycerol and stored in an airtight bag. Even with these treatments, the band will lose power with use as the molecular structure is deformed by repeated stretching and contraction. This can be important if your goal is to win a world championship model plane competition, but is not really necessary for the investigations detailed below.
Tools and Preparation
Most tools you will need should be readily available in the household, like scissors, glue, sticky tape and a writing implement. A boxcutter can be handy, but safety considerations should apply.
A pair of needlenosed pliers will be very helpful if they are available.
Wherever possible, alternative methods will be provided.
Workshop Walk through
Workshop 1: Make a simple rubber powered steamroller

This device uses a twisted rubber band and friction to power a pair of wheels connected by a hollow axle.
Step 1: Assemble the Materials and Tools
Materials
- a couple of wheels. These could be a matched pair of plastic screw tops, or jar lids, discs cut from wood or thick cardboard, or recycled wheels from the toybox. Heavier is better (within reason) to maximise the traction between the wheels and the surface they travel on, but this can be addressed by adding rubber band tyres as shown later. Traditionally, this device was made from a wooden cotton reel, but these are in short supply nowadays.
- a rubber band. The longer and thicker the band, the more energy you can store and the further your steamroller will roll. Looping or doubling the rubber bands will also increase power, but make sure the twisted result fits inside the hollow axle. If you only have small rubber bands, you can tie them end to end.
- sticky tape to hold the axle together
- paper to make the axle. Standard A4 copy paper is fine.
- a short stick. This could be half a matchstick, or a piece of a wooden skewer or toothpick. It needs to be shorter than the diameter of your wheels.
- a longer stick. A skewer, an ice block stick or any other light, rigid material that will not snap under load. This stick needs to be a couple of times the diameter of the wheels.
- a button, bead, washer or other smooth, thin circular object. This needs to be smaller than the wheel, but with a hole that is big enough to pass the doubled rubber band through. Traditionally, a slice from a wax candle cut from the wick and leaving a hole in the centre was used.
- a rigid, hollow axle. This needs to be about as long as the unstretched rubber band, and strong enough not to collapse under the strain from the twisting. A straw might not be strong enough, but the stiffer hollow plastic sticks used for balloons might work. You can make an axle from paper and sticky tape as described below, or even use an empty matchbox (provided the diameter of your wheels is more than the width of the matchbox) - the axle does not have to be tubular. There needs to be enough room down the hollow of the axle to hold the twisted band without rubbing.
- a hook a bit longer than the axle You could need this to pull the rubber band through the axle, if your rubber band is short or the holes are tight. A hook made from a piece of wire, or a bent paperclip is sufficient.
WHY?
The sticks anchor the ends of the twisted rubber band on the outside of the wheels. The long stick trails on the ground, which prevents it spinning, transferring the twist (or torque) from the rubber band to the short stick, and so the wheels as it unwinds. A smooth washer or button (or slice of wax) reduces the friction between the fixed stick and the wheels, allowing more energy to be transferred to the wheels, and so maximising the distance travelled. Friction also wastes energy if the twisted rubber band rubs on the inside of the axle too much, so the space needs to be large enough to stop this happening.
Tools
- scissors to cut the paper and sticky tape (and maybe the wooden skewer)
- a metal skewer or nail to make a hole in the plastic lid
OPTIONAL (but really useful)
- needle nosed pliers to bend and cut the paperclip hook
Step 2: Make a hole in the centre of each wheel

The wheels need to have holes in the centre to pass the ends of the rubber band through. If you are using plastic lids, a metal skewer, pushed through and wiggled around a bit should work.
Metal lids might need a hammer and nail. You could use a drill, if you have one, too, but the important thing is to make the hole just big enough to allow the twisted rubber band to pass through without rubbing too much.
If your hole is a bit off-centre, the steamroller might bob up and down like a clown's bicycle, but it should still work.
Step 3: Prepare the hollow axle
If you have not been able to find something that will work, then you can make an axle:
- cut a strip of paper as wide as you unstretched rubber band, and 150 - 200mm long
- wrap the paper tightly around a pen or pencil, or some other cylindrical object, rolling tightly.
- when you reach the end of the strip, use a piece of sticky tape to hold it in place
- use more sticky tape to tightly wrap the entire length of the paper tube you have made (this makes it stronger, too)
- slide the tube off, and you have a stiff, hollow axle


Step 4: Make a hook


Straighten out a small paperclip, or find a piece of wire of a similar size. Steel wire will be best, since copper will more likely not stay bent under the rigours of use.
If you have a pair of pliers, then they will serve well to make a hook in one end of your wire. Make the hook just large enough to catch a rubber band - too big and it will be hard to push through the hole you made in the wheel.
If you have no pliers, then try pressing the end of the wire down and around a bamboo skewer.
Step 5: Attach the first wheel


If you have made a large enough hole in the centre of the wheel, then you might be able to push the rubber band through. Otherwise, make a hook in the end of a piece of wire (a straightened paperclip will work well), and push the hook through the hole from the inside.
WHY?
If you cannot push the hook through the hole, then you would not be able to draw the rubber band back through either. Much better to adjust the size of the hook (or the hole) now, rather than after you have attached the rubber band and become frustrated when it will not pass through. You need to check that the hook passes through the hole in your smooth washer as well.
Pulling through from the inside means you get to decide which side of the wheel you want to be visible, which is important if you have invested in decorative hubcaps.

Insert the short stick through the loop of the rubber band on the outside of the wheel, and pull tight. This short stick will be held firmly against the wheel, and friction will transmit the force of the unwinding rubber band to the wheel.
Step 6: Attach the Axle

You will need a hook now to pull the rubber band through the centre of your hollow axle. Your unstretched rubber band should be hidden inside the axle, but the end of the hook will be available to finish the assembly.
Step 7: And the other wheel

Once you stretch the rubber band through the second wheel you will need to keep it under tension, and so it is a good idea to have the smooth washer and the longer stick you will need to finish the job ready and waiting.
Feed the hook, and the attached rubber band through the second wheel, from the inside, holding it firmly in place.
Step 8: Add the washer and trailing arm


Slide the washer onto the handle of the hook, and push it down to the wheel.
Pull the rubber band through the washer so you can see the looped end of the rubber band, and slide in the long stick.
Disengage the hook, and the two sticks should hold the rubber band in place, stretched through the centre of the axle.
Step 9: Wind up, and go!
The long stick is used to wind up the rubber band, as you hold the other wheel still.
Place the roller on a surface, and let go.
The more you wind, the more energy you store in the rubber band, and the faster and further the roller will travel.
Troubleshooting
- the wheels spin in place when the energy coming from the untwisting band is greater than the friction keeping the wheels in contact with the surface. Adding mass to the roller is one way to avoid this (use heavier wheels, for example), or wrap another rubber band around each wheel like a tyre to increase friction. Less winding will also work.
- it veers to one side if the drag from the long stick is not sufficient. Use a longer stick to overcome this.
- it spins in circles and the wheels don't grip when the short stick holding the rubber band spins on the outside of the wheel. This could be because the friction at the long stick is too high (check that there is a smooth washer between the long stick and the wheel), or if the friction holding the short stick in place is too low (you could try a bit of stickytape to hold the short stick in place, or just wind tighter)
Workshop 2: Make a rubber band powered helicopter

While the first device used a twisted rubber band horizontally, to turn a wheel, this time we will use a twisted rubber band vertically, to drive a propeller.
Any time you make a flying thing, the key to making it work is to have power enough to lift the weight (there are lots more technical terms to describe these things, if you do more research). Keeping that truth in mind, when making or modifying this device at every step it is important to choose materials that minimise weight, and use the least amount of them that produce a functional design. Wooden skewers, for example, weigh more than paper straws, which is why they make up the fuselage of the helicopter.
This design has been adapted from the excellent work of Slater Harrison, and his thorough and easy-to-follow instructional videos can be found at https://sciencetoymaker.org/. Our innovation is in the propeller design, which while adding some difficulty in preparation has reduced safety concerns (and the need for a razor blade) and made the project more suitable for on-line delivery. There are many other well developed and inexpensive ideas available from Slater's website, and the walk-along gliders are a joy.
Step 1: Assemble the Materials and Tools
Materials
- a paper straw which can be replaced by a paper cylinder made by tightly wrapping a strip around a pencil, and using sticky-tape to hold it together, as for the roller axle described above. If you use this method, the paper strip needs to be 12-14cm wide, and keep the number of layers to the minimum needed for a stiff cylinder (less paper means less weight).
- a small paper clip which will be straightened and cut to make the propeller shaft, and the tail hook. Needlenosed pliers make the process easier, and ordinary wire of similar diameter could substitute.
- a cotton bud to make the propeller shaft bearing (lucky they are hollow, and made from low-friction plastic)
- a smooth, cylindrical PET bottle Larger sizes will work best (1.25 or 1.5L softdrink containers, for example). A simple cylinder is optimal, and any textured surfaces, indentations or shaping might make the propeller non-functional. The thinner the walls of the bottle, the better (less weight, again).
- a rubber band the more rubber in your band, the more energy it can store, so thicker will be better. Purchasing 3mm thick rubber strips sold for model aeroplanes is the premium option, and will give longer and higher flight, but household rubber bands can still work.
- sticky tape though hot glue works too, if you have a glue gun. Be careful - hot glue is hot, and it will burn your fingers - use with adult supervision.
- printed propeller template available for download at the end of this page.
Tools
- Scissors sturdy enough to cut the PET bottle
- Needle nosed pliers or some other way to bend and cut the paperclip
- Marker pen that can write on the PET for transferring the propeller design
- Ruler, or measuring tape
- Metal skewer, awl or a nail to make holes in the PET
- Boxcutter is handy if skill or supervision is available to avoid injuries
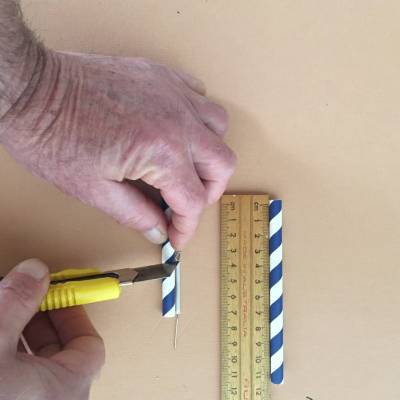
Step 2: Cut the paper straw to length

Cut the paper straw to a length of about 13cm. Scissors tend to crush the straw, and a boxcutter gently used like a saw will work better, especially if you work your way around the straw cutting one side at a time.
Keep the small piece (it gets used later)
If you are making your own paper cylinder, use a strip of paper about 13cm wide, but not too many layers. When the band is wound up, the straw is under a bit of tension and may collapse, so some experimenting might be required here to get the thickness right. Covering the entire length with sticky-tape might help with the strength (and not add too much weight). You will also have to make another short paper tube for use later.
Step 3: Make a propeller shaft by straightening the paper clip

Use pliers and a bit of patience to straighten out a small paper clip.
Step 4: Make the propeller shaft bearing

Cut the ends off the cotton bud, and check it is hollow, and that the straightened wire will fit easily down the centre. Some extra straightening might be needed, and the smoother the fit the better.
Shorter will mean less weight, but you need a bearing at least a couple of cm long or attaching it to the helicopter becomes difficult.
WHY?
A bearing is a machine part that allows rotation with as little friction as possible, and mostly this is achieved using steel balls or cylinders moving in a circular metal track. The shaft bearing here reduces friction because plastic is slippery, and the metal shaft running down the centre can move with the least friction, while still being held in place.
Step 5: Prepare the propeller shaft


This is where you will really benefit from having a pair of needlenosed pliers.
Begin by bending the end of the wire at 90°, using the very tip of the pliers.
Move the pliers along the wire, and make another 90° bend, so the end of the wire is now U-shaped.
Do this again, to make a square.
Finally, grab the wire inside the square, at the last bend, and bend back 45°, so the square now looks like a diamond on the end of the wire.
Keep a small gap between the diamond shape and the rest of the wire - this is where the rubber band will slip down into the hook you have just made.
If you do not have the pliers, then it might be possible to create a hook by wrapping the wire tightly around a bamboo skewer. A circular hook will be the result, but it will still work.
Step 6: Cut the shaft to length
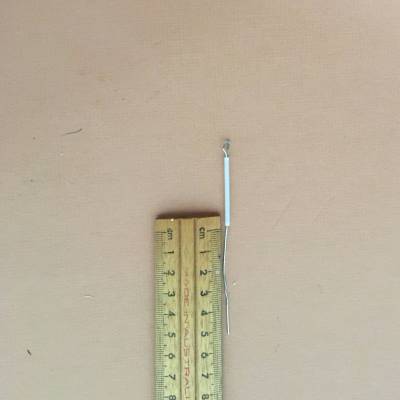

Slide the wire axle through the shaft bearing, and check it can rotate smoothly.
Now cut the excess from the end of the wire shaft, leaving about 2cm (you will need this later to fix the propeller in place).
Keep the bit of wire left over to make a tail hook.
Step 7: Make the tail hook

You will need a hook at the end of the straw to hold the rubber band, but it is best fixed in place later (alignment is important). Bend the tail hook into an Z-shape, as shown. The longer tail will slide inside the straw, to help keep the hook in place.
Step 8: Mount the propeller shaft support on the fuselage

If we fixed the propeller shaft onto the straw now, then it would not be able to spin freely - which is why there needs to be a support in place holding the propeller shaft above the body of the helicopter. This is where your left-over piece of straw used.
Cut a piece of straw about 2cm long (or at least, shorter than the length of the shaft bearing). If you are making your own paper straws, then you will need to make a small one about this size.
Use sticky tape to fix the support at the end of the straw, as shown.


Step 9: Add the tail hook


It is important that the tail hook lines up with the propeller support, so that the rubber band is parallel to the straw. The opening of the hook faces towards the rear.
Slide the tail hook onto the end of the straw, as shown, and sticky tape it in place, keeping the alignment.
Step 10: Make a propeller

Download and print out a copy of the propeller design (files are in Downloads, below), or use this as a guide to sketch your own. The important bits are to have a central hub about 1cm in diameter (with a hole in the centre), and blades about 7cm long with a straight edge along the front, and a curve along the back. Rounded corners are important, too, to make it safe (sharp corners of rapidly rotating plastic are not something you want to have contacting eyeballs).
Cut out the strip of paper with your propeller template on it, and cut the end off the PET bottle.
CAREFUL! Take care using sharp tools.

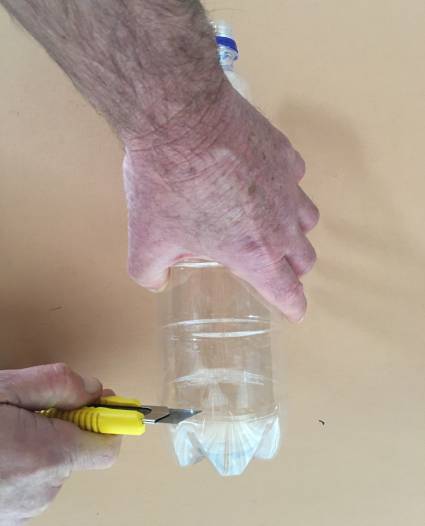
Now, cut a vertical strip of PET bottle a bit larger than the propeller template.
Sticky tape your template on the INSIDE of the piece of the bottle, with the straight (leading) edges of the propeller parallel to the long axis of the bottle.
Trace the template onto the plastic, and you can remove the template.

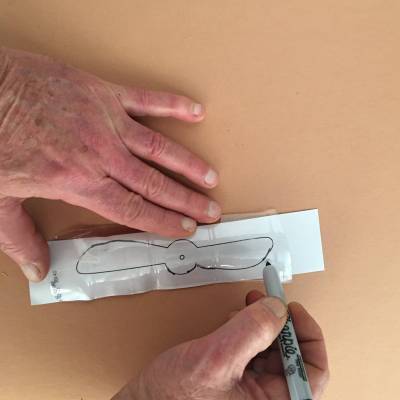

And then you can cut out the propeller. Use a metal skewer or something similar to make a hole at the centre of the propeller hub.


WHY?
Tracing the template onto the bottle seems redundant, since you could just as easily tape the template onto the outside of the bottle, and cut around it.
If you try it (like I did), you will find that as you are cutting, the sticky tape holding the template in place will also be cut, and by the time you get to the end, you will find the template has moved and keeping the propeller symmetrical is difficult.
Step 11: Fix the propeller to the shaft
When the rubber band is attached, the propeller shaft will be pulled towards the rear of the helicopter, hard up against the shaft bearing. To reduce friction at this point, you can add a washer between the propeller and the end of the shaft bearing. This could be a small plastic bead (as long as the shaft can pass through the hole), or a home-made washer cut from the PET bottle. Remember to keep the weight as low as possible.


Cut a small circle of plastic from the PET bottle - this needs to be less than the diameter of the propeller hub, 6 or 7mm diameter if you can manage it. It does not matter if it is not very circular.
Then use the metal skewer to make a hole in the centre of the washer


Slide the washer onto the propeller axle, and then the propeller. If your skewering has raised one side of these pieces, then place the two smooth sides together to minimise friction.
Now you need to firmly connect the propeller to the axle.


Push the propeller down the shaft, and use the pliers to bend the protruding shaft into a U-shape, with the open end of the U facing the propeller.
Squeeze the propeller on to the U-shape (the free end will pierce the propeller, holding it in place), and add a piece of sticky tape to keep it all together.
Step 12: Mount the propeller on the fuselage


The propeller assembly is mounted on the support so that both ends are free to rotate. If the propeller or the hook holding the rubber band touch the support, then energy is lost through friction, and the propeller may jam in place and not spin at all.
Cut some sticky tape, and roll one end around the shaft bearing. Now, hold the shaft in place so both ends are free, and wrap the rest of the sticky tape around the straw fuselage. Give the propeller a flick to make sure it is moving easily, and you are almost there.
WHY?
When the rubber band is wound up, there is a lot of force pulling the propeller shaft towards the rear of the helicopter. To prevent the propeller slipping backwards, and being stopped from spinning when it hits the front of the straw, it is important to hold the shaft bearing very firmly in place. Wrapping the sticky tape around the shaft bearing maximises the surface in contact with the tape, and gives you the best chance of preventing slippage - just taping over the top of the shaft bearing would mean at best only half of the surface of the bearing is in contact with the tape.
Step 13: Add a wing for stability


Cut a strip of paper 2 -3cm wide, and about 20cm long - remember that keeping the weight down is important, so extravagant wings would be a problem. Experimenting to get the best size and design is encouraged.
Use sticky tape to fix the wing to the fuselage - you can stick it on the back, or a bit front of centre to avoid any interference with the rubber band.
WHY?
As the rubber band unwinds, both ends will tend to twist, and energy will be used to spin the fuselage as well as the propeller. Your helicopter will twirl in place, instead of being dragged into the air by the propeller. Adding a wing means a lot more force is required to twist the fuselage (because of the air pushing against the wing), and it is easier for the rubber band to untwist at the propeller end than the fuselage end - more flying and less dancing is the result.
Step 14: Add a rubber band, wind up and fly!
It is easier to hook the rubber band onto the propeller shaft first, before stretching it over the tail hook.
Turn the propeller backwards to wind up the rubber band by pushing on the straight edge of the propeller with your finger - LOTS!
At least 50 turns will be needed to get lift off, and 100 or more to get a satisfactory flight time.
Workshop 3: Make a Rubber Band Racer

In this device the rubber band stores energy by stretching, rather than twisting, which means less power is available to make things happen. Because energy is only needed to turn an axle (rather than lift something into the air) this should not be a problem - unless you are attempting to set distance records. The basic approach can also be adapted to make a rubber powered paddle boat, if the wheels are replaced by paddles, and you make it out of some material more waterproof than cardboard.
Striking in it's ugliness, the device made below is intended to introduce you to the basic design constraints, and how to overcome them. More realistic or imaginative models can be made using the same ideas if you wish to take this further.
Step 1: Assemble the Materials and Tools
Materials
- corrugated cardboard enough to cut out two copies of whatever chassis design you desire.
- a paper clip
- a couple of wooden skewers
- a sheet of paper
- 2 matched pairs of lids for wheels If you put wheels of different size on the same axle, then the racer will travel in a curve. The lids can be plastic or metal, but you need to be able to make a hole in the centre of each one. You could even cut wheels from cardboard, using some circular object as a stencil.
- rubber band about the same length as your chassis
- sticky tape
Tools
- scissors to cut the tape and paper. You can cut the cardboard with these too, but a boxcutter will do a better job
- ruler and pencil
- metal skewer or something else to put a hole in the wheels
OPTIONAL (but very handy)
- boxcutter
- needlenosed pliers
Step 2: Cut out the chassis parts

Cut out two identical pieces of cardboard to make the chassis. They can be any shape and size, but something that is in proportion with the wheels will look better. Other materials could be used, as long as the stuff is rigid and not too heavy. Many examples can be found using styrofoam, wood, plastic bottles and small cardboard boxes.
We will use sticky tape to fix the two layers together and give a bit of extra strength.
Step 3: Notch the rear and finish the chassis


Mark the centre of the rear end of your chassis, and cut a notch around it about 1cm deep and a couple wide. This will allow the rear axle to spin freely when the rubber band has been attached.
You can stick the chassis layers together, and cut the notch, or like here, use one cut as a template for the other.
Step 4: Make some axle guides
Bamboo skewers will be used for the axles of the racer, but they need to be fixed to the chassis, and yet still be able to spin freely. Some hollow axle guides will make this possible.


Use your chassis as a guide to make a strip of paper a bit narrower than the rear tabs and about 15cm long (half an A4 sheet is fine).
The paper will be rolled up to make a hollow tube with a diameter a big bigger than the axles. Too big, and the axle will wobble around inside the guide, but too tight and the friction will stop the axle from spinning.
You can use your axle (as shown), and try to make the tube a bit loose, or find another cylindrical thing a bit bigger than your axles to wrap the paper around. Roll up the paper strip and use sticky tape to hold it together.


Now do the same for the front axle, only this time make a single, longer guide.
Step 5: Make a rear hook


Make a hair-pin bend in a piece of wire or paper clip as shown, and bend the legs out to the side. Trim the legs to about 1cm long.
The loop will hold the rubber band, and the legs allow you to attach the hook to the rear axle with sticky tape.
It is a good idea to mark the centre of the axle and use this to locate the hook.
Step 6: Adjust the chassis if necessary, and fix the back axle


Slide the axle guides on to the rear axle, and check to see if the hook has enough room in the slot to spin freely.
You can see that the slot has been cut too short, and this means the hook will not be able to spin freely. Solve this problem by cutting a bit more out of the slot, and when things look right, sticky tape the axle guide to the chassis.
Keep the axle perpendicular to the direction of travel, or your racer will run crooked.
Step 7: Fix the front axle

Slide the front axle into the guide, and use sticky tape to fix it in place, a centimeter or two back from the front edge.
Again, keep the axle perpendicular to the direction of travel.
Step 8: Make a front anchor point for the rubber band

Mark the centre of the chassis at the front, and use a boxcutter or scissors to make a notch about 1cm long.
Step 9: Attach the rubber band to the rear axle


Push the rubber band through the loop of the hook on the rear axle.
You can then loop the rubber band through itself and pull tight to make a secure knot.
Step 10: And then to the front


Make a keeper from a short piece of skewer, and loop the untied end of the rubber band over it. Pull the band forwards and down into the slot you made at the front, and sticky tape it place.
Step 11: Add wheels, and go!

Use a skewer or other tool to make a hole at the centre of each wheel - try to keep the hole small enough the make a tight fit on the axle and you might not need to fix the wheel in place. Otherwise, sticky tape might hold things together.
Push the wheels onto the axles, and you are ready to go.
Winding the rear wheels backwards will stretch the rubber band, and if you put the racer down before you let go it should speed across whatever surface it is placed on.
Troubleshooting
The back wheels just spin because a lot of energy is released from the rubber band when it first starts to unwind. You can solve this by adding weight to the rear of your racer, using heavier wheels (try metal lids) or increasing grip (try wrapping a rubber band around the outside of the wheels).
My racer careers off at an angle if the axles are not aligned, or if one wheel is bigger than another on the same axle. You can cut the axles loose, and reset them to fix this.
I am embarrassed to show this ugly thing to my friends Well, it is just a prototype. Next time, you can use your artistic skills to make something more worthy of public exposure.
Going Further
There is a world of rubber band enthusiasts out there if your interest has been stimulated, and a bit of searching will provide lots of other devices you can make. The rubber powered plane community is especially active, and detailed designs or groups to join are available. Mostly, these involve balsa wood, exact measurement and toxic glues (and professional quality rubber), but here are some good ones :
Make a rubber band powered heat engine
This device uses the startling fact that heating a stretched rubber band makes it shrink. You can turn a wheel with rubber spokes placed in front of a heat lamp. It is pretty slow, however, mainly because it takes a while for the heated bands to cool down again.
You can see some instructions here: https://www.instructables.com/id/How-to-Build-a-Rubber-Band-Heat-Engine/
Make a rubber band powered ornithopter
Ornithopters are flying machines that flap their wings. If you use high grade rubber band, and very light materials like balsa wood and tissue paper, with plans like those below you can make a flapping flying machine that will fly a few metres at least.
http://www.ornithopter.org/plans.shtml
Make a rubber powered butterfly
Flapping does not always result in flight, sometimes a fright can be just as much fun. This design can be hidden between the pages of a book, and leap into life at an unexpected moment.
https://www.instructables.com/id/Wind-Up-Paper-ButterFLY/?utm_source=newsletter&utm_medium=email
Downloads
Propeller template file: propeller.zip
For those reproducing this workshop, the following file has multiple propeller designs on a single page: 6_propellers.zip