Augmented Reality Interactivity
Great and Grand Rumpus Augmented Reality
Introduction to Augmented Reality
Let's run through what Augmented Reality is, the use cases, how we can incorporate that into arts and more;
We'll be referring to the following guide: Augmented Reality
https://wiki.slq.qld.gov.au/doku.php?id=workshops:public:augmentedreality:start
Introduction to Filters-Lens
Social filters and lenses have become very popular in recent years, with Snapchat, Instagram and Facebook all including the option to augment yourself and environment through videos and photos.
It has become not only a terrific way for digital (and traditional) artists to not only compliment their practice, but also make a great income from creating filters. Because many of the other augmented reality options can be quite costly for hosting and creating apps or using third-party apps, and AR glasses are still in early days and expensive, using Spark AR (Facebook) or Lens Studio (Snapchat) which are free and have lots of community creators and tutorials.
Because we always want to highlight the good and the bad with any new technology, it is important to note that there has been some research into the problems of social media and beauty standards and body dysmorphia in young people. So we feel it's important to note that the workshops we run will not usually cover any of the body/face manipulation aspects.
To start with we are going to make some mushrooms and leaves with Tinkercad to use for our project. You would have run through the basics of Tinkercad yesterday but I'll quickly show you how to make a leaf and mushroom for demonstrative purposes. You can create flowers or other shapes, we just need to export as OBJ files.
You can also think about what 2D things you might want to make if we have time as well, we have Inkscape on the laptops.
101 - Vector Design with Inkscape
Or you can grab copyright free images from places like https://pixabay.com/, make sure you don't need to provide attribution (credit), so you can just use without worry.
Lens Studio
Open the Lens Studio app on your laptops and let's get to know some of the basics. You can do a lot of creative and cool stuff with the templates to create your own lenses, it's a fairly quick and easy process but the preparation of our designs before importing is key, which is why we spent time on the design and creation process firstly.
Their resources - https://lensstudio.snapchat.com/guides/
3D Interactive Head Lens
Part 1 - Attach a 3D object to your head
For this lens we are going to use our mushrooms or leaves we created in Tinkercad and attach them to our head.
Let's choose to create a NEW PROJECT
In this new project, we want to search and add a HEAD BINDING in the objects panel.
We can use the above 3d models or use our own. Download the free ones and unzip the folder (they are GLTF files).
If using one we created in Tinkercad, export the model as an OBJ file. It will download as a zipped file so make sure you expand that file so you can import just the .obj file to your Lens Studio project.
Now we want to import our 3d model into the project, go to the resources panel and click the plus sign, import From Files.
Once imported, it will have created a folder with sub folders, materials and meshes and a stand alone file with the same name as your model.
Drag the stand alone file model into your OBJECTS panel, titled 'Mushroom' in this image.
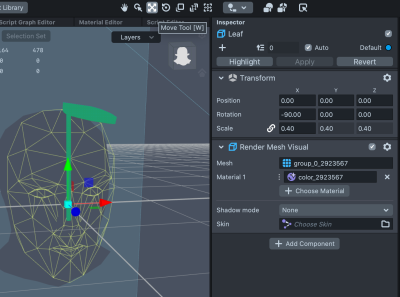
You may need to scale your model, you can do that several ways, either with the navigation tools at the top of the 3D scene window or with the inspector panel direct coordinate changes.
Make sure you use the main folder if you have several parts to your model like the mushroom pictured, you can rename the parts Stalk and Cap if it helps.
Drag your object from the main panel onto the head binding object. If you have just one 3D object in the folder, such as our grouped leaf, you can drag it out of its folder and onto the head binding object and delete the empty folder.
You should now see that object attached to the head of the preview model or your own if you have the camera on!
You can play with the scale more and move the object around until you have it where you want it attached to the head.
That's the first part done!! Congratulations on getting this far, you can test your lens with different models in the preview window along with viewing yourself. If you do have a mobile phone, you can set up a Snapchat account, and link it to preview your lens on your phone.
Part 2 - Simple animation
Let's create a Tween animation for our model. In the object panel, click the plus sign and search 'tween' or 'helper scripts' and navigate to choosing 'Tween Manager'.
This will bring in several other 3d models and animations, you can open the folder and delete the folder titled Remove Me (right click>delete). Move the Tween Manager to the top of the OBJECT panel.
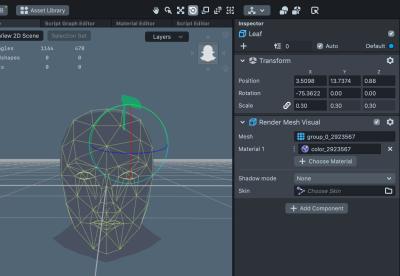
We'll now be adding to the INSPECTOR panel, so navigate to that (make your 3d model is selected) and choose 'Add component'. Select 'Script' and then 'Add script'
In your scripts you should now see lots of Tween options. We want to 'scale' our leaf so it looks like it is growing out of the head, so we will add 'Tween Transform'.
We need to choose our model in the Scene Object Field and also name our Tween. I have called this GrowUp.
Once added your model might move or disappear, this is probably because Play Automatically is on. Check that box off if you want to check it's still in the correct spot, but remember you will want to have it checked to test your scaling animation.
It will automatically be on the Move option, use the drop down menu to choose Scale.
In the End fields add the scale of your model that you can see in the Transform section, for this example it is 0.40. The Start should be 0, as we want it to look like our leaf or mushroom is growing out of our head. We also want to set our main scale in the Transform window to 0, so the lens doesn't start with your object showing.
You can change the Time field to a higher number so your object grows slower. You can also play around with Looping and Ping Pong in the drop down options, but for our next part, we just want the loop type to be None.
Now we want to reverse the growing so let's right click our GrowUp Script and 'copy', we then want to 'Paste Component' underneath in the Inspector. We just now need to rename this to GrowDown and reverse our Start and End times.
Remember, you can check the Play Automatically box off an on to see both your scripts working. When they are, we can move to the next step!
Part 3 - Face Trigger
For the next step, we want to add a face interaction to run our Tweens by using 'behavior' scripts.
In our OBJECTS panel, click the plus symbol and search 'helper scripts', click on that and choose behavior. This brings in lots of support scripts that we can use to create interactive lenses.
It should automatically have added one script that we can use to edit to what we need. If not, select 'Script' and then 'Add script', you may need to 'Add component' first if there is none.
You can play around with different face behaviors by using the drop down menus and experimenting later, for now just choose the same fields as in the below image.
Copy the script for Mouth Open that you just made and paste and then change to Mouth Closed.
We also want to make our model disappear at the start, so change the scale to 0 so we can only see it appear when mouth is opened.
Now you should have a fun interaction happening! Well done!
You can test that on your phone if you have a Snapchat account by syncing with the app, you can also publish your lens but it can take a little while to be approved and you need to go through a few steps.
2D Face Attachables Lens
Follow similar steps for the lens above to attach a 2D image to a face.
We will need one or two PNG (with transparent background) images and for this workshop, I've chosen to go with the theme of mushrooms and leaves which are part of our Grumpus world.
I've grabbed a couple of mushroom images from Pixabay
![GGR Snapchat link]]
=== Incorporating 3D models and 2D designs ===
Here are some free 3D models for use if you don't want to create your own.
{{ :engagement:flyingarts:artiz2021:glowing_mushroom.zip |Glowing Mushrooms GGR Snapchat link]]
=== Incorporating 3D models and 2D designs ===
Here are some free 3D models for use if you don't want to create your own.
{{ :engagement:flyingarts:artiz2021:glowing_mushroom.zip |Glowing Mushrooms](/lib/exe/fetch.php?w=600&tok=904d91&media=engagement:flyingarts:artiz2021:ggr-snapchat-promo-image.png)


