Skills Development: Beginner Arduino 101 and Intro to Neopixels
Monday 2nd July 4-7pm
Preparation
Set up the Innovation lab with computers and power supplies
The Plan
Intro to Arduino
- what it is and then give example code to edit.
Introduction to Arduino Microcontrollers
What is a micro controller?
(For description of where this part of the workshop and its origins please go here: Deskduino
A microcontroller (or MCU for microcontroller unit) is a small computer on a single integrated circuit.
- one or more CPUs (processor cores)
- memory
- programmable input/output peripherals
- can be mixed signal devices interacting with
- digital signals
- analog signals
Why use an MCU?
Microcontrollers are small, low powered and robust, making them perfect for embedded systems such as:
- medical devices
- remote controls
- office machines
- appliances
- power tools
- toys
- wearables!
What is Arduino?
Arduino is an open source computer hardware and software company, project, and user community (see: https://en.wikipedia.org/wiki/Arduino ).
- The hardware is based on the Amtel 8-bit AVR MCU
- The software uses the Processing IDE, with a simplified version of the C++ language
- Open source has led to the creation of a huge range of
- clones
- compatible devices
- peripherals
- A strong community means
- “Someone, Somewhere has solved the problem”
- we can run this workshop using and adapting existing resources.
Assembly and Testing
It's time to get started!
Step One: Connecting and Testing the Arduino Nano
Download the Arduino IDE
Download the latest version of the Arduino IDE.
Select your operating system and when prompted choose “Just Download”.
Follow the instructions and install the program on your computer.
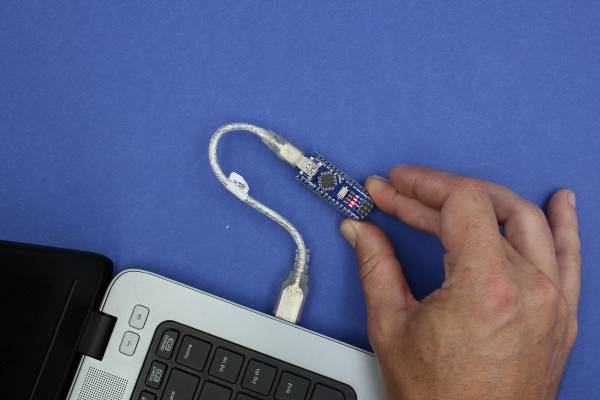
Connect Your Arduino
A red and then a green LED will light up on the Arduino, indicating that it's receiving power (for some Arduinos this may just be a single red light)
Now launch Arduino IDE

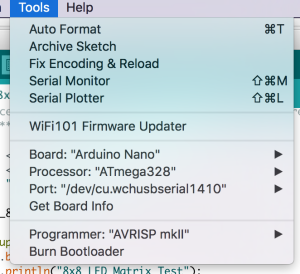
Go to the Tools menu and change the following:
- Board to Arduino Nano

- Processor to ATmega328

- Port to USB/Serial (different depending on OS and Chip)
- If you are having problems finding a USB port you most likely need to download the correct drivers.
Once that is done, run “Get Board Info” in the same menu, this should bring up a small pop-up with some information.
As long a you're not receiving an error in the console, you have successfully connected your Arduino!
Test with the Blink Example
Another step you can take to test that everything is working is to load one of the basic example projects and upload it to the Arduino.
- Go to File → Examples → 01.Basic → Blink
- Click on the verify button (Check mark) and let it compile. You should get a message at the top of the console telling you when it's done (this should take no more than a few seconds)
- Once this is done, without any errors, click the Upload button (Arrow)
- This will upload the instructions to the Arduino and it will say “Done Uploading” when everything worked
- Your red LED on the Nano should now be blinking, one second on, one second off
- Uploading scripts to your Arduino works!
Intro to Neopixels-
See here Introduction to Neopixels
Reflection
This session was full house of 15 people.
The feedback from one of the facilitators was that this workshop needs to focus more on the basics of Arduino and programming. This was not being captured in previous workshops such as badge and desktop such as Deskduino
So intro Arduino needs to be intro as in these previous workshops, plus programming. At the moment the workshop is only giving a few lines of programming to edit not the actual skills in programming. It is suggested that for 101 there are more core skillsets being explored and developed.
In the future offer Arduino 101 then intro to programming on Arduino. Actual programming skills. Then you can take a kit home and actually work with it. Then the 101 becomes the pre-requisite for all other workshops.
Then intro to Neopixels- crash course intro into how to edit the code. Does not give you skills to change colour and really understand. The next step is how to do it from scratch.
Then could move onto- program on Arduino, or Raspberry pi or computer etc
People working and learning together worked well. Otherwise limit numbers to how many laptops that we have.
A decision needs to be made whether skills dev or outcome based.


