Table of Contents
Water Wheel prototype
The water wheel works on a simple principle; falling water spins a wheel, which turns a generator, and lights up an LED.
The problems for the design are;
- Using recycled materials where possible.
- Making the entire mechanism hand-held and self-contained.
- Re-using water, making it leak proof (ish!)
- Getting enough voltage to light the LED.
The methods used to solve these problems;
- Use recycled PET bottles;
- A one-way valve to recycle the water;
- magnetic joints to ease assembly,
- squeezing the bottle to create pressure,
- a tube with a narrow outlet to aim the water flow and further increase pressure,
- and a joule thief to increase the voltage.
This Workshop was developed for the Woodford Folk Festival 2015.
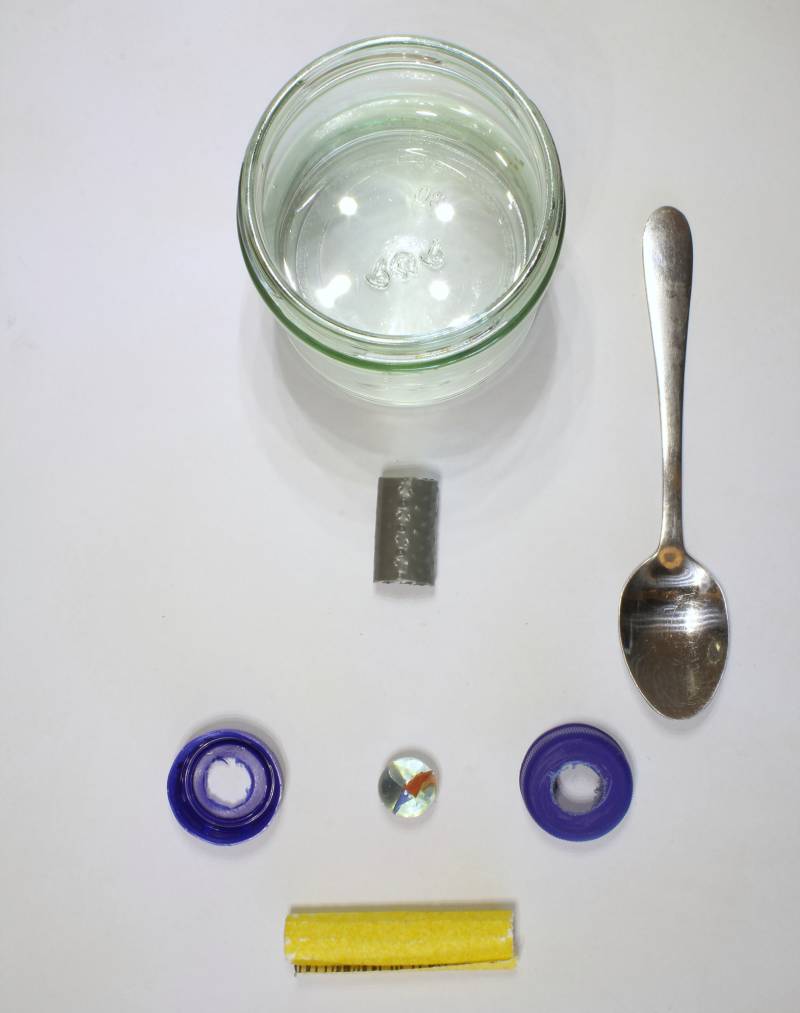
Parts
- 4 water bottle or similiar. 330ml minimum, the more resilient the plastic the better. Washing up bottles are perfect.
- 1 drink can – cut into 8 paddles. (This step is not shown)
- 1 short length of garden hose.
- 1 marble
- 1 length 6mm PVC pipe
- 1 pipette
- Rubber bands or cable ties.
- 20 grams of Plastimake.
- Gaffa tape
- Joule Thief kit – with 1 LED.
- Axle
- Generator (motor)
Tools
- Hot glue gun.
- Mug of Boiling water
- Mug of Cold water
- Tablespoon
- Markers,
- Screw.
- Drill with 6mm and 8mm bits
- Scissors
- Rough sandpaper (60 or 80 grit)
Step One - Connect the bottles
We need to make the water flow from the top (tank) bottle to the bottom (wheel) bottle, then empty back into the tank bottle when turned upside down. The first step is to make a one-way valve using drilled-out lids, garden hose and marble.
- Grab two holed lids, one piece of hose, a marble, a little roll of sandpaper and and a mug of hot water
- Drop your hose in the hot water to soften.
- Check the holes in your lids line up, then enlarge them with the sandpaper until the hose just fits.
- Push the marble into the hose to stretch it – leave it for a couple of minutes to harden a little.
- Sqeeze the hose into the two lids.
- Glue you lids and hose together.
- Drop the marble in the tank bottle.
- Assemble and test the one-way valve – make sure the top with the hose formed is on the tank bottle!
Step Two - Make the Wheel
A water wheel is the most efficient way of working with a low pressure water flow. We'll use a pre-made perspex hub, and some thermal plastic (plastimake) to glue it all together.
- Grab 8 wheel blades, the wheel axle, hubs (2), your mug and a tablespoon of plastimake.
- Heat up the plastimake dropping about a table spoon in your mug.
- While you are waiting for your plastimake to melt, peel the paper off your hubs and slide them on your axle.
- When it is clear it is ready to use. take care - use the spoon to pull it out - it will be hot!
- Make a small ball out of plastimake, then stick it between hubs to make a core of about 1cm of plastimake. Don't use to much, just the core of the wheel.
- Slide the wheel paddles in to wheel hub, using the plastimake to glue to together.
- Use a little bit of extra plastimake on either side of the hub to hold it in place.
- Let the plastimake dry, then slide the wheel off.
Mount the Axle
We now mount axle in the wheel bottle and check the water wheel for fit.
- You'll need your wheel bottle, a marker, a screw an some gaffa tape.
- Mark a spot for the axle at the top of the wheel bottle. Put a dot on one side, then line it up on the other.
- Punch a hole with a screw.
- Put a strip of gaff tape over the hole – this is for strength and heat resistance.
- Punch a hole through the gaff with the screw,
- Repeat for the other side.
- Enlarge the both holes until the axle just fits all the way through and and spins freely – the gaffa will gum the hole up.
- Take the generator bottle lid, and punch a hole through big enough for the axle. Grab the screw with the small plyers and twist the cap to enlarge.
- Thread the axle through the cap and bottle.
- Carefully hot glue the generator bottle lid – thread out – on the wheel bottle, glue just around the rim.
- Slid the axle through again and check it spins freely again – wait for the glue to dry!
- Punch a hole, then cut the wheel bottle in two, just above half way up.
- Check the width of your wheel – will it fit in? If not give the vanes a trim.
- Fit the axle and sliding the wheel on – you may will need to angle the axle.
- Make sure your wheel is the centre of the bottle and can spin freely.
- Make note of whether the wheels spins clockwise or anti-clockwise!
Make the spout - Join the bottles
This part involves precise measurement to make sure the wheel and spout are aligned, so remember - measure twice and cut once! The spout is made from PVC and the pipette. The pipette end of the spout need to be precisely pointed at the paddles of the wheel. Both ends need to seal well, so be careful to make the holes as small as possible.
- Grab both bottles, the valve, PVC tube, pippette and hot water, you may need a top-up.
- Heat one end of the tube for about 1 min, then push the pipette in.
- Cut of the top ¼ of the pipette.
- Screw the tank and wheel bottles tightly together.
- Mark the wheel bottle neck above the wheel paddles, imagining where the water will squirt – this is the pipe inlet.
- Make a hole, then enlarge the inlet until the pippette just starts to fit.
- Insert the pipette, then mark and cut the PVC to size.
- Mark the tank bottle directly above the inlet mark. This is the outlet.
- Start heating the other end of the PVC pipe
- Enlarge the outlet until it is just a little smaller the PVC pipe.
- Cut a small wedge out of the pipe, the squeeze it together.
- Squeeze the pipe into the outlet in into the outlet.
- Check the pipette lines up with the paddles, adjust the pipe to fit.
Build the joule Thief
This curcuit is built on a disk of perspex that mounts inside the neck of your third bottle, with all parts and cable paths marked on the top side. We will poke the wires through and twist them together to make a curcuit. The generator sits inside the throat of the bottle, and is attached later. Here is the design for reference.
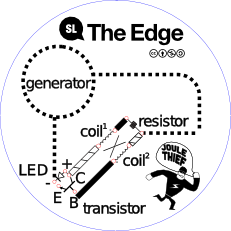
- Grab your joule thief cercuit, generator, LED, inductor, and transistor.
- Insert one leg of the resistor.
- Pull through the second leg until the resistor is flat on the board.
- Insert the long legs of the inductor, making sure the coil markings are facing the right way, with the wire in the right coloured holes.
- Insert the short legs of the inductor, you can take of the label.
- Flip the board over and twist the short legs of the inductor to the resistor, one at a time.
- On the transistor, bend out the E and C legs and the B leg forward - refer to the diagram.
- Insert the transistor into the labled holes.
- Insert the LED into the labeled holes, refer to the diagram. The + goes next to the C and the - next to the E.
- Twist the E and LED- wires together
- Twist the C, the LED+ and the inductor white wire together.
- Twist the B and the inductor coloured wire together.
Remember which direction your wheel spins in? If it spins anti-clockwise;
- Twist the RED lead of the generator onto the E.
- Twist the BLACK lead of the generator on the the labeled resistor leg.
If it spins clockwise;
- Twist the BLACK lead of the generator onto the E.
- Twist the RED lead of the generator on the the labeled resistor leg.
Test the Joule Thief by twisting the generator shaft hard. The LED should light up when spun in the right direction!!
Mount the Generator
This is where we attach our generator and Joule Thief.