Table of Contents
101 - Vector Design with Inkscape

Developed by Michelle Brown, revisions by Ellie Dumigan.
Summary
Inkscape for beginners
Create and edit vector graphics (like illustrations, decals and logos) in this Inkscape course for beginners.
In this 1.5 hour intro course we’ll start with the fundamentals:
- A demonstration of the basic tools and functionality of Inkscape
- Navigating around the interface
- Setting up your own custom workspace
- Key features and tools: layers, paths, the pen tool and trace
*Please provide a USB to save your work
Workshop Outline
Introduction to Inkscape
- Do you know anything about Vector Graphics?
- Have you experimented with Inkscape or similar programs before?
- What are you hoping to use it for?
- What are you hoping to get out of today?
Workshop Outline
- Understand vector vs raster
- Colour
- Document settings
- Become familiar with the interface
- Learn about layers
- Grouping and ungrouping
- Learn pen tool basics and create shapes
- Add and adjust strokes
- Add and adjust colours
- Add basic text
- Learn how to use the Trace Bitmap tool
- File types and cross compatibility (SVG, EPS, AI etc)
Resources
Let’s get started!
First we'll cover some basic digital design items.
Vector vs Raster


- Vector images are rooted in mathematical theory. Lines and curves known as ‘paths’ are used to make up the design. It can be scaled infinitely. Vectors are great for logos, icons and illustrations.
- Raster images are created using pixels. They do not scale well – if you zoom in, you will see each pixel. It is often used for photographs.
Vector images can be converted to raster if needed for publishing etc.
CMYK vs RGB colour spaces

- CMYK is a subtractive colour model. It refers to the four inks generally used in printing (cyan, magenta, yellow, and black). If your artwork is to be printed, use CMYK.
- RGB is an additive colour model. Red, green and blue light are added together in various ways to reproduce a broad array of colours on screens. If your artwork is to be displayed digitally, use RGB.
Please note, if you intend to use your vector graphic with the Edge Laser Cutter, you will need to work with RGB colour. For the Vinyl Cutter it doesn't matter.
File Formats
Vector Image File Formats
EPS Adobe's EPS format (Encapsulated PostScript) is perhaps the most common vector image format. It is the standard interchange format in the print industry. It is widely supported as an export format, but due to the complexity of the full format specification, not all programs that claim to support EPS are able to import all variants of it. Adobe Illustrator and recent versions of CorelDRAW have very good support for reading and writing EPS. Inkscape can only export it.
SVG The World Wide Web Consortium (W3C) is the main international standards organization for the World Wide Web, the W3C standard vector image format is called SVG (Scalable Vector Graphics). Inkscape and recent versions of Adobe Illustrator and CorelDRAW have good support for reading and writing SVG. Further information on the SVG format may be found on the official SVG website.
PDF Adobe's PDF format (Portable Document Format) is very widely used as a general purpose platform-independent document format. And while it is not exclusively used as such, it is also a very good vector image format. Adobe Acrobat PDF reader is free, but to create or edit PDF files directly you need to pay (third party tools that perform the same task are also available). There are free options that let you save/export as a PDF using the Print option.
AI The native format of Adobe Illustrator is the AI format (Adobe Illustrator Artwork), a modified version of the older EPS format. The AI format is fairly widely supported, but is less available than the EPS format, and most programs that read AI can also read EPS.
DXF Drawing eXchange Format. A CAD format from Autodesk, used by CAD tools from many different vendors. Some programs have difficulty reading DXF files with splines (curves), so the Desktop Edition supports line+spline as well as line only output modes.
There are numerous other vector formats: CDR is the CorelDRAW native format and XAR is the Xara Xtreme native format, to name a couple.
Inkscape Interface
Document Set Up
On your computer open up Inkscape from your file/applications menu. It should automatically open a new template;

To check the document size and setup info, go to the File dropdown menu and choose 'Document Properties', change your set up from portrait to landscape for today's exercise;

Menus
Let's quickly go over what you will find in each of the drop down menu's;
FILE

EDIT

VIEW

LAYER

OBJECT

PATH

TEXT

FILTERS

EXTENSIONS

HELP

Interface Layout
There are a few different toolbars in Inkscape, we'll go over the default layout quickly.
Tool Controls

Tool Box

Command & Snap Bar
Colour Palette & Status Bar

To learn more about these and setting up your preferred interface, refer to the Inkscape manual, we want to get into the more practical side of our workshop now!
Videos
| Video | Transcript |
|---|---|
| Adding simple shapes often makes up the foundation of a graphic. To start, click on the rectangle tool on the left hand bar, then click and drag it to make a rectangle on your screen. You can hold down ctrl key and drag at roughly a 45* angle from your start point to force the rectangle to be a square. Similar with the oval tool, you can hold down control to force it to be a circle. You can also make pac-man shapes by changing the start an d end degrees of a circle. Holding down control while using the polygon tool snaps the corner you’re drawing out to an angle increment of 15 degrees, Which allows you to snap things to be vertical or horizontal. You can also change the number of corners of a polygon using this box. Once you have a shape you can move it by clicking the select icon and then clicking and dragging the object, and releasing it when you have it in a spot you like. When moving you can snap corners to other corners by hovering them near each other until this “corner to corner” tooltip appears. We can also resize our object using these arrows…. and we can click on the object again to bring up rotate… and skew tools. To de-select an object click somewhere that’s blank on the canvas |
|
| To change the colour of a selected object we can click on a pre determined colour from this palette at the bottom of the screen but if we want to choose a colour that isn’t listed here, we need to open the fill and stroke tool from the object menu. The fill is the main colour of the shape. To change it click on the flat colour icon, and change the colour mode to Wheel. from here we can change the colour by clicking and dragging the little bar on the rainbow ring, and the circle within the triangle. We can also make the colour transparent using this alpha bar. If we want to give our object a gradient, we can do so using the linear gradient icon. We can also edit the gradient by clicking on this icon. From here we can change a colour in our gradient by clicking on the point and changing it using the wheel or a swatch. We can add more colours to our gradient by double clicking anywhere on the gradient line and editing that dot lie we did the beginning and end dots. We can also change the direction of the gradient by clicking and dragging these points at the end of the line When we are happy with our gradient click off our object to set it. We can add boarders to our objects. These are called Strokes. To add one, select your object Then head to the Stroke Paint menu and click the Flat colour icon. You can pick a colour for it here. You can change various aspects of the line in the stroke style menu, like the width… dashes…. and corner type. This allows you to really make objects look and feel your own. |
|
| Sometimes you want a graphic you can’t find, and thankfully Inkscape offers a few ways to make your own. The simplest way is by using multiple primitive shapes to create more complex new ones, which you can do via various options listed under the Path menu You can combine shapes using union You can cut one shape from the another by selecting the one you want to keep, then shift-clicking the one you want to remove and using difference You can keep just the area that two shapes overlap using intersection Or just the bits they don’t overlap using exclusion You can also use one shape to cut parts of another shape So you can more or recolour segments of it using division. You can combine these methods to build up some pretty complex forms, but if you want even more flexibility it’s time to look at Bezier curves. With this tool you can draw straight lines by left clicking to form your first point, then clicking again to form your first line, and again to form another, connected line. You can also make curves by clicking and dragging a new point, then releasing your mouse when you like the curve. And you can close a shape by clicking the first point once more. You can also edit your shape using the node edit tool. We can now click on these points and move their handles. You’ll notice we can now move one handle to be long and one short, which allows us to further refine our shapes. But say we have a curve here but we want a corner. We can change it using this button. I can now drag this handle to make a corner. Similarly we can convert corners to straights again using this option, or to equal straight using this one. If you have a hand drawn picture you can scan that in and import it, then trace over it with a Bezier curve to make your graphic. That can be a good way to get a feel for things when you’re just starting out wit Bezier curves. |
|
| Converting pixel-based images to vectors While you can manually trace a bitmap image in inkscape to make a vector file, for complex images it can be very time consuming! This is where Inkscape's “Trace Bitmap” function comes in. It allows you to take a bitmap image and will attempt to convert it to a vector for you through various methods. Brightness cutoff, tries to separate the image into black and white. This method is really good for images that already look a bit like stencils. click update to see a preview. Threshold changes the midpoint, or the point where it splits black and white, fiddle with it to capture the right amount of detail. Colours tries to seperate an image into the colours it's composed of. Good images already look like paper cutouts, or logos, with several distinct colours. You can specify the amount of colours it looks for by changing this setting. results may vary as computers interpret colour differences differently to humans, and sometimes it's easier to use brightness cutoff to split your image into parts and add colour after the fact. Centre line new feature, aims to reproduce your drawing with single lines, try it with very simple lines as complex ones are likely to crash. What If/Next: No matter the mode you're using playing with speckles, smooth corners, optimise can help further refine results. These changes won't show in preview, so Click apply to see the results. you may wish to make some changes and try again. You may also wish to edit small parts of your traced image after its made, or if you can't get the results you are after, you can go back to manually tracing images, check the end of the 'custom shapes' video to learn more. |
Basics
Selection Arrows
The 2 arrows at the top of the Tool Box are your main navigational tools, the first large arrow is how you can select and move items around on your document (artboard).
The second arrow down is how you can edit nodes and curves/straight lines of a path. We will discuss this in more detail later.

Layers
Layers are important to keep your work easily editable and to also create a variety of design techniques. Think of layers like old school cell animation, you layer each change of the art to create the animation.
Each layer can contain one o more objects, the final image is made up of all the visible layers stacked on top of each other, but you can turn layers (and the objects housed on them) off and on, you can move layers around to change the order and so forth. You can also create sub-layers.
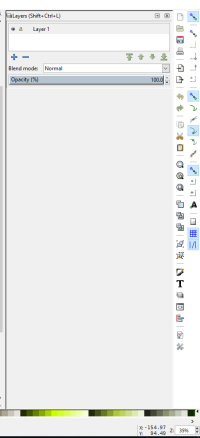
Let's open our layers using the interface tools we already looked through. The icon should be in your Command Bar, which may be across the top of app or down the side, when you find it click on it to open the layers window down the right side of the interface.

Groups
Like layers, you can group or ungroup individual shapes and lines to edit or move objects around. This can come in handy when working on files with lots of objects or design items.
To group and ungroup objects, you can use either the Edit menu or Command Bar functions.
Shapes
There are a variety of geometric shapes available in Inkscape to use to create designs, these are vector shapes. Choose them from the Tool Box menu. Hold down the Ctrl key to maintain some constraint of the shape when resizing.
Paths / Pen tool
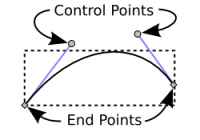
Most paths are described internally in Inkscape (and in many other drawing programs) as a series of Bezier curves. It is very useful to understand the basic properties of Bezier curves for drawing and manipulating paths. Bezier curves are defined by four points, two of which are the end points or nodes of the curve. The other two are control points or handles, each paired with one of the end points. The control points have the useful property that a line starting at one end of the curve and ending at the corresponding control point is tangent to the curve at the end point. This enables the smooth joining of multiple Bezier curves to form a path.
With The Bezier curve tool in Inkscape you can draw outlines around bitmap images of create your own shapes and designs. It can take a little practice to get used to, but once you gain an understanding of this you can do a whole of cool stuff.
Adjust Strokes
Once you have created a path you can make the stroke as large as you need via the stroke
Adjust Colour
Similar to above, you can also change the colour of the stroke or if wanting to have an object/shape that is in colour, you can change the fill. If you want to have just a coloured shape with no outline, turn off the Stroke and vice versa.
Text
Text is pretty straight forward, use the text tool to type any text and adjust like you would in most computer programs (font, size, colour).
Designing a Sticker
We have 2 options for creating our vinyl sticker in Inskcape, we can use the basics we've just learned to make our own basic shape or text for printing on the vinyl cutter with a few minor steps, or we can use the following method to import a bitmap (does everyone remember what a bitmap is?) and learn how to trace our bitmap to create a vector to print.
Please follow along to learn the Trace option, as it's very handy and similar to Adobe Illustrator's option.
Trace Tools
Using Trace Bitmap
Using this option is great but can be very time consuming
- Let's find a photo that we can use and save to our desktop (go to an internet browser and search for something that will be simple in shape and without much background) or we can draw our own image with a black marker and paper.
- Import the image into Inkspace via File menu>Import or Ctrl+ I is the shortcut.
- A pop up asking you about import options will come up, for now let's just use the defaults.
- Position your image in the middle of your A4 page (the default page setup), towards the top but it doesn't really matter too much here. Remember to zoom in and out you can use right click while holding down control to zoom in and shift to zoom out.
- This will create a layer called Layer 1, it's good practice to start naming your layers straight away, so let's rename it to something relevant like 'base image'.
- We need to prep the image for tracing, as tracing photos or detailed images is a very tricky and time consuming process! We can do this by going to the Filters menu and then Colour, let's first make our image greyscale as we don't need any colour for this sticker. Make sure you choose the preview option so you can see what it will look like before you apply, don't worry too much about changing any settings here, we'll do that in our next step.

- For our sticker we are only going to create a silhouette so we now need to adjust the brightness and contrast to create a black shape. We do this in the same Colour menu, choose the 'lightness and contrast option' and again, hit the preview option so as you move the lightness and contrast sliders you can see what happens. We want a plain black silhouette or outline, the main goal is to create a good contrast image with a white background that can be easily removed.

- Now that our bitmap is a black shape, we want to convert it to a vector. Make sure you have the image selected, then go to the Path menu and choose 'Trace Bitmap' or use the shortcut Shift+Alt+B. This will open the Trace Bitmap pop out window. Don't forget to enable the preview function so you can see what the end result will look like. You may only need to adjust the Brightness Cutoff threshold slightly, but you may also want to play around with the settings to get what you want, particularly if you aren't working on a plain shapes like we are and want more detail in your design. Choose the ignore background option and once you are happy with your solid shape (a few key lines left in are ok), hit the OK button.

- You now have a copy of your image as a vector, hooray! This will have copied the new vector image on to the same layer, if you want to keep your original image, add a new layer and copy, cut and paste to the new layer and turn it off for now (click on the eye to turn it off).

- Now when you choose the node editing arrow or double click on the shape, it should show up all the 'nodes' and paths that you've created as now your image is a vector. You can grab individual nodes (zoom right in) and adjust as needed.

- If you want to simplify your shape, you can also go to the Path menu and try that out by choosing Simplify (ctrl + L).
- With our cat outline, we need to make it more suitable as a sticker, because right now it won't really work as it's thin outlines rather than a solid shape we can peel off the vinyl. Let's start by deleting any stray nodes, like background noise or the whiskers inside the face as we won't need those. There's an eraser tool that you can use to draw a line across the path you want to remove, once you separate a line from the main artwork, you can select and delete it. We also need to make sure our outline becomes a stroke rather than a fill, when we converted the image we created a line but it is currently a fill so we'll need to adjust this by playing around with our fill/stroke setting and deleting any double outlines. We should end up with something that looks like either of these 2 images;

- We have now got a vector image we can print on the Vinyl Cutter as your sticker!
There's a few Youtube videos that you can watch to get more ideas on how to make the settings work for you;
https://www.youtube.com/watch?v=YFLxCMoE9Gk
Using the Pen tool
So we showed you the trace option and that may seem super easy but once you get into more detailed photos and images you will see it can be a bit more time consuming and a lot more work. So we want to show you a bit more about drawing your own vector shapes (just like hand tracing) with the Pen tool / Bezier Curves tool.
Let's use the same bitmap image we used for our auto trace option, now create a new layer that sits over the top of our image. You may want to lock your image layer so it doesn't move during this process.
Select the Bezier Curve tool and find an easy starting point of your image and click release to make your first node, then start to trace around your image incrementally adding nodes as you go. You have 2 options to curve your paths, if you don't release your click finger when you create a node you will see you can create curves by moving the mouse, once you click off your mouse button it finishes the path, but you can easily adjust later with the 'handles'.
If you just move around your image making the nodes and straight lines, this is also ok as you can go back and adjust all the handles to get your curves, and it's up to you which way you might prefer to work.


Vinyl Sticker
We can now save our new vector shape ready for printing on the vinyl cutter, go to the File menu and Save As, choose the name of your sticker and make sure you are saving as a standard SVG file.
We use Illustrator on the vinyl cutter to import our image to print it, Illustrator can import SVG and should have no issues.

We load our vinyl roll on to the bottom of the vinyl cutter where there is a plastic roll holder, we feed the vinyl colour side up into the cutter and align it to the side but also make sure our feed rollers (small rollers that feed the sheet through) are inside the white marks. If they aren't you may get an error that says bad position.


You also need to make sure the size of your print job will not exceed the size of the vinyl roll. When you feed the vinyl into the machine and hit enter, it should auto calculate the width and show on screen. Since we're just making small stickers, we should be fine but always good to check these settings.

We can see on screen a preview of what our sticker will print like and once you are happy with it, hit the print button and away we go!

See also
- Info about Vectors more generallyl
- linda.com tutorials (free through your SLQ membership)
- guides made by Inkscape
- community forums for Inkscape