Table of Contents
~~REVEAL~~
HP Sprout Pro
Summary
The HP Sprout Pro G2 is an all-in-one computer based solution for:
- 3D scanning
- documentation
- and interactive learning
The Sprout has two separate scanning systems:
- Structured light, combining HP hardware(projector and high res webcam) with software acquired after taking over DAVID 3D systems
- SLAM Fusion, using a 3D sensor and webcam for hand-held scanning.
The HP AU Sprout site and the HP US Sprout site contain the official documentation, educational videos and case studies.
Hardware
- Intel® Core™ i7-7700T
- NVIDIA® GeForce® GTX 960M
- 23.8“ diagonal, 10-point touch-enabled, full HD display.
- Full HD projector
- RGB-D sensor (rgb640 x 480 @30fps - depth 640 x 480 @30fps)
- 14 MP Webcam
- 21.3” diagonal Touch Mat
- 2048 levels of pressure sensitivity
- 20-point capacitive surface
- Active pen
Use in the Fabrication Lab
- The sprout main use in the Fabrication Lab is for 3D scanning.
- Objects that rang from approx
- minimum 50 x 50 x 50mm mm to
- maximum trapezoid dimensions of a base of 210 x 290mm, height 200mm, top of 100 x 150mm1) can be scanned.
Basic Scanning Considerations
Due to the limitations of non-contact light scanning, objects must be:
- opaque,
- not reflective
- not translucent
- no sub-surface scattering
- not too dark
- not too light
Comparing Scanning Technologies
Below is example of the output from both technologies on the Sprout.
From the SLAM fusion with textures:

From Structured light wth textures

SLAM fusion - no textures.

Compared with the Structured light, no textures.

Choosing a Scanning Method
As you can see from above, the quality of the output of the structured light is considerably higher, so whether to use the SLAM fusion or structured light scanning depends on the size of your object, the quality of your desired result and your physical capabilities (and patience!).
- If your object is large enough and you want a quick result that covers all surfaces and is pre-textured, use the 3D SLAM fusion method.
- If your object is less than 100 x 100x 100mm then the 3D SLAM sensor will probably not detect it at all, and structured light is your only option.
- If you have difficulty holding your object steady for 5-10min inside the sprout scanning area, then use the structured light method.
- For all other objects, use the structured light method.
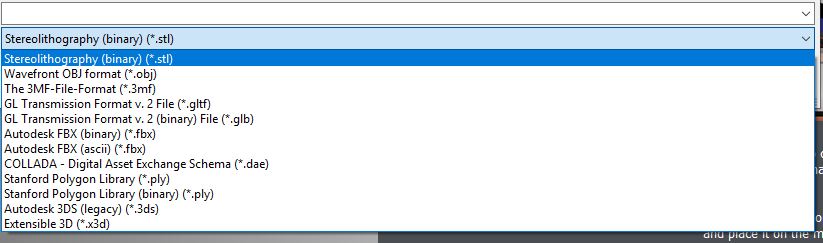
Output file format
If your model requires more processing or you want to retain colour information, export as an OBJ file. If your model is nearly ready to print then use the STL format. The file size for the structured light output is much larger, the example above was about 180 mb.
SLAM Fusion Scanning Using Camera3D
Before start -its important to know that Camera3D will not open 3D files, so you need to complete the process in one go.
- The Sprout uses 3D depth sensor2) combined with a high resolution webcam.
- It is controlled using the HP Camera 3D software, and is operated by manually rotating your object with your hands in front of the sensor.
- Depth (3D) information is captured by the depth sensor, and the webcam is used to map high quality textures onto the model.
- There is a built in tutorial in the Camera 3D app
- Also Launch HP 3D Scan 5 from the desktop or taskbar.
 Check out the video on the HP Z 3D Camera - this is for the stand-alone version of this system.

Important Notes
The depth sensor works best without interference from outside light sources, this is why we have the sprout inside a small photo booth.
Before you start
- Check with the Fabrication Lab supervisor whether the sprout has been used or calibrated recently.
- Turn on the Sprout.
- Log in as edgeuser (password edgeuser)
- Close up the sides of the photobooth (leave the front and the vent on the top open)
Scanning - Prep
- Launch 3D Camera app
- Turn on lamp on app
- Check the size of your object inside the green ring (will it scan?)
- start with the object on its longest side or base (remember this orientation!)
- Click the camera icon to start
Scanning
The aim here is to capture an entire scan of your object, without your fingers or hands mapped as textures or parts of the model.
- Hold the object in the tips of your fingers, starting underneath
- Start rotating the object
- if you lose tracking
- go back to the last position
- go back to the start orientation
- Rotate the object around one axis at time
- lift the object closer to the scanner to get more details
- Click the tick when done
Texturing
Texturing is done using the high resolution webcam. This is done without your hands in the frame!
- Start with the object in the start orientation
- Rotate the object in 3 dimensions
- Use lego blocks and blue tack to hold the object in place
- Take as many photos as you can - the more photos the better the texture
Saving and Exporting
While Camera3D saves your file in a number of formats:
Its important to remember this is a one-way process, with no going back once the scanning is started.
Structured Light
The Sprout uses a built in projector, touchmat and web camera. The software used is HP 3D scan V5 originally designed for stand alone scanners and cameras and developed by DAVID Laserscanners3). State Library has also purchased the optional turntable to ease the scanning process.
The project, webcam and turntable need to be callibrated before use, then adjusted to suit your scanned object. Despite the all-in-one nature of the Sprout, its not a “set and forget” kind of tool. Good scanning results depend in part upon experimentation and can be a pain-staking process.
Important Notes
Carefully read all of the following safety precautions before using Sprout 2D calibration, 3D calibration, and 3D Capture scans.
WARNING! -- Photosensitive Epileptic Seizures
If you experience any of the following symptoms, immediately stop using Sprout calibration or 3D scanning functionality and consult a physician:
- Altered vision
- Light-headedness
- Dizziness
- Involuntary movements such as eye or muscle twitching
- Nausea
- Convulsions
- Loss of awareness
- Confusion
- Cramps
- Disorientation
Resume Sprout usage only on approval of your physician
Parents should monitor and ask their children if they have any of the above symptoms. Children and teenagers may be more likely than adults to experience these symptoms.
The vision of young children (especially children under the age of 6) is still under development.
Consult your physician (such as a pediatrician or eye doctor) before allowing young children to use Sprout calibration or scanning functionality.
To help reduce the likelihood of adverse physical reactions:
- Use in a well-lit area and do not look directly at Sprout or light patterns generated by Sprout during calibration or 3D scans.
- Avoid prolonged use of the 3D scanning process.
- Take a 15-minute break during each hour of Sprout use.
- The length and frequency of necessary breaks may vary from person to person.
- Please take breaks that are long enough to allow any feelings of discomfort to subside.
- If symptoms persist, consult a physician.
- Avoid calibrating Sprout or producing 3D scans when you are tired or need sleep
Before you start
- Ask the Fabrication Lab Supervisor if the Sprout has been used today or recently calibrated.
- The sprout structured light scanning works best with some ambient (non-direct) lighting. Open up the sides (not the top) of the photobooth before you start to scan.
- Turn on the Sprout.
- Log in as edgeuser (password edgeuser)
Worktools Control
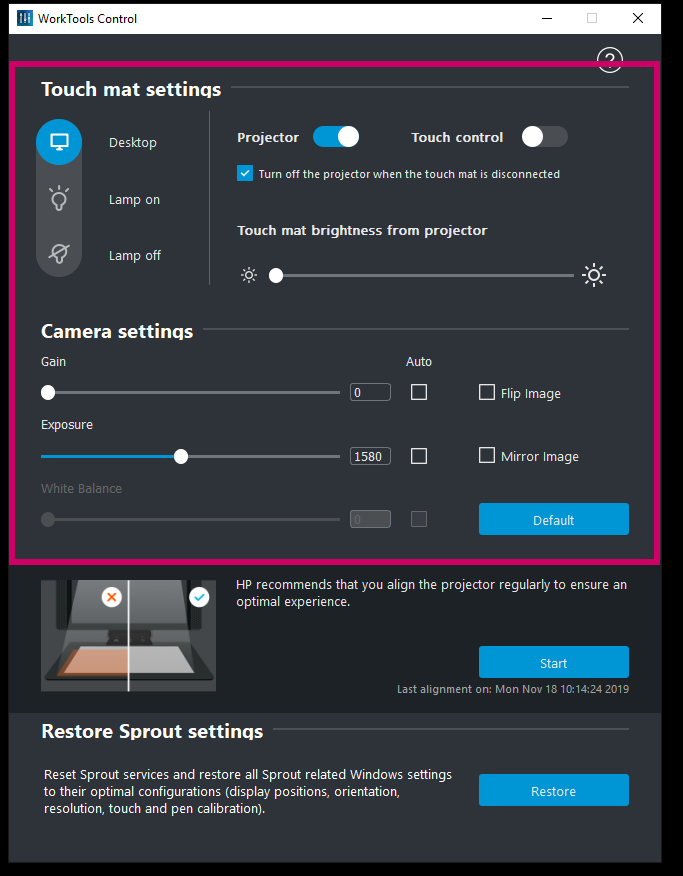
Now we need to align the projector and set the scanner and touch mat settings. Open the Worktool Control app
 then calibrate the projector 4)

Next check the touch mat and projector settings are as below. You will be adjusting these settings as you scan, but this is a suggested starting point.
HP 3D Scan 5
- Place the dark object in front of the scanner, and adjust the exposure until red sine waves are correct on the dark object.
- Set the Projector Brightness slider to maximum.
- For some object the image may be too bright because the calibration panels are white - this cannot be helped 5)
Too Dark

HP 3D Scan 5
Other Resources
HP Sprout Stop Motion - https://digitalpromise.org/global_project/moving-pictures-student-guide/