Table of Contents
CNC Operator Instructions
Press Esc to navigate using the arrow keys < > ^ v or press X to go to main menu
Machine Safety
- When machine is running, keep clear of any rotating or moving parts eg. the cutting bit, spindle moving gantry and head parts.
- Do not lean on machine whilst in operation.
- Parts of the machine , particularly cutting bits, will get hot so you may need gloves when handling/ or changing tooling.
- Maintain a clean workspace-check that the gantry and rails for tooling/materials left behind.
- Clean up as you work. The machine does the messy work for you to clean up!
- Use the right tool for the job. Different tooling pieces have a specific purpose and material.
Safety - Emergency Stop
The CNC is fitted with an emergency stop.
This can be activated to bring the machine to an immediate stop in an emergency.
Note -if the machine is turned OFF mid operation, wait 1 minute to turn ON. After activating emergency stop, needs to be homed.
Safety - Operator Hazards
The CNC router is capable of directly causing death or serious injuries, including amputations, fractures, de-gloving, lacerations, contusions and crush injuries. The hazardous parts of the machine are:
The spindle
- The spindle spins at up to 18,000 rpm - capable of cutting at over 10 metres/minute (m/m)
- through metal
- (or flesh)
- The bit takes at least 30 seconds to come to a complete stop.
- Every time.
- Even if you touch it.
- The bit can fracture, break or shatter.
- A bit rotating 18,000 RPM will fly out about 50 km/hr
- at your eyeball
The Gantry and Machine Head
The gantry can move at over 10 meters/min and weighs over 100 KG.
It can hit with enough force to knock a person over, or trap and mangle a limb.
Safety - Damage to Machine
- The vacuum bed is soft aluminium. If it is damaged the machine is unusable.
- Drill bits are brittle, and will shatter or crack if dropped on concrete.
- The router will cut through metal clamps and screws
CNC Materials
The Edge currently holds a stock and sells 1200x1200mm (half sheets) 15mm Plywood. Participants are also welcome to have a look in the offcuts for suitable material (this is for prototyping only- no commercial/professional jobs)
We also have a small reserve of 15mm ply and 18mm Formply in full sheets (2400×1200)
These are stored offsite and require extra handling. Prearrange if you want to organise a full sheet for your next booking
The Edge has also started experimenting with Expanded PVC Board and Expanded Polystyrene Foam.
Talk to your Fab Lab Supervisor if you have a specific material you would like to trial on the machine.
Preflight checks - getting the Machine ready to cut
- Is there a hot work permit in place?
- Is there room in the extraction bag for your saw dust?
- Check the required tool is is in the machine and is secure?
- Has the tool been qualified?
- Has the machine been homed?
- Are the required Vacuum bed zones are turn on?
- Is the material secure on the bed?
- Have you loaded the right cutting file ( Preview File on the A2MC console)?
Check with the Fabrication Lab Supervisor before cutting
Preflight checks - Enroute
When you are cutting your job
- Are you and (everybody in the room) wearing your PPE?
- Are you and (everybody in the room) standing behind the yellow safety line?
- Are you alert and ready to hit the emergency stop if required?
- Are you ready to hit the pause button to clear debris?
DO NOT GO NEAR THE SPINDLE UNTIL YOU CAN CONFIRM IT HAS STOPPED SPINNING
Commonly Used Tabs and Functions
A2MC Tabs
| FUNCTION | NOTES |
|---|---|
| Tab 1 - Jobs Mode | |
| Tab 2 - Position & Jog Mode | |
| Tab 3 - Speed Mode | |
| Tab 4 - Spindle RPM | |
| Tab 5 - Origin Mode | |
| Tab 6 - Tooling Mode | |
| Tab 7 - Function Mode |
Spindle Functions
| FUNCTION | NOTES |
|---|---|
| Function 01 - Machine Properties | |
| Function 02 - Verify Job | |
| Function 09 - Abort Job | |
| Function 16 - Set Parking Position | |
| Function 20 - Set Material Thickness |
| Function 25 - Set Tool Height | |
| Function 27 - Set User Z Origin | |
| Function 28 - Set and Plane Waste Board | |
| Function 30 - Edit Tools | |
| Function 31 - Change Active Tool | |
| Function 40 - Current Job Properties | |
| Function 41 - Feed Speed | |
| Function 42 - Spindle Control | |
| Function 43 - Job Repeat | |
| Function 44 - Job Array | |
| Function 45 - Plunge Speed | |
| Function 46 - Measured Move | |
| Function 47 - Cut Rectangle |
Tangential Knife Functions
| Function 24 - Set Knife Length | |
| Function 42 - Rotate Knife | |
| Function 58 - Swap from Spindle to Knife Control | |
| Function 67 - Knife Overcut/Undercut Compensation | |
| Function 822- Set up Tangential Knifes |
Multicam CNC Bookings
The Edge's Multicam CNC Router is available for bookings by inducted members of the community on Tuesday Afternoons from 12 - 4pm.
Hit the booking page to make your 2 hour booking.
~~REVEAL~~
Other Operations - Staff Only
includes
Other Operations - Staff Only - Continued
Daily Setup
Prepare Space

- Sign out Pit Key
- Establish Comms via walkie talkie (Channel 21)
- Open Roller Door
- Place bollards out for CNC work area
- Check dust extractor bag /Empty if required
Prepare Space Continued
- Turn on compressor
- Ensure required PPE is available and that the space is tidy enough to commence work.
- Remove MDF cover board from waste board.(2 person lift recommended)
- Check the condition of waste board for high spots and lightly sand where necessary
- Turn on the CAD Computer, digital signage, lights and fan where necessary
Setup Machine
- If there is a cutting tool/bit on the machine - ensure it is secure.
- Ensure Spindle is clear for warmup procedure.
- Test Vacuum Bed Compressor
- Test Dust Extractor
Setup Machine Continued
- Turn on CNC machine and wait for it so go through its start up procedure
- Home the machine
- select Warm up spindle and OK (5 Mins)
Daily Machine Pack Down
Cleaning up
- Throw away any off-cuts or larger debris
- Use extraction tube to vacuum the material before removing, once removed vacuum the waste board. Use the dust pan to remove any debris still stuck on the board by scraping it off lightly.
- Use compressed air clean around and underneath the machine.
- Use compressor to clean the machine, most importantly the linear rails.
- Replace Night Cover on Wasteboard
- Return tools to tool storage
- Tidy up work bench (dust, wipe if needed)
- Make sure space is tidy for next person to use
- Bring the barriers back in, shut the door and turn off the light
Shutting Down
- Return the Machine to Home position
- Turn off machine by pressing the Off button
- Turn off Vacuum bed and Extraction fan on the wall
- Shutdown CAD Computer via Windows menu
- Turn off Monitor, Fan, Lights, Compressor and WAP
Supervisor Preflight Check
Just like the supervision of the Laser Cutter there are a number of critical factors that a Fab Lab Supervisor needs to satisfy for themselves before Green Lighting a job. it is not a question of skill or experience (newbie or an experienced machinist) - Only a recognised Fabrication Lab Supervisors have the delegated authority to supervise the use of Edge Fabrication Lab tools and approve the safety of each and every job.
As such the Supervisor on duty must satisfy for themselves
Safety
- The area is clean and safe to operate the machine in
- Everyone in the area is wearing the correct PPE
- Everyone in the area is has received a safety brief.
- The Machine is maintained and safe to use
Preflight Check - Machine physically ready to use
- An appropriate cutting tool has been selected for the job
- The cutting tool is correctly fitted on the machine
- The material is appropriate to be cut on this machine and is secure on the bed
- There is no tools clamps or fixings in the path of the tool or that will obstruct the movement of the gantry.
Preflight Check - BEFORE EXPORTING JOB AS NUMERICAL CODE - Check Job is Programmed Correctly//
- Feeds and speeds are appropriate for the material being machined and the cutting tool being used.
- Depth settings hare appropriate for the thickness of the material.
- Maximum Depth of cut has been verified.
- Correct Plate dimensions have been verified.
- Program Simulation has been run to verify correct programming of job.
Preflight Check - Last checks before go
- Verify that correct version of the NC file has been sent to machine.
- Ensure machine has been homed.
- Ensure correct tool has been verified.
During the Job
- Ensure participant is actively observing progress of job.
- Ensure participant is watching for small parts being sucked up by/ stuck in the vacuum extractor.
- Ensure participant is watching that vacuum hose and extractor/ guard assembly does not foul with material.
- Ensure only one person inside yellow line when machine is operating.
- Ensure that operators are verifying that the spindle has completely stopped before approaching machine (encourage use of Point & Shout technique).
Tool Change
Changing of tool is an operation only to be carried out by a Level 2 certified user or the Fabrication Lab Supervisor.
- Move router to over bed (this is so if the bit drops it doesn't hit the ground)
- Pair the right sized collet for the cutting Tool you have selected
- Blow collet out clean with compressed air
- Blow Collet nut out clean with compressed air and inspect (clean collet nut with steel wool if required).
- Inspect Clamping nut surfaces on the Spindle (clean with steel wool if required and blow out clean with compressed air)
- Fit collet in Collet nut with an audible click
Tool Change Continued
- Hand tighten collet nut (and collet) onto spindle - take care not to cross thread
- Place Bit into clamping hole of collet and hand tighten until collet begins to grip bit.
- Adjust bit so that approx 5mm of bit shank is exposed below collet (ensuring swarf will clear flutes of bit without feeding up into collet.
- Tighten Collet nut using Collet nut Spanner and Spindle Spanner. Note not too tight.
To Tighten - Squeeze the Tools together.
- On CNC Control Console go to TAB 6 and select appropriate tool for the job
Tangential Knife Operations
Step 1 - Swap out sacrificial boards
Swap the sacrificial MDF Board used with the spindle for the sacrificial Polystyrene Board used with the knife.
Step 2 - Remove AXYZ Spindle Unit
- Move machine head to a position that is convenient for making changeover of the different tools.
- remove the vacuum hose as safety collar.
- With an allen Key loosen the 5x Hex Studs securing the Spindle mounting plate to the machine head mounting plate.
- Disconnect control cables connecting spindle to the machine head by turning the aviation connector plug sleeve anticlockwise.
- Support the weight of the spindle while simultaneously completely removing the hex studs.
- Now place spindle unit safely to one side.
Step 3 - Install Multicam Tangential Knife Works
- align the holes on the Knife Works mounting plate with the holes on the machine head mounting and insert the 4x hex studs and tighten.
- Use the lowest holes available
- Do not use the cross-threaded hole 2nd from the bottom on the left-hand side
Step 3 - Install Multicam Tangential Knife Works - Continued
- When tightening bolts
- support the knife with another pair of hands - or your gut hand
- get the top left and bottom right screws 3/4 threaded.
- make sure the knife plate is flat against the machine head mounting plate.
- Thread the bottom left, then top right screws 3/4 threaded
- Finger tighten all screws in the same order
- Use the 3mm Allen Key to fully tighten.
Step 3 - Install Multicam Tangential Knife Works - Continued 2
- Connect the control cable via the aviation plug.
- Connect the air supply hose;
- push the socket down
- jam the hose in - the socket has teeth that will grip the hose.
Step 3 - Install Multicam Tangential Knife Works - Continued 3
- Add 2 drops of machine oil to oil nipple (2 drops to be added every 2 hours of operation)
- Execute function F58 - Changes A2MC from Spindle control to Tangential Knife control setting. At this point the machine will reboot
- Allow the machine to home the knife on the X&Y axis
Step 4 - Fit Knife Blade
WARNING - KNIVES ARE EXTREMELY SHARP
Move Machine head to middle of table and place scrap foam on knife as guard whenever knife is not in use.
Extreme care should also be exercised when handling Knife blades as they are expensive and fragile and are likely to break if dropped.
Only remove them from their packaging over the sacrificial board
Step 4 - Fit Knife Blade - Continued
- Wear protective gloves whenever handling the knife. - Select specific knife blade appropriate for your cutting requirements. - The knife cutting length should be as close as possible to the thickness of material - Again, position Machine head over sacrificial board in a convenient position for installing the required knife blade. - Execute Function F42 to 90 deg to expose the knife retention grub screw and remove grub screw with 3mm Allen Key. - Insert Knife blade with into holder with keyway oriented to the grub screw hole. Screw in grub screw and tighten.
MAKE SURE THE KNIFE IS FITTED STRAIGHT The grub screw should only contact the flat area of the knife blade hilt
Step 5 - Set Knife Length
The machine head needs to be calibrated to the correct Z axis value so that the knife tip's highest point of travel is level with the upper surface of the sacrificial board. This requires the operator calibrate the z axis manually ( or by eye) while the knife is reticulating.
- Now move Machine head over sacrificial board.
WARNING the next Step Starts the Knife
Step 5 - Set Knife Length - continued
- Execute Function F24 - Set Knife Length. This will start the knife's reticulating movement.
- Using the Z axis jog buttons (and =/- buttons to adjust jog speed -fast, medium or slow) to lower the tip of the blade slightly into the sacrificial board.
- When you have adjusted the Z axis to the correct depth the tip should be just under ( by the smallest fraction possible) under the surface of the sacrificial board at the highest point of travel.
- When you are happy with the calibration of the Z axis select enter.
- A2MC will now ask if you want to Set Knife? Perform a visual check of whether the knife is running parallel to the X axis. If the knife is aligned on the X axis Select no. If the Blade is not aligned select Yes and perform the Set Knife procedure.
Other Knife Operations
Manual Tip-Off
This Function is used for tool tip off if the tool is physically bigger the the touch disc mounted on the gantry or when planning the waste board.
- Change the tool using Tab 6 → Change → Select Tool eg 45mm Surface planer (Tool 10)
- Insert the 45mm Surface Planer and press ok.
- Move the spindle roughly 300mm x 300mm in from the home position
- Key in F24 to select Manual Tip-off
- Drive the head physically down to touch the wasteboard. use the +- button to cycle through the speed options (Fast, Medium, Slow, Step). Once touched the board press ok.
Planeing the Wasteboard
1) Position the wasteboard hard into the corner and location blocks
2) Turn on the vacuum pump!
3) Remove location blocks!!!`
For a new board both sides need to be dressed to remove wax coating and level the board. 1.5 to 2 months under heavy use. 1mm deep initially on first side on a fresh board .5mm deep on second side on a fresh board From this point the board should need not flipped until a new board is used. .2mm deep there after on the same side
Planning the Wasteboard
4) Key in F28 on A2MC Console
- Set waste board No
Wasteboard must be set AFTER the planing table or machine bed damage may result!
- Plane table yes
- Tool Diameter 45
- Overlap 50%
- Length (X Axis) 2420mm
- Width (Y Axis) 1230mm
- Z depth .5 mm
- Feed rate 12000mm
- Spindle RPM 10000
- Set origin NO
- Plane table Yes
Set the Wasteboard
When planing is complete replace location blocks.
Now you need to set the waste board (ie zero the Z Axis)
5) Key in F28 on A2MC Console
- Set waste board Yes
Jog tool down to complete a manual tip off (as per manual tip off) and press OK when you are have just touched.
Full List of A2MC Tabs and Functions
| FUNCTION | NOTES |
|---|---|
| Function 01 - Machine Properties | |
| Function 02 - Verify Job | |
| Function 03 - Machine Limits Control (Co-ordinate display) | |
| Function 05 - Execute M-Code | |
| Function 06 - Execute G-Code | |
| Function 07 - Enable/Disable Machine's Motors | |
| Function 09 - Abort Job | |
| Function 10 - Set User XY Origin“ |
Full List of A2MC Tabs and Functions Continued
| FUNCTION | NOTES |
|---|---|
| Function 11 - Choose Current Origin | |
| Function 12 - Seek Machine Origin | |
| Function 13 - Go to Current Origin | |
| Function 16 - Set Parking Position | |
| Function 20 - Set Material Thickness | |
| Function 24 - Set Tool Height of tangential knife heads | |
| Function 25 - Set Tool Height ” | |
| Function 26 - Set ATC Tool Heights | ATC not fitted |
| Function 27 - Set User Z Origin | |
| Function 28 - Set and Plane Waste Board“ | |
| Function 30 - Edit Tools | |
| Function 31 - Change Active Tool | |
| Function 34 - Unload Spindles | ATC not fitted |
| Function 35 - Set dual carriage spacing | ATC not fitted |
Full List of A2MC Tabs and Functions Continued 2
| FUNCTION | NOTES |
|---|---|
| Function 40 - Current Job Properties | |
| Function 41 - Feed Speed | |
| Function 42 - Spindle Control | |
| Function 43 - Job Repeat ” | |
| Function 44 - Job Array “ | |
| Function 45 - Plunge Speed | |
| Function 46 - Measured Move | |
| Function 47 - Cut Rectangle” | |
| Function 50 Vacuum Pump, Dust Collector and Mist Control | Not Fitted |
| Function 51 - Digitise 2D & 3D Jobs.“ | |
| Function 54 - Safety Interlock | |
| Function 56 - G41/G42 Compensation | |
| Function 58 - Multi XML ControlFunction | |
| Function 59 - G41/G42 Modal Preset ” | |
| Function 801 - Set Static IP Address | |
| Function 821 - Set up Tool Tip Sensor | |
| Function 822 - Setting up Tangential Knives |
CNC Induction
In this induction you will learn
- the safe operation of the Multicam CNC router
- what you can achieve with router.
- how to prepare a simple design for fabrication.
- how to assign tool paths and export for the router.
- Cutting and finishing your job.
- how to identify problems and what to do when problems occur.
Requirements
- An State Library membership.
- Closed footwear.
- Participants must be over 16 years of age
Safe Usage of the CNC Cage
- The Edge staff supervisor to be present at all times
- A Hot Work Permit must be in place at all times
- Machine be used by inducted participants only.
- No person other than the operator or other authorized persons should be in the working area
General Personal Safety
-
- Enclosed footwear must be worn at all times.
- No loose or dangling jewelery or ID cards
- Long hair or beards must be tied up
- Avoid loose fitting clothing
- Personal Protective Equipment (PPE) must be worn when operating, supervising or observing the router in operation.
- SOP for Manual handling of materials
Machine Safety
- When machine is running, keep clear of any rotating or moving parts eg. the cutting bit, spindle moving gantry and head parts.
- Do not lean on machine whilst in operation.
- Parts of the machine , particularly cutting bits, will get hot so you may need gloves when handling/ or changing tooling.
- Maintain a clean workspace-check that the gantry and rails for tooling/materials left behind.
- Clean up as you work. The machine does the messy work for you to clean up!
- Use the right tool for the job. Different tooling pieces have a specific purpose and material.
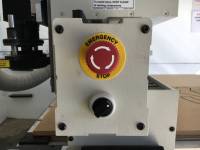
Safety - Emergency Stop
The CNC is fitted with an emergency stop.
This can be activated to bring the machine to an immediate stop in an emergency.
Note -if the machine is turned OFF mid operation, wait 1 minute to turn ON. After activating emergency stop, needs to be homed.
Safety - Operator Hazards
The CNC router is capable of directly causing death or serious injuries, including amputations, fractures, de-gloving, lacerations, contusions and crush injuries. The hazardous parts of the machine are:
The spindle
- The spindle spins at up to 18,000 rpm - capable of cutting at over 10 metres/minute (m/m)
- through metal
- (or flesh)
- The bit takes at least 20 seconds to come to a complete stop.
- Every time.
- Even if you touch it.
- The bit can fracture, break or shatter.
- A bit rotating 18,000 RPM will fly out about 50 km/hr
- at your eyeball
The Gantry and Machine Head
The gantry can move at over 10 meters/min and weighs over 100 KG.
It can hit with enough force to knock a person over, or trap and mangle a limb.
Safety - Damage to Machine
- The vacuum bed is soft aluminium. If it is damaged the machine is unusable.
- Drill bits are brittle, and will shatter or crack if dropped on concrete.
- The router will cut through metal clamps and screws
Main parts on CNC machine
- Machine bed - with vacuum suction
- Steel Gantry - X axis
- Machine head - Y and Z axis
- Spindle - routing bits and collets spins at 16000rpm average
- Controller panel - Manually control the gantry and load jobs
- Inverter enclosure- DO NOT OPEN! High Voltage. Main on/off switch is located here.
- Vacuum Pump manifold - four sections can be isolated to increase vacuum.
Machine Operation
Router Preparation
- Remove the waste cover board if required (2 person lift)
- Check over the wasteboard for rough and uneven spots and sand down using scour pad
- Use compressor to blow dust away.
File Preparation
The induction contains a introduction to VCarve to become familiar with creating tool paths and design orientation. We are going to make a simple stool from pre designed DXF files
- Tool paths are demonstrated on predesigned shapes
- Sending files to ouput so the CNC can fabricate
Prepare Files
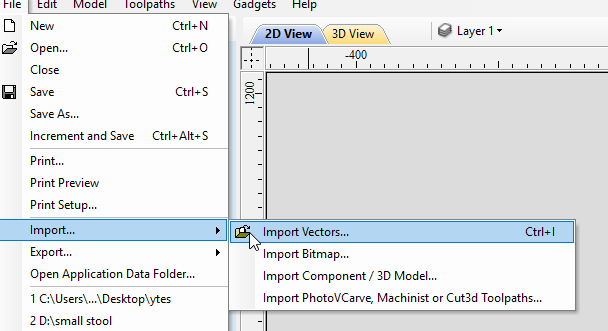
Export your file as a DXF, PDF and the original format.
Vcarve
As of August 2017 we have moved to using Vcarve for inductions.
You can download Vcarve Pro and authorize it with The Edge's makerspace code.
86B4F-F467A-280D9-9F4C6-9C56B-4C528-BEE6F
Create a new document
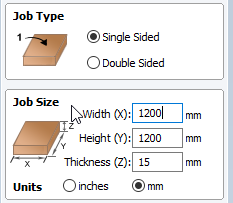
Define the Job
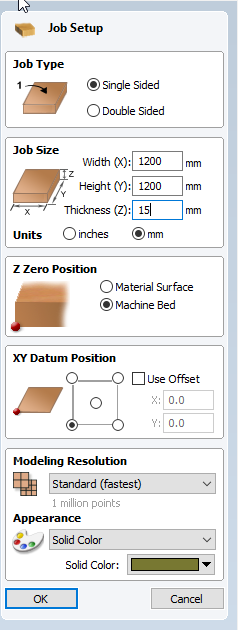
Make sure your material dimensions match your Job dimensions. For the inductions we use use a 2400x1200x17mm sheet. Measure all dimensions on the sheet!
Ensure your Z Zero position is the Machine Bed

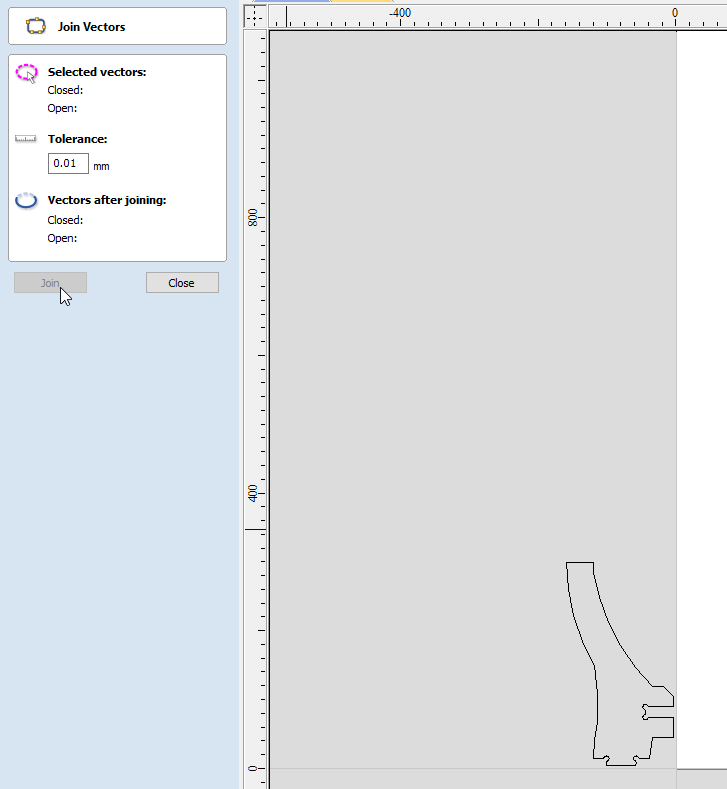
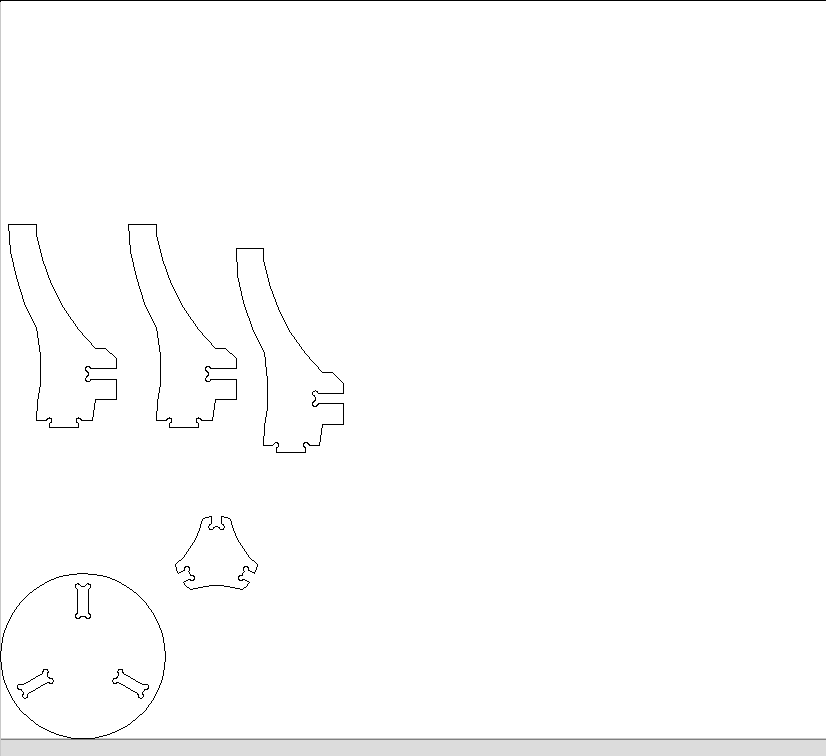
Import your first DXF shape with the correct thickness from the zipped files. Drag and drop one file at a time.
We need to check if the vectors need to be joined wtih the join tool.
If you see open vectors, close them.
Your shape should be solid black
Import your next shape - if it has separate parts - group to move all together.
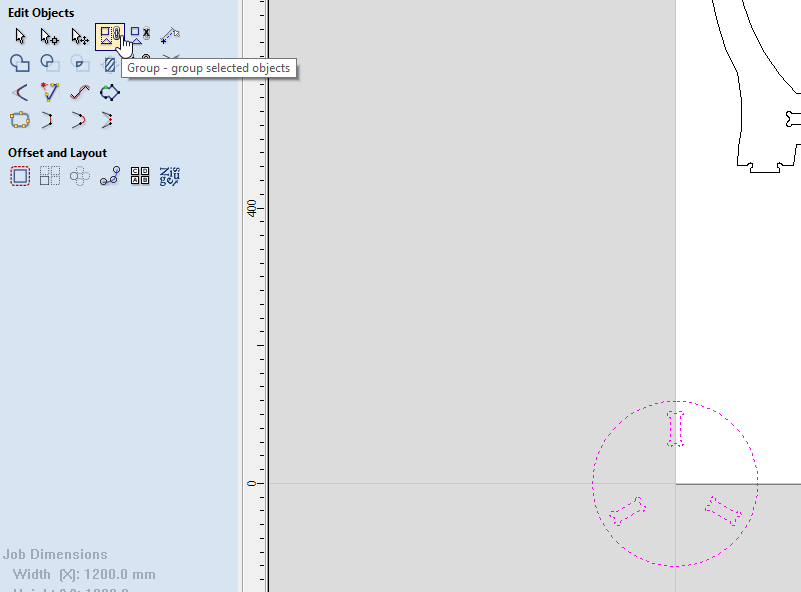
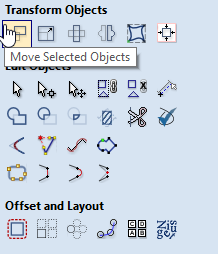
You Can move them easier using the move tool
Create Tool Paths
The router follows the tool paths to cut.
- Right click on shape outline (or select from left menu)
- Click Create toolpaths
- Select routing type
- Routing offset this is for whole, complete shapes with no breaks. Cuts around the edge of the shape.
- Internal (female) cuts inside the shape.
- external paths (male) cuts outside the shape.
- Island Fill/Island Hatch - removes all material inside an area.
- Engrave Paths - single lines that don't join to make a shape (appear with a small arrow)
Tool Type
Select the tool type you would like to use -For the induction we use either a 10mm 2 flute compression. You can import the entire edge tooling database into your version of Vcarve.
Depth, Feeds, Plunge and Speeds
These are the settings which the router uses to operate. It is up to you to set them, then the supervisor to double check any existing settings.
Depth
Set the depth in the path dialogue.
- Depth - How far above the bottom of the waste board the router starts its cut.
- Currently add an additional 0.3mm below your material thickness
- This may change after each service and/or waste board planing, your supervisor
- If your material is 17mm thick (make sure to measure) then the cut depth should be 17.3mm
Your supervisor will help you select the correct feeds and speeds for your job.
Feeds, Plunge and Speeds
In the tool 'edit' menu set:
- Feed - How FAST the router moves in the x,y dimensions. This is a constant linear speed in millimetres per minute (mm/min)
- Feed rate = Number of cutting edges x chip per tooth x RPM
- Plunge - How FAST the router move in the z dimension into the work material.
- Speed - This is the rotation speed of the router bit on Revolutions per Minute (RPM)
Click Save as.. if the tool path will be repeated or Ok when done
Moving Designs to Machine
Sending Jobs to the Multicam
- Open the Multi Cam App Manager
- Select File Manager
- select Connect -Note CNC Machine must be on to connect
- Once connected ,select your saved job and select the arrow to move to machine
Loading a Tool
Changing the tool is an operation only to be carried out by a Fabrication Lab Supervisor.
Loading the Router
- Load material onto the waste board.
- Align with bottom left corner of the bed
- Press TAB 1
- Load job using the folder button
- Check the job preview
Cutting with the Router
- Don PPE
- turn on bed suction
- Turn extractor
- start the job - the job will verify
- if preview fails abort and review Enroute settings
- Start cut with green button
While machine is operating
- Wear PPE!!!
- Observe the machine in operation
- Operator only inside yellow safety line
Pausing a Cut / Clearing Debris
If a piece is moving or get stuck in the extractor.
- Pause the cut with the red stop button
- Wait for the machine head to withdraw
- Watch the controller
- Wait for the spindle to stop
- Watch the spindle - verify it has stopped.
Use emergency stop if necessary
Note -if the machine is turned OFF mid operation, wait 1 minute to turn ON.
Cleaning Up
Move the machine head clear Use the extractor as a vacuum to clean debris Turn of the vacuum bed remove your job blow off bed with compressed air sand back wasteboard