Table of Contents
Response Workshops with Young People
Engagement Style: Free 1.5 hour sessions facilitated creative process.
Venue:The Edge Auditorium, Digital Media Lab and Innovation Lab.
Dates: 2-6th July.
Capacity: 15 young people per session aged 9-16
Staffing/Contractors: 2 artists, 1 program officer
Workshop Planning
3 x 2-4 hours meetings, plus autonomous preparation time as required. Access to SLQ equipment as required
Workshop Delivery • 2-6 June • 5 days of delivery. • 10 x 1.5 hour workshops, 2 workshops per day.
Content Integration • 1 day total, allocated as required.
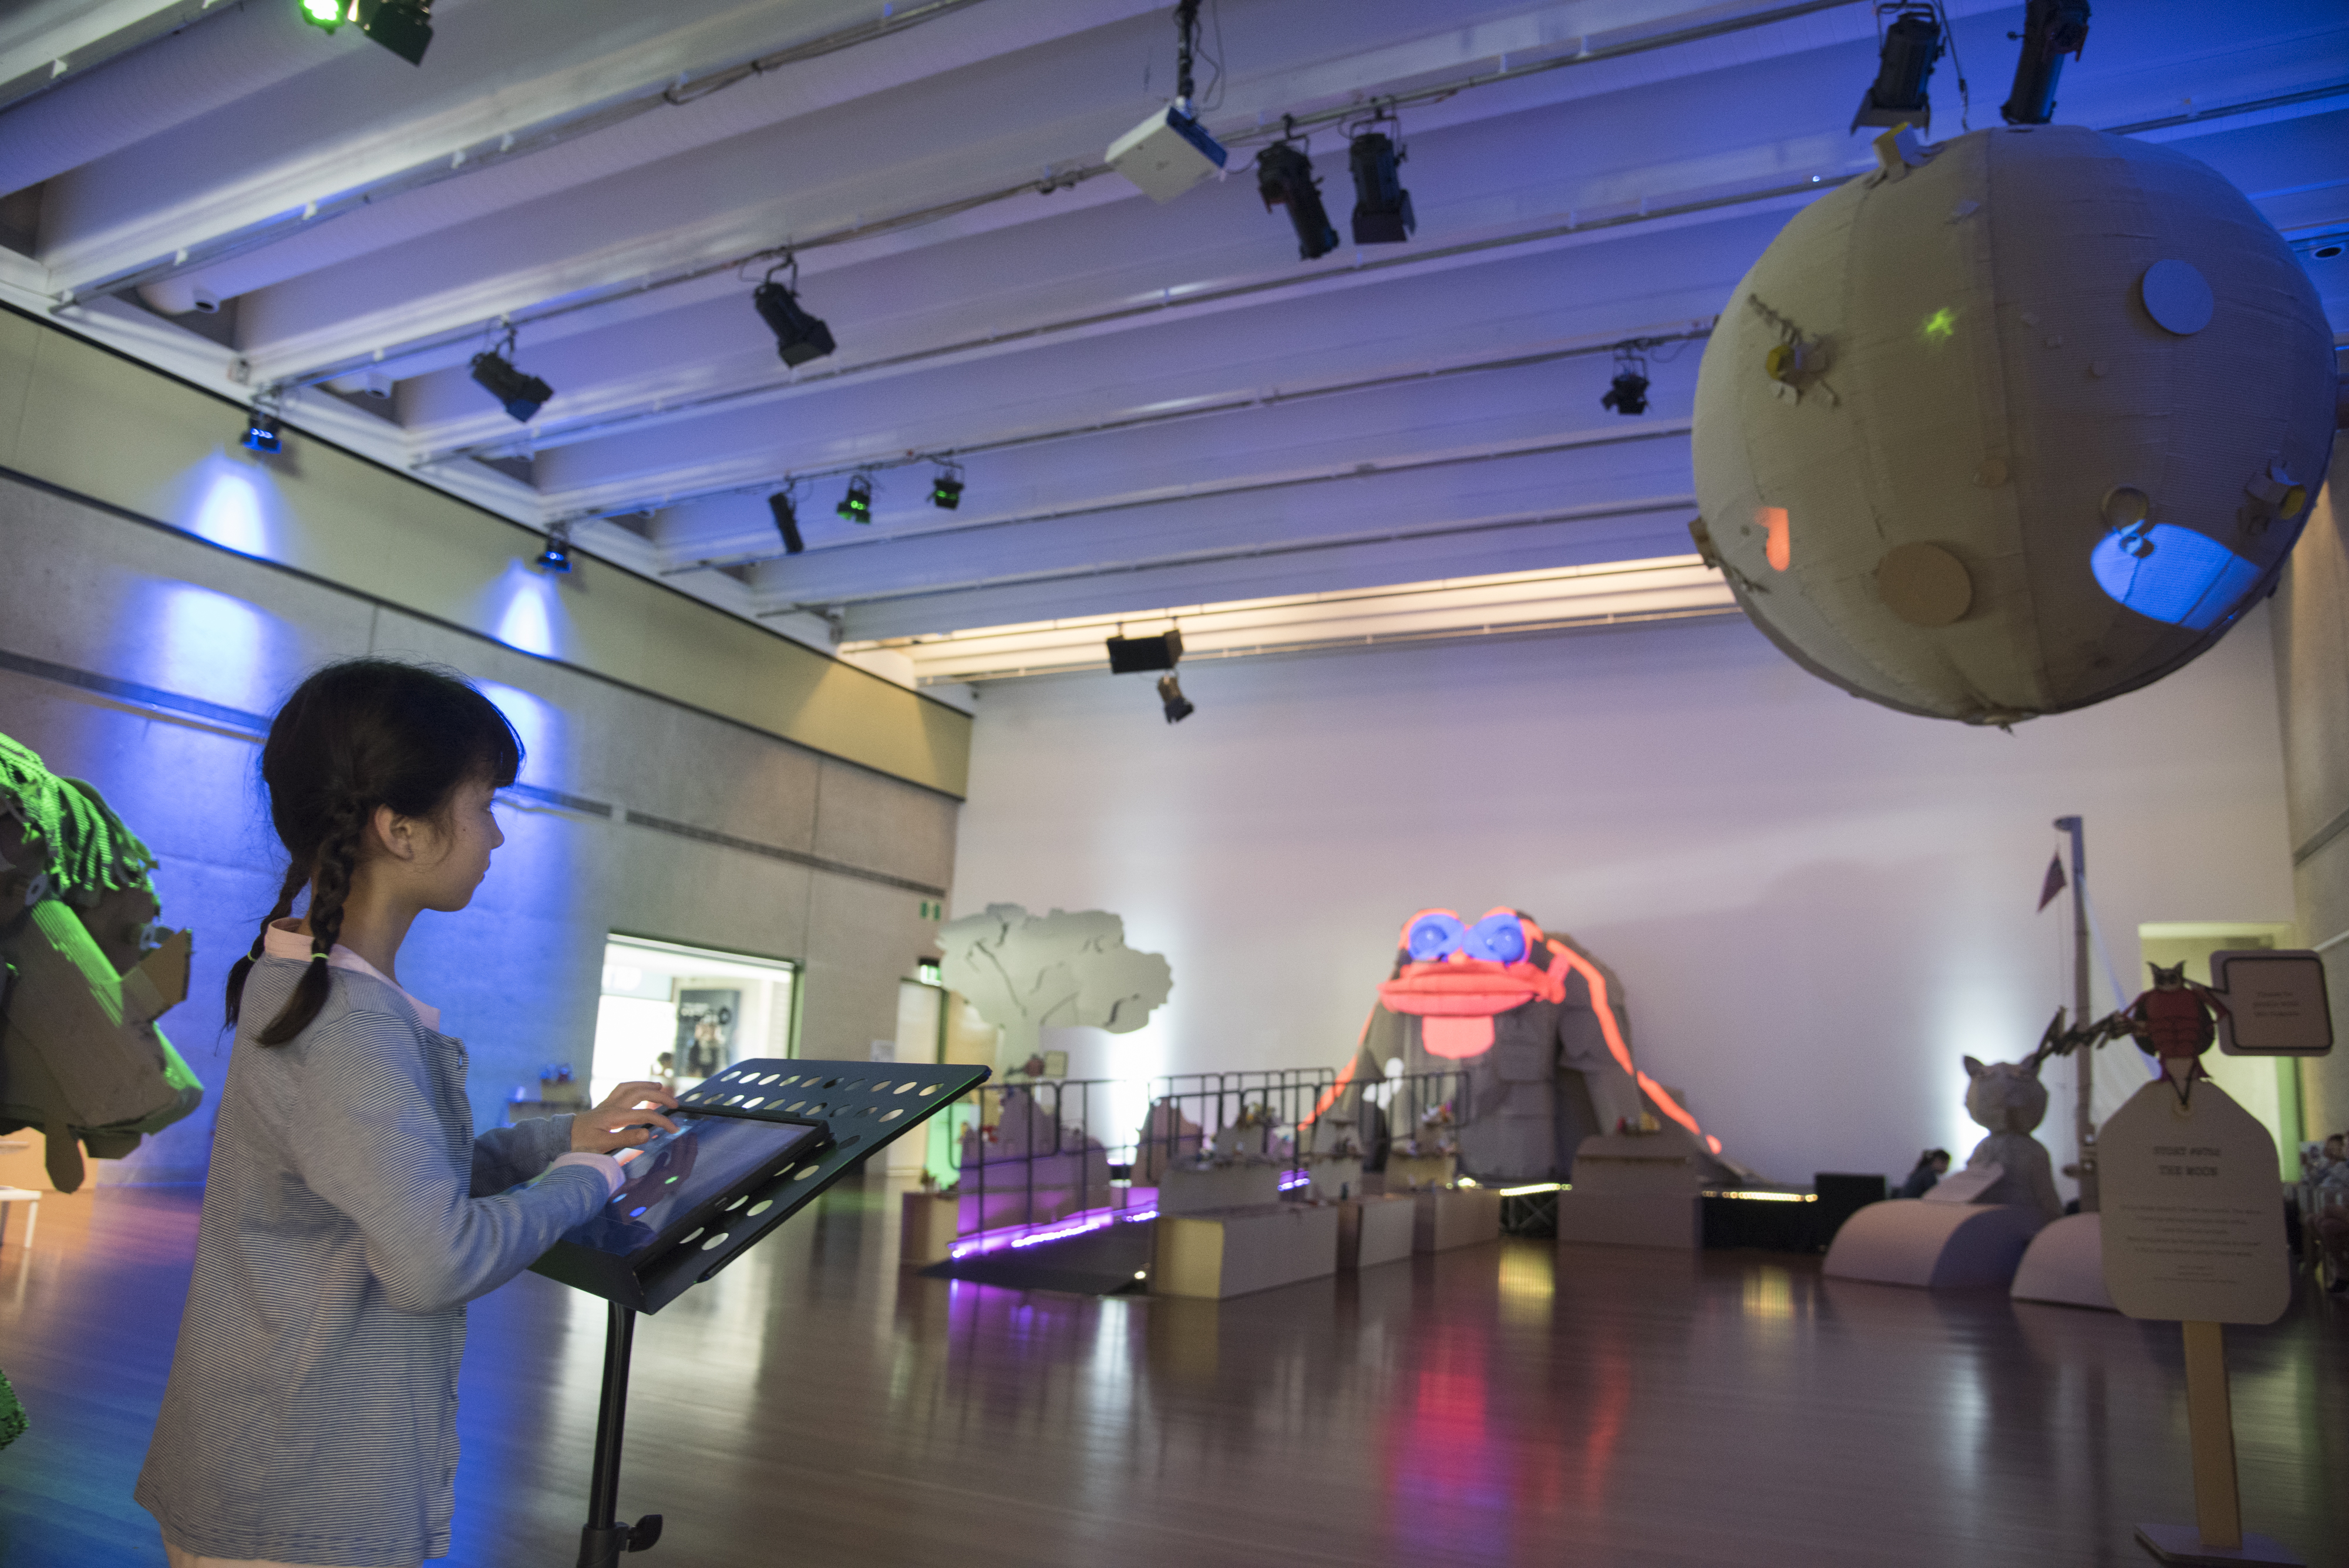
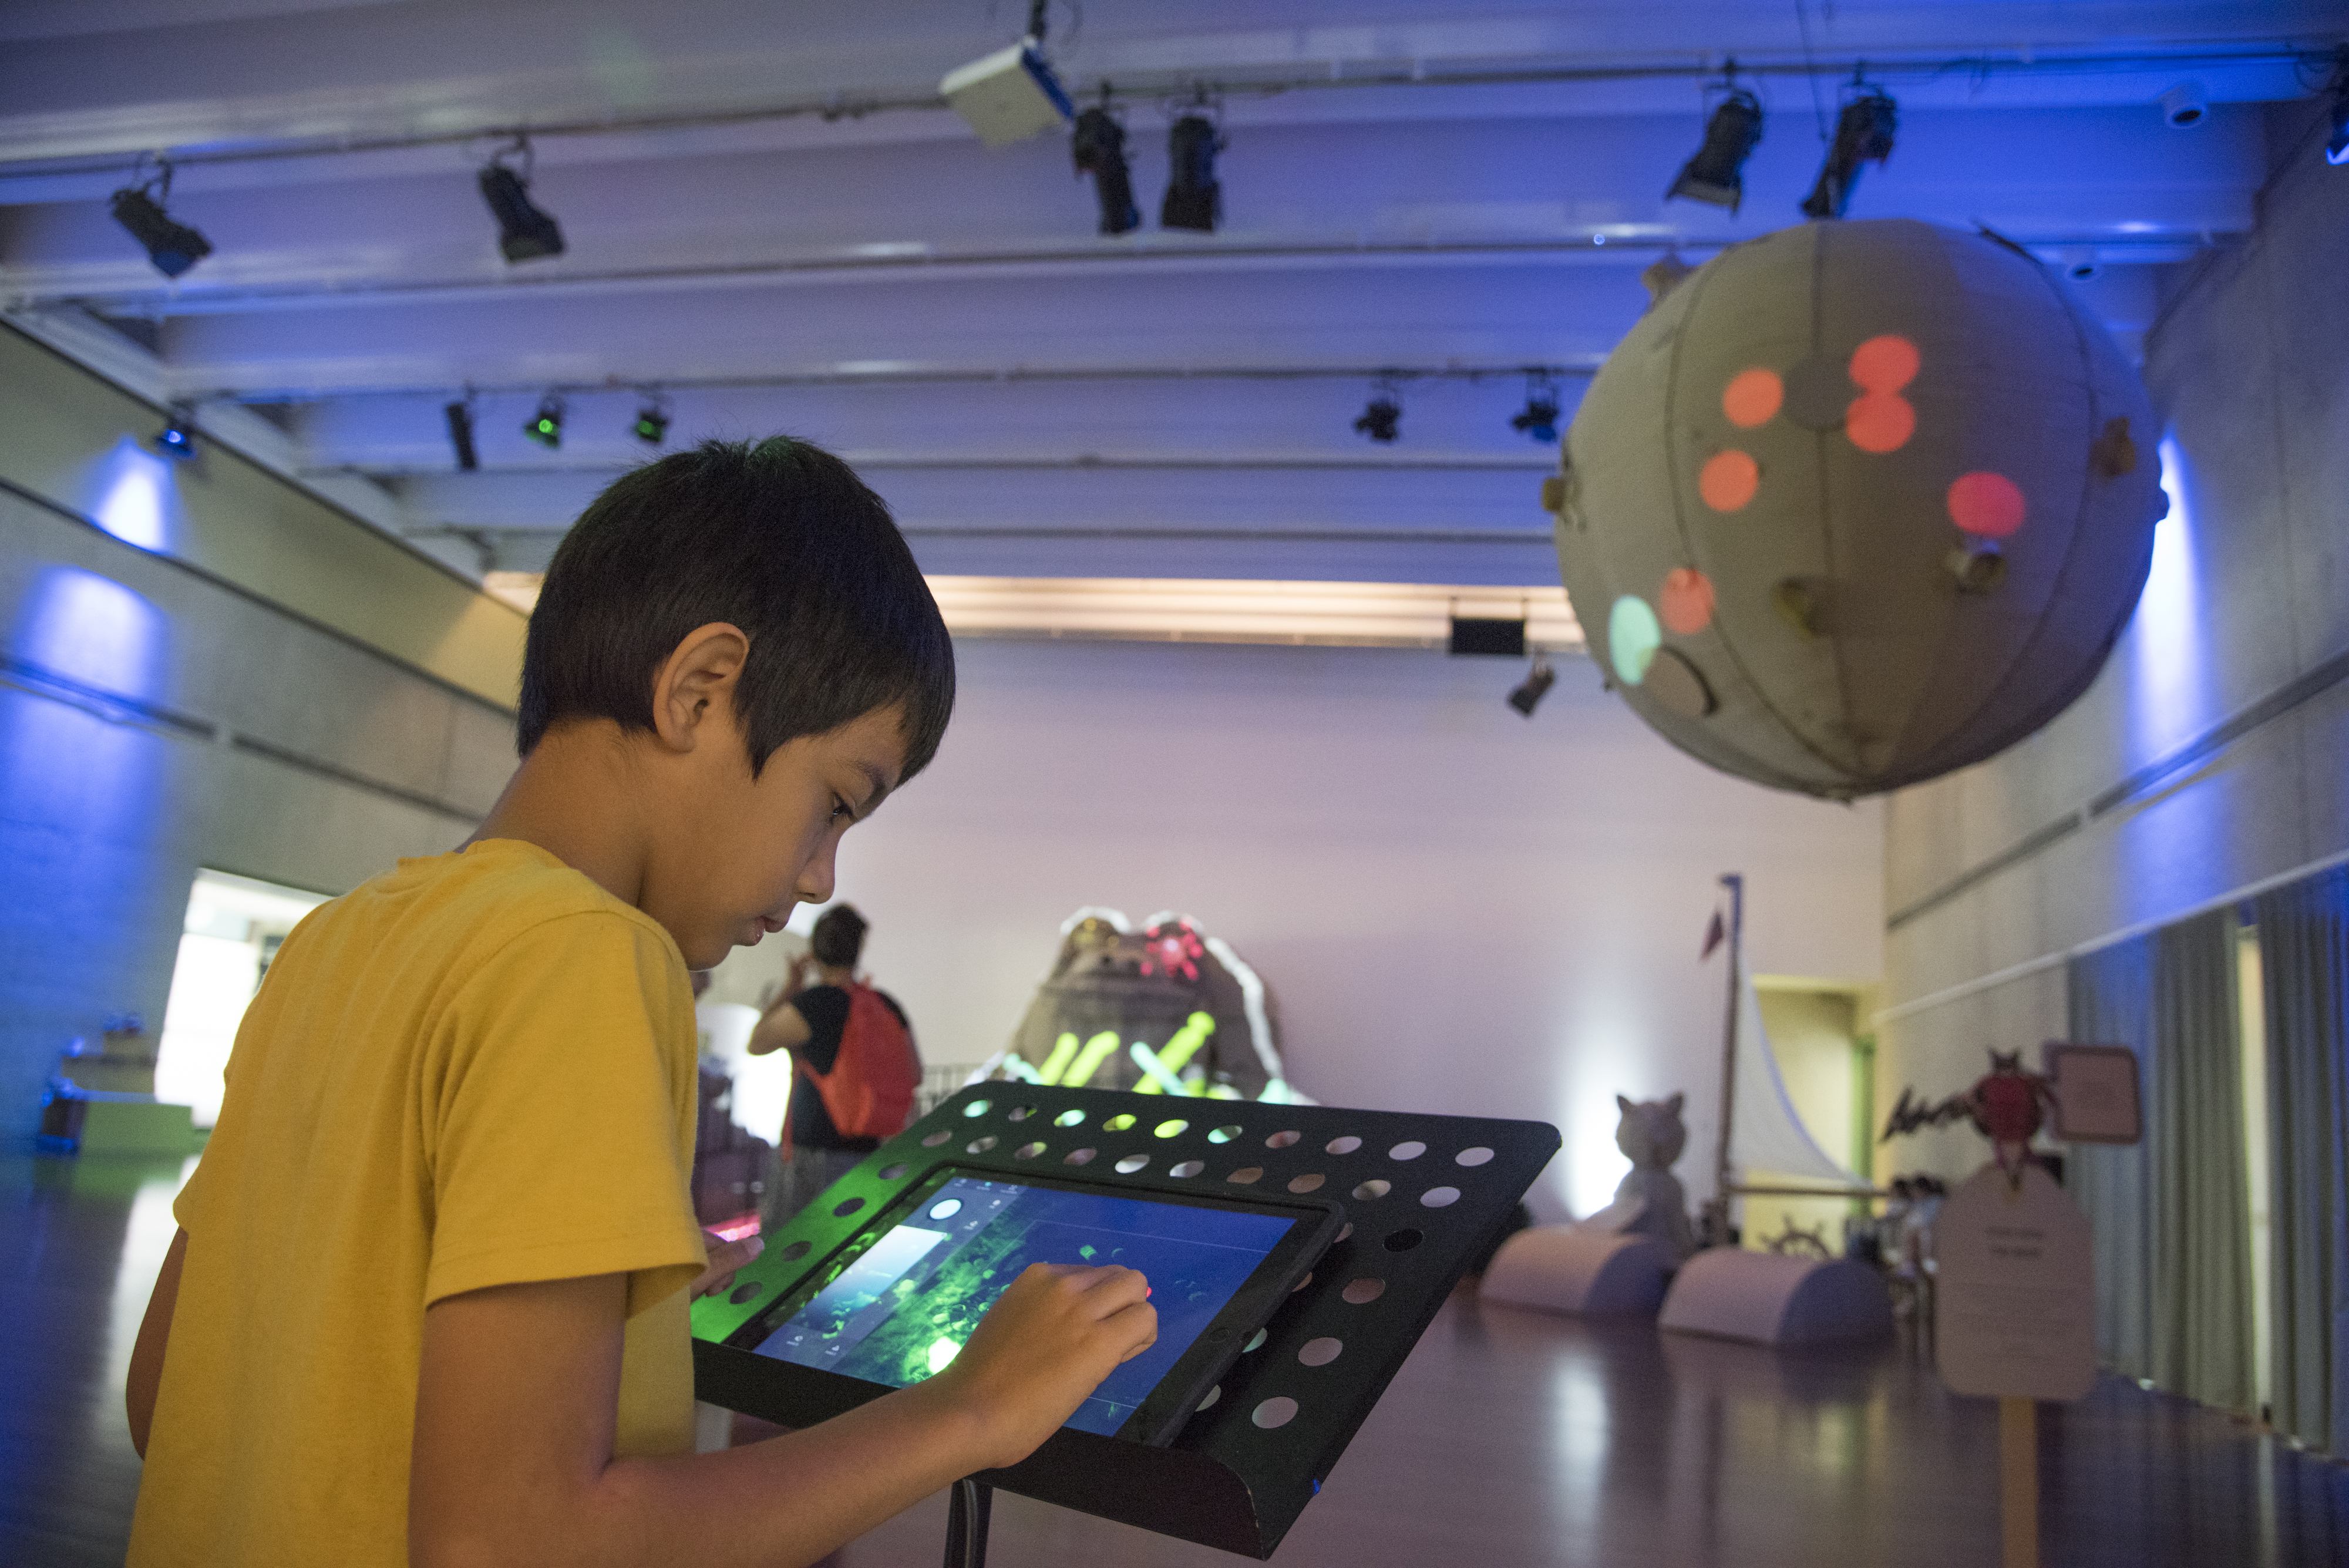
The final installation in The Edge
- Showcased the creative output of State Library’s community of participants
- Showcased the variety and capacity of State Library design and fabrication resources
- Build new audiences and extend current audience knowledge of SLQ programs and resources
Rationale: Groups of community members aged 9-16 were lead through a series workshops by artists/STEAM practitioners that use the rich imaginative content of the Great and Grand Rumpus as a point of departure for young people to developing activation content and exercising new creative and technical skills in the fields of audio and video. Groups will respond to and expand the modality possibilities of the installation in small scale ways, augmenting existing elements in the installation through the use of sound, projection, electronics and writing.
Both workshop strands engaged young people in a process of rapid content creation and skills development, aiming at for short, simple intensive bursts of creativity that lead to intuitive and spontaneous artistic outcomes. Workshops were pre-fabricated technically, allowing young people to arrive and ‘play’ with digital audio and video content without needing to understand the entire process behind them. This programming choice was made to prioritise rapid, playful, uninhibited creation over deep skills development around creative technology.
AUDIO RUMPUS - Workshop Plan
The AUDIO RUMPUS facilitating artist worked with the SLQ Program Officer to develop a sound design workshop series for young people aged 9-16 year olds engaging them in a creative process to respond to the Great Grand Rumpus installation using audio recording, digital manipulation of recordings, sampling, and live triggering, using Ableton Live and trigger based hardware ('Bare Conductive Touch Boards'). The artist worked in collaboration with SLQ to develop the workshops, then worked autonomously to deliver them with young people. The artist then worked with SLQ to integrate the digital content developed throughout the workshops into the installation environment including preparation of content and system design.
Workshop Materials
- 15 Mac computers with a built in microphone
- Ableton Live Lite on each compute
- 15 Headphones
- USB drives
Workshop Daily Schedule
8:30: Arrive (1st day) 10:00: Workshop Start 11:30: Workshop Finish 12:00: Lunch 13:00: Workshop Start 14:30: Workshop Finish 15:00-5:00: Setting up
Workshop Session Sequence
1. Introduction: 10mins
- The Story of the Great & Grand Rumpus
- The story of the project.
- Your role - creating audio soundscapes to activate the Great & Grand Rumpus
2. Brief: 15 mins
Each space has a story. Your space is… Read the story allocated to your space. Brainstorming ideas for content creations Brainstorm - How do we turn the installation ideas into audio. What does this space or character sound like?
3. Ableton 101: 25 mins
Task. We are going to:
- Use vocal mics to do audio recordings
- Manipulate the audio using effects to create sounds and stories
Step 1: Basics
- Channel Strips. Layers and functionality.
- Enabling recording on each channel strip.
- Location of the in-built microphone.
- Recording on each channel strip.
- Playback of recordings.
Step 2: Recordings
- Adjusting pitch
- Enabling recording on each channel strip.
- Recording on each channel strip.
- Playback of recordings.
Step 3: Effects
- Setting up a reverb bus.
- Routing a channel to a reverb bus.
- Experimenting with effect variables.
Step 4: Experimentation time.
- Have fun! Make recordings and play with them for 40 mins
Examples of workshop audio outcomes.
Upside Down World
Let's Drop the Bass
Pluto Ant Whisper
Robot She Sells
Audio Rumpus

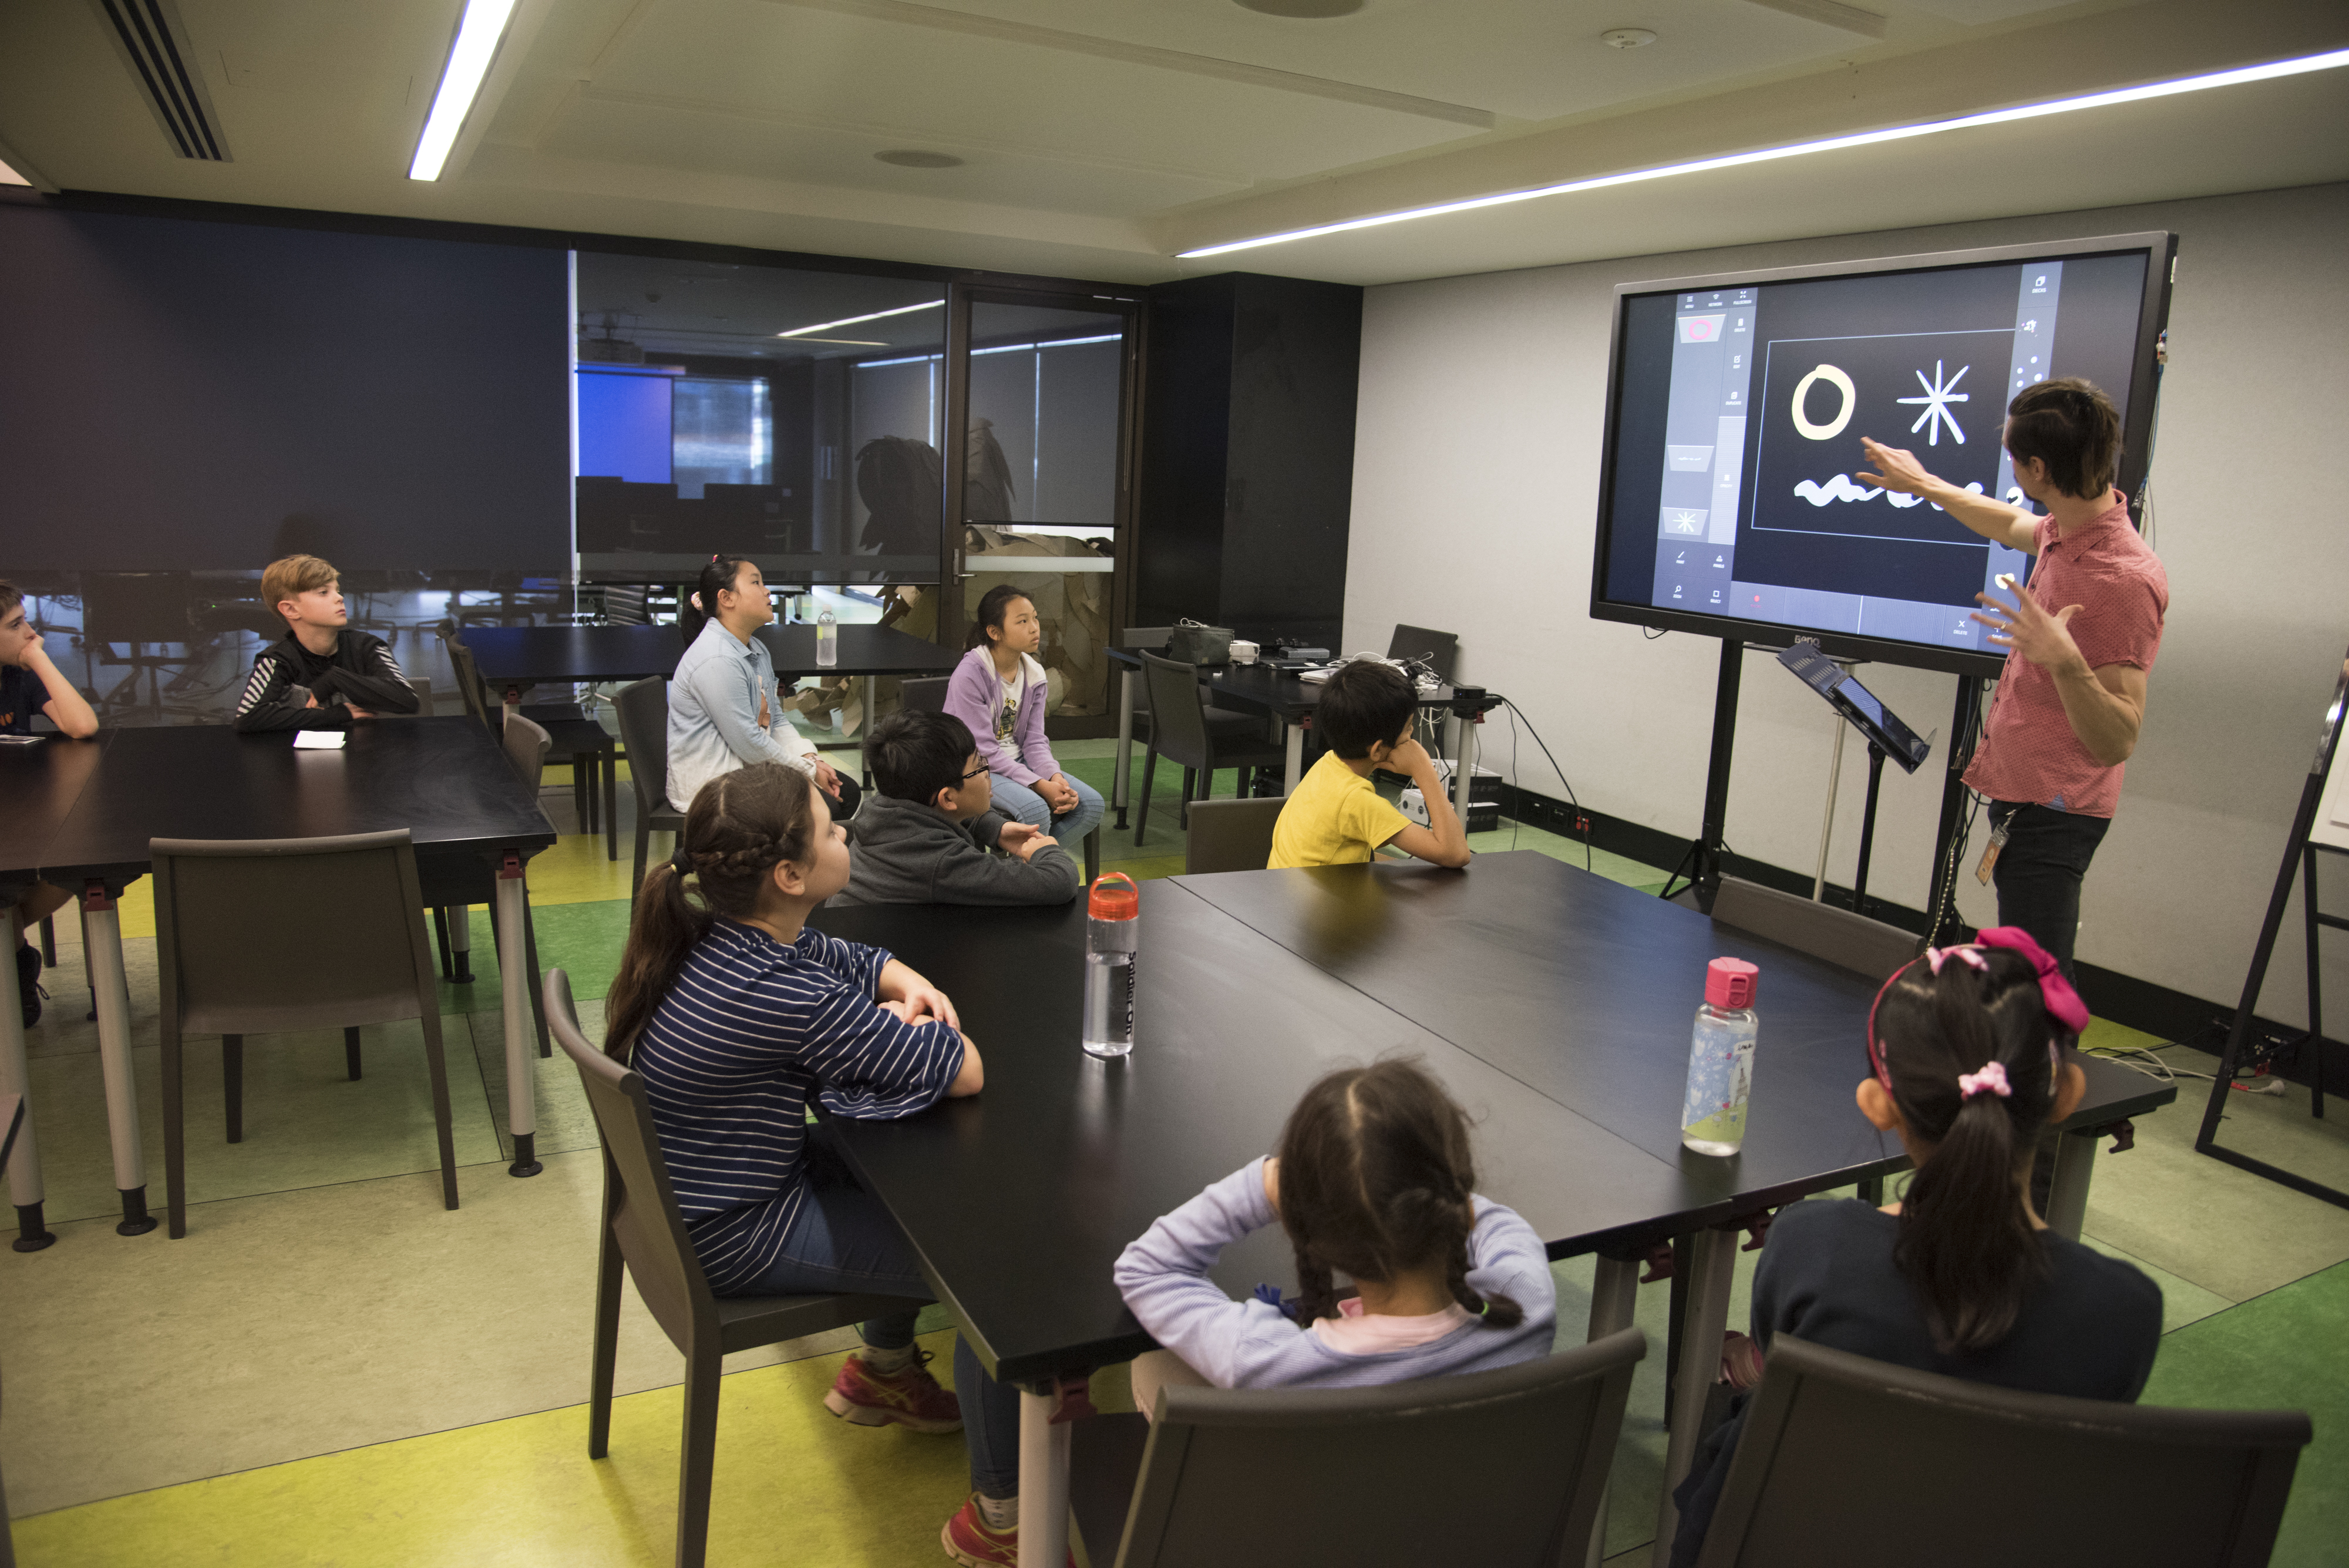
VIDEO RUMPUS - Workshop Plan
The VIDEO RUMPUS facilitating artist worked with the SLQ Program Officer to develop a video design workshop series for young people aged 9-16 years, engaging them in a creative process to respond to the Great Grand Rumpus installation using the live VJ/Projection tool Tagtool https://www.omai.at/tagtool/ by Omai, creating a layer of digital animated content that can be projected onto cardboard sculptural pieces throughout the installation in a process of ‘live projection mapping’.
The artist worked in collaboration with SLQ to develop the workshops, then work autonomously to deliver them with young people. The artist then worked with SLQ to integrate the digital content developed throughout the workshops into the installation environment preparation of content and system design.
Workshop Materials
- 15 iPads
- Each iPad pre-installed with ‘Tagtool’ app (pro version) https://itunes.apple.com/au/app/the-new-tagtool/id1129269238?mt=8
NOTE: You only need to purchase one license of the Tagtool Pro app to access it on all 15 iPads, as long as you have all iPads logged in on the same Apple account.
- Projector 1, for projecting onto cardboard sculptures. The larger the sculpture, and longer the projector throw, ideally the more lumens (brightness) the projector should have.
- 1 x Apple Mac Computer installed with ‘Tagtool Player Beta’ AND Qlab 4 outputting to Projector 1.
- Projector 2, for the Tagtool demonstration portion of the workshop.
- 1 x Apple TV outputting to Projector 2.
- Appropriate video & power cables.
- 1 Music stand
Workshop Preparation
- This workshop requires the facilitator to have a working knowledge of iPads and the iOS environment; Tagtool; QLAB 4; and the operation of digital projectors.
- For Step 3 of the workshop (see below) the facilitator should connect their iPad to a projector via the Apple TV using the Airplay Mirroring’ function on the iPad’s dock. Both the Apple TV and the iPad need to be connected to the same WIFI network for this to function. Tagtool automatically outputs to ‘Airplay’ in performance mode, showing on the connected screen or projector the full screen canvas being worked on in Tagtool.
- Before the workshop begins, the facilitators iPad should be outputting in ‘Demonstration Mode’. To activate ‘Demonstration Mode’, the iPad should be turned off, then turned on again. Once the ‘Tagtool’ app is then opened, it will do so in demonstration mode.
- For Step 4 and 6 of the workshop (see below) Projector 2 and the Mac running Tagtool Player an QLAB 4 should be setup, focused, and tested. QLAB 4 will require a ‘Pro Video License’ to be installed, at a hire cost of $4.50 AUD per day.
- For Step 6 of the process, a GGR QLAB file should be setup and saved onto the Mac it is running it on.
Creative Commons Agreement
- Because this workshop is collecting the digital content and therefore the intellectual property of the workshop participants, their parent/guardian should ideally sign a Creative Commons agreement, licensing you to collect, share, reuse or remix the content as part of the exhibition, or for other purposes.
This document makes clear the nature of the workshop, and protects the moral rights of the participants whilst allowing State Library to capture and present workshop outcomes in a public exhibition content.
Workshop Daily Schedule
8:30: Arrive (1st day)
10:00: Workshop Start
11:30: Workshop Finish
12:00: Lunch
13:00: Workshop Start
14:30: Workshop Finish
15:00-17:00: Setting up
Workshop Session Sequence
DURING WORKSHOP
Step 1. Introduction
- Introduce yourself, participants introduce themselves, cover any housekeeping.
- Cover basic group rules such as working together, being respectful.
- Set up a process and way of working, building a positive and productive dynamic within the group.
- The goal of this section is to get participants feeling relaxed, supported and collaborative.
Step 2. Discussion & Brief
Facilitate a discussion to give context to the content that you will be creating throughout the workshop.
- The story of the Great & Grand Rumpus
- The story of the project.
- Roles - create animations to project onto the Great & Grand Rumpus cardboard sculptures.
Step 3. Demonstration & Learning
- Introduction to TagTool - What is this tool? What is it used for?
- Deliver a basic instructional session, demonstrating the basic functions of TagTool.
- Ask participants to copy you step by step. Do not move on until everyone in the group has completed each step in sync with you.
- For more information, see the ‘Tagtool Instructional Info’ section below.
Step 4. Tagtool Mapping
- Once everyone has learnt the basic functionality of Tagtool, move into the space where the final projection will take place. Ask them to keep experimenting on Tagtool by themselves as they prepare to create their GGR animation.
- With the Projector 2 & Mac already setup, connected to WIFI and tested, start a new session on the Tagtool Player called VIDEO RUMPUS. Connect the facilitators iPad to VIDEO RUMPUS session. You should now be able to paint/animate live onto the cardboard sculpture via the projector.
- All participants will use the facilitators iPad to create their GGR animation. Invite each participant to come up to use the connected iPad to create their animation. Once a participant completes their animation, group their layers, an add that group to the DECK using the Save to Deck button.
- Once all participants have completed their animation, time should be up, and the workshop will finish. Let each participant know that their animation will be exported an added to the GGR installation.
POST WORKSHOP
Step 5. Exporting content
- Reload each participant’s animation from the Saved Decks section.
- Curate/edit/tidy up each animation as required to ensure it is suitable for public exhibition.
- Using the ‘Screen Record’ function on the iPads dock, make a recording of the animation whilst Tagtool is in ‘fullscreen’ mode.
- Repeat this recording process for all animations created during the workshop.
- Save each animation recording to Google Drive or another cloud based service.
Step 6. Integrating content
- On the Mac computer, close the Tagtool Player, an open a web browser.
- Accessing Google Drive or another cloud based service, download the animation video files from the workshop, and save them into the QLAB content folder associated with your QLAB GGR file.
- Open your QLAB 4 GGR file, and drag and drop the video files into the QLAB playlist.
- On each of the video files, use the INSPECTOR tool to play the loop to an ideal duration, trim the file to its ideal start and finish time, and rescale the image to match the proportions of the cardboard sculpture.
- It may be the case that the recorded resolution of the animation on the iPad is different to the output resolution of the projector. If this is the case, use the SURFACES function in QLAB 4 stretch the image and map it back to the sculpture proportions. Save your final edits to a custom surface, so you can apply this saved preset to the other files in your playlist
- Repeat this step for each file in your playlist.
- Use the ‘follow-on’ function in QLAB to program the time sequencing of your playlist.
- Program a ‘load’ and ‘go’ cue at the end of your playlist to allow the playlist to loop.
- This process will require some troubleshooting.
Refer to the QLAB manual for additional support. http://figure53.com/docs/qlab/v4/
TAGTOOL INSTRUCTIONAL INFO
A. Gestures.
Tagtool is a multi-touch gesture based interface, so it’s important to have a good grasp of a variety of multi-touch gestures before you even pick up an iPad. Before you hand out iPads to start the hands on session of the workshop, teach the gestures that you’ll need to the participants. This seems like simple stuff, but really comes in useful down the line!
Gestures to cover include:
- One finger tap
- One finger hold
- One finger drag
- Two finger tap
- Two finger pinch
- Two finger drag up/down
- Two finger drag left/right
- Three finger tap
Tagtool is an app that requires two hands to operate, and often you will be required to do two gestures at once, on each hand. Ask the participants to respond to your instructions. For example.
- Left hand = One finger hold. Right hand = Two finger pinch.
- Left hand = One finger drag. Right hand = One finger hold
- Transparency selection
B. Discovering the interface
Learn mode
Make sure all participant have their iPad in ‘Learn Mode’. This will cause Tagtool to show you the functionality of the interface whilst it is in use. Encourage participants to tap around the pane and read the text that appears to learn different functions.
Paint Mode
There are two interfaces to Tagtool, Paint Mode which shows your paint pallete pane and paint functions, and Animate Mode which shows your animation layers pane, and animation functions.
Discuss paint mode as the illustration aspect of the app, an interface for creating visual content to animate. Learn the following functions.
- Colour selection
- Hue (tone) selection
- Transparency selection
- Brush Size selection
Instruct participants to draw a shape with their chosen colour, and to fill it in.
Creating New Layers
Discuss the concept of layers, the idea that you can have different elements of your image in different layers, so they can be edited and animated independently. Demonstrate layers by:
- Do a 3 finger tap in the colour selection pane box. The screen should flash to indicate a new layer has been created.
- Choose another colour and add two dots to your shape to make eyes.
- Do a 3 finger tap in the colour palate pane. The screen should flash to indicate a new layer has been created.
- Choose another colour and add a line to create a mouth or smile to the shape. Your end result should look like a face.
Animate Mode
Ask participants to press the ANIMATE button to toggle to the Animation mode of Tagtool. On the left, they will see the Layers pane, with the three layers they have just created (shape, eyes, mouth). These layers will be visualized as rectangles.
Ask the participants to drag the layers up and down to re-arrange the layers, where they should notice that the top of the pane is the rear of the image, and the bottom of the pane is the front of the image. Ask them to re-sort the layers to make sure the head shape is at the rear of the image, with the mouth and eyes on top.
Ask participants to tap the layers, either in the layers pane, or on the image themselves, and notice that the layer selected turns yellow in the canvas pane, whereas the deselected layers are grey.
Animate Layers
Instruct participants to tap and hold the PANELS button with one finger, then with the other, tap on the arrow buttons to ensure that the panels around the canvas pane are not hidden.
Participants can then follow these instructions to animate their first layer (the shape/head).
- Tap the shape/head layer so that it turns yellow in the canvas screen.
- With one finger, tap and hold the record button on the bottom panel below the canvas pane.
- With the other hand, tap and drag, or pinch the layer in the canvas pane to move it around, and resize it.
- You will see a dotted circle appear whilst you are moving the layer. When this dotted circle is red, remove both hands to set a smooth animation loop.
- Notice that the animation loop is shown in the bottom panel and can be scrolled through.
Ask participants to repeat these steps with each of the two other layers to separately animate both the eye and mouth. The end result should be an animated face with eyes and mouth that move separately. If they wish, they can add additional layers and animation loops to the image. You can create more than one animation loop on a single layer.
To preview animations, ask the participants to tap the FULLSCREEN button in the top menu row, and hold up their iPads to show each other their progress.
Group Layers
The Group function allows you to group layers together so they behave as a single animated layer. This allows for complex layers animated in sync to be connected, and re-arranged, duplicated, or saved. To use the group function participants can:
- Make sure that you’re in Animate Mode.
- With the left land, tap and hold the SELECT button.
- With the right hand, tap the layers you would like to group, in this case, the head, eyes and mouth. They should all turn yellow once selected. Remove your finger from the select button you were holding.
- Press the GROUP button. All the selected layers will now be connected as one grouped layer. Notice that these layer are now stuck together in the Layer Pane.
- If you wanted to un-group that layer, you could do so by selecting the grouped layer, then pressing UNGROUP.
Save to Decks
Deck is a functionality that allows you to save components of, or the entire animation for future use. You can save individual, or grouped layers to your Decks. To save to Decks, instruct participants to:
- Ensure you are in Animate Mode.
- Select your grouped ‘face’ layer that we have been working on. You’ll know it’s selected because it will have turned yellow.
- Press the + SAVE button in the bottom right hand corner of the screen. You will now see an icon of your grouped layer in the Decks pane. Drag and drop your saved layer to you canvas pane to add it to your canvas.
- Note: When you drag and drop saved layers to you canvas from a Deck, it will automatically be set at 100% opacity. To make the layer visible, turn your opacity up using the OPACITY bar next to the Canvas Pane.
Editing Layers
Once a layer has been created or imported, it can then be edited using Paint Mode. Ask participants to follow these instructions to learn how to edit layers.
- Make sure you are in ‘Animate Mode’.
- Using your left hand, hold the SELECT button, then with your right hand tap the layer you would like to edit. You’ll know your layer is selected because it will appear Yellow in the canvas pane. Remove your finger from the select button you were holding.
- Now tape the EDIT button. You will see that Tagtool takes you straight to Paint Mode, but rather than be creating a new layer, you will now be able to edit the layer that you had selected ready to edit.
- You can now paint and erase your image as you wish.
Erasing parts of a layer
Once a layer has been made available for editing in ‘Paint Mode’ by following the above process, it is possible to erase the parts of the image that you do not require in order to animated specific parts of the image. For example, and using an image containing a butterfly, the butterfly can be extracted by erasing the rest of the image. That butterfly can then be animated as a layer. Ask participants to follow these instructions to extract the foreground object/figure from an imported image.
- In ‘Animate Mode’ choose the layer that you would like to edit and follow the previous ‘Editing Layers’ process to make that layer editable.
- Change your paintbrush size by pinching in the colour palette. The size of your paintbrush will also equal the size of your eraser. A larger brush size is great for erasing large sections of an image, whereas a smaller brush sized is great for erasing small detailed sections of the image.
- One you’re editing that layer in ‘Paint Mode’ and have your desired brush size, with your left hand tap and hold the ERASE button.
- With your right hand, hold and drag on the image to erase the desired portions of the image.
- A handy function to use when erasing smaller detailed sections of image is to use the Zoom function. You can tap and hold the ZOOM button with one hand, then pinch the Canvas Pane with the other to zoom in or out of your canvas, to get more detailed to your image and do finer erasing.
- Once you’ve erased the sections of the image you wanted to, you can tape back to ‘Animate Mode’ to animate this new foreground layer.
- It’s a good idea to save these extracted layers to your Decks, for easy access later on.